FAQs |
Audio Output
Effects
Question:
What are the basic functions of the effects editor in the Forte SE/7/8?
Answer:
Explore the FX processing power and full editing capabilities of the Kurzweil Forte 7/8/SE with this Quick Tip video. Learn how to select, modify and build effects chains in this 6 minute tutorial:
(Note: The Forte 7/8 UI is used for demonstration in this video. While the Forte 7/8 color display is different than the Forte SE display, the concepts/parameters discussed apply to the Forte SE as well.)
Download the handy “Effect Preset Guide” page featured in the video. This quick graphic shows you the general categories of individual FX presets available when building your own FX chains.
Question:
I’d like to route a KB3 program to the B outs but also disable the internal Leslie effect as I plan on connecting into an external Leslie/sim. How can this be done?
Answer:
-
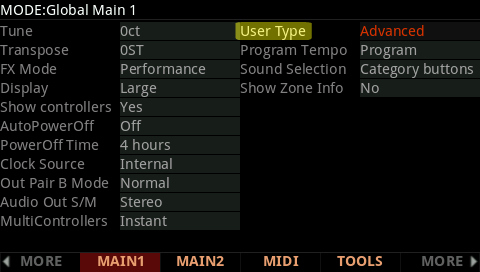
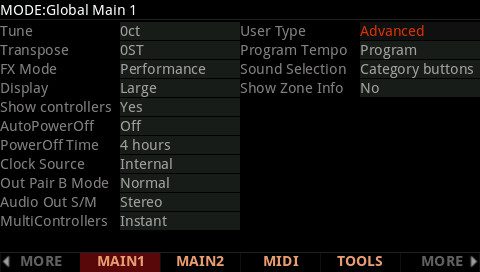
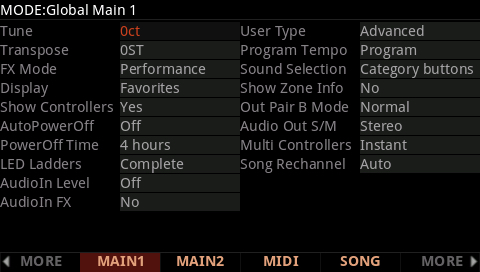
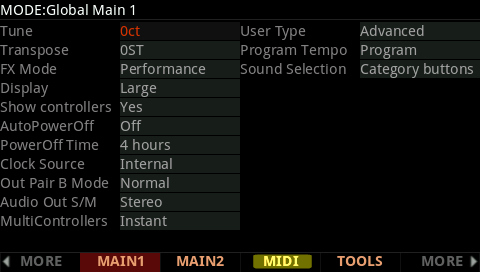
- Go to the GLOBAL mode and Enable “Advanced” User Type:
-
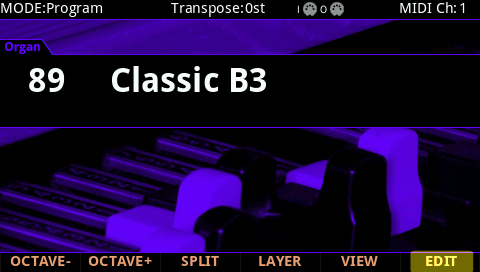
- Go to Program mode, select the desired KB3 program and press EDIT. For ex, here we are choosing “89 Classic B3”:
-
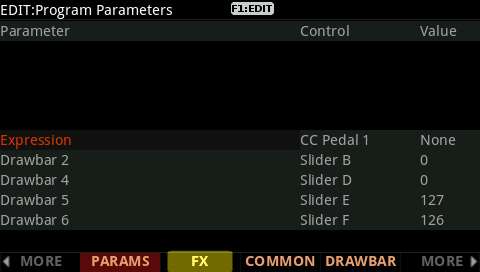
- Press [ FX ] page soft button:
-
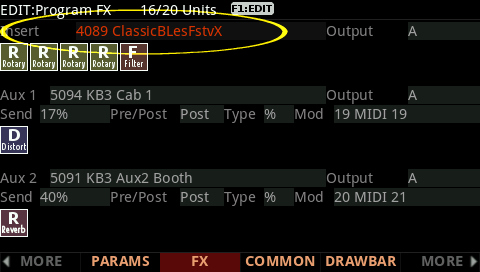
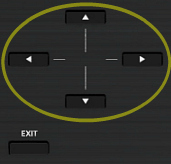
- Using the cursor arrow buttons, highlight the current Insert effects chain:
-
- Press Favorites 1 (aka F1:EDIT):

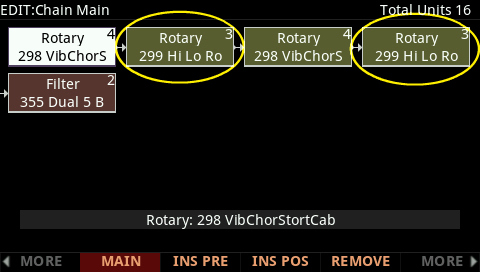
Next you will see the individual FX chain components. Every FX chain is a bit different. To disable the internal Leslie, we need to remove any “299 Rotary Hi Lo Roto” blocks. Depending on the given chain you are editing you may see one or two “Rotary Hi Lo Roto” blocks – in our example here there are two:
-
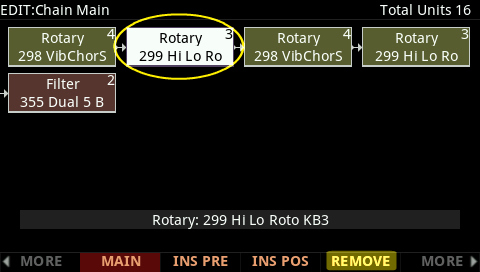
- Using the cursor buttons, highlight the first “299 Rotary Hi Lo Roto” block and press [Remove]:
-
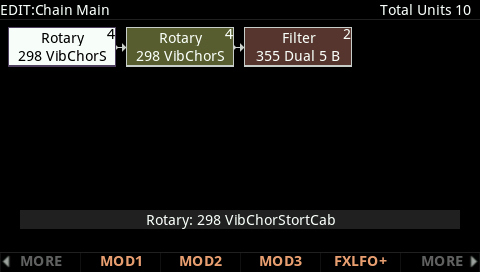
- As seen in this example above, if the FX Chain you are editing has two “Rotary Hi Lo Roto” block, then repeat the above and highlight the remaining “299 Rotary Hi Lo Roto” block and press [Remove] again. Following you will see (note both “299 Rotary Hi Lo Roto” blocks have been removed):
In addition to removing the Leslie rotary itself, you will likely want to disable the internal cabinet simulation as well, which is a separate process (generated by one or possibly two “298 VibChorStortCab” blocks). This will produce or truer, more balanced tone for your external amp/sim to work with, especially if you are running mono. However, the 298 VibChorStortCab block generates more than just the cabinet effect (also handling the vibrato/chorus circuit and distortion elements), so we cannot simply remove it entirely in this instance.
-
- To disable just the cabinet simulation portion of the 298 VibChorStortCab effect, press either corner [MORE] button to locate the [MOD1 ], [MOD2 ] and/or [MOD3 ] pages, then press each to check for a free unused FX MOD. Here in our example some free MODs could be found on the [ MOD 1 ] page. As as shown below, add a “Cab In/Out” mod for EACH existing 298 VibChorStortCab block. Again as our example has two we are adding TWO such Mods:
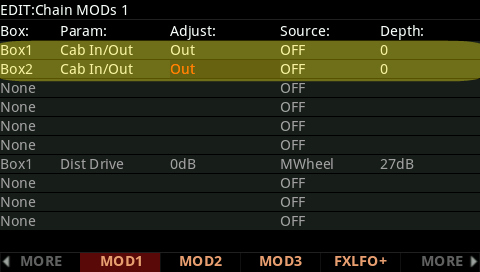
Note Box1 and Box2 are chosen as these correspond to FX Box 1 and FX Box 2 in the chain (each instance of the 298 VibChorStortCab effect,). Assign the “Param:” to “Cab In/Out” and “Adjust” to “Out”. This will disable the cabinet sim. If the FX Chain you are editing only has one VibChorStortCab block then you will only need one such MOD.
-
- Press Exit and Save your tweaked FX chain.
-
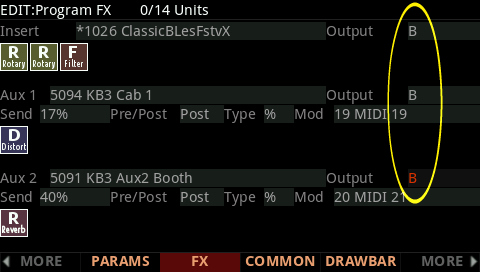
- (Optional) If you also need to route the resultant KB3 program to the separate B outs, then lastly, highlight and set each “Output” routing parameter to “B” (for Insert and any Auxes in use):
(TIP: if planning on using this KB3 in a Multi you can alternatively opt to route things at the Multi level instead using the ‘Out’ parameters on the MAIN and FX pages of your Multi).
- Press Exit and Save again to save the final Program, now using your custom effect chain.
You have now routed a KB3 sound to the B outs, minus the Leslie and cabinet simulation but have left the other KB3 performance features intact, such as drawbar controls, vibrato/chorus circuit and any tube distortion that may be employed.
Question:
Can I search the internal memory for select objects by name?
Answer:
Yes, the Forte offers a comprehensive search-string tool that permits searching many parameter fields by name, including:
- Multis
- Programs
- Keymaps
- Samples
- FX Chains
- FX Presets
- Program Control Sources
- Arp and Shift Patterns
- Intonation Maps
- Velocity Maps
- Pressure Maps
To do so, with the desired field selected, hold the Enter button and at the same time press any one of the alpha-numeric keypad buttons 2-9 (take note the button arrangement is much like a telephone keypad):

This will bring up the Search display:

Type in the string of characters you want to find using the alphanumeric pad.
For example, if you began in Program mode looking at the Program list and you want to find all Programs containing the word “Vintage”, you would type v-i-n-t and so on. This function is not case-sensitive; it will find upper and lower-case characters equally. When you’ve typed the string of characters you want to find, press OK. The Forte searches through the current list of objects or values, finds all items that match the string of characters you typed, and displays the first one it finds.
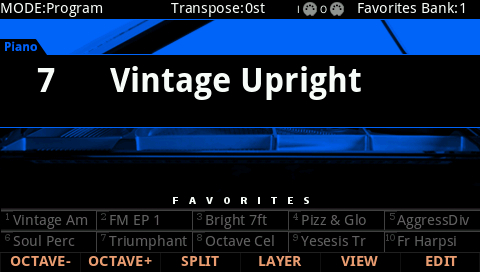
Note in our example above we only typed a portion of the word. That works too. The result will be every program with ‘vint’ somewhere in its name will be part of the search results. Staying this same example, the first result displayed is “7 Vintage Upright”:
To navigate through the list of matches, hold ENTER and press either the PREVIOUS(-) OR NEXT(+) button (below the Alpha Wheel) to move to the next higher(+) or lower-numbered(-) object that matches your search.

Following our example, if we pressed ENTER and NEXT(+), incrementing up to the next higher match, we’d see Program “8 Vintage Grand”. Press ENTER and ext(+) again, you’d see “31 Vintage Squash” and so on. If we pressed ENTER and PREVIOUS(-) we would step backwards through the same search list.
As mentioned, the search tool works in other modes and fields as well.
Let’s search for an FX Chain. On the FX page of the Program Edit mode, highlight the ‘Insert’ field:
Then press and hold ENTER and type “h-a-l-l”:
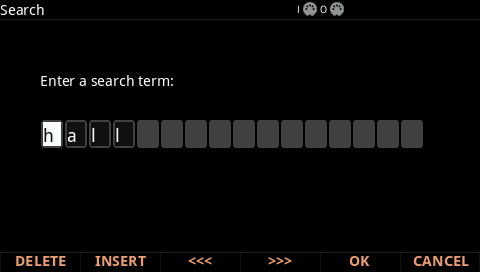
Press OK when done typing to start the search – you will see something like:
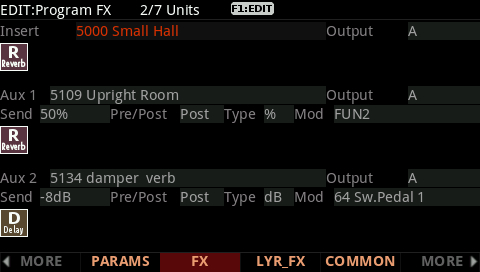
If we pressed ENTER and NEXT(+), incrementing up to the next higher match, we’d see Insert “5012 Small Hall2″. Press ENTER and NEXT(+) again, you’d see the next ‘hall’ match, and so on as before. Again if we pressed ENTER and PREVIOUS(-) we would step backwards through the same search list.
Power User Tips
-
- It bares repeating, the above applies to many parameter fields throughout the Forte UI. Try it – look up an LFO as a Control Source for your filter cutoff assignment, or locate that Arp preset you can’t quite remember the full name of.
- The text strings you search for remain in memory until the Forte is turned off. Further, you can store and select a string of characters with each of the numeric buttons. Hold Enter and press one of the numeric buttons at any time to select the last string associated with that same numeric button. When the string appears, you can change it, or just press Enter to re-find that same string.
MIDI Controllers
Question:
What pedals can I use with my Forte?
Answer:
Single Switch Pedals
The Forte ships with one KP-1 Switch Pedal however any standard foot switch pedal (with 1/4″ mono connection) will be compatible. Polarity is a non-issue as the Forte checks the pedal polarity on power up and calibrates itself accordingly. For this to work, be sure to plug the switch pedal in before turning on the Forte, and do not step on the pedal during the boot up process. Doing otherwise can lead to the pedal working in reverse or not at all. If that occurs, simply power down, be sure the pedal is fully connected, then power back up without touching the pedal.
Half-Damper Pedals
The Forte also supports connecting half-damper pedals (sold separately) to any of the three switch pedal inputs.
The Kurzweil KP-1H half-damper pedal is the recommended pedal and is available via any Kurzweil dealer.
In addition, there are several other manufacturers of half-damper pedals on the market. Not all are compatible or interchangeable.
KORG pedals are compatible with the Forte.
ROLAND and YAMAHA pedals are not compatible.
Continuous Controller Pedals (CC Pedal)
The Forte requires a CC Pedal with a TRS 1/4″ connector and 10k linear potentiometer, such as the Kurzweil CC-1 (sold separately). Most manufacturers EXCEPT Yamaha and Korg make pedals with the same specifications and should work. Yamaha and Korg pedals typically use an exponential potentiometer and therefore will not work correctly.
CC-1 Wiring Spec
The Control Pedal must be wired to a single stereo (TRS) 1/4″ plug as follows:
- Wiper to tip connection of 1/4″ plug
- Top end of resistance element to Ring connection
- Bottom end of resistance to Sleeve connection

Operating System Updates
Program Mode
How can I customize the Forte’s touch sensitivity?
Answer:
-
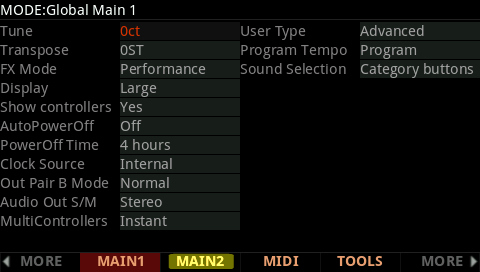
- Press the GLOBAL mode button – you will see:

- Press the MAIN2 soft button:
- Using the cursor navigation arrow buttons, highlight the “Velocity Map” parameter. Using the alpha wheel and/or Previous/- Next/+ buttons, adjust to taste:
- Press the GLOBAL mode button – you will see:


The default map (Linear) provides the widest range of velocity expression, but you may want to choose a different map if the default does not suit your playing style. You can select from any of the following settings:
| Light1 Light2 Light3 |
Makes it increasingly easier to produce high MIDI velocity values for the same key strike velocity (with Light3 being the easiest). These maps work best for those preferring a light touch. |
| Linear | The Forte default map. Linear, allows MIDI velocities to pass unchanged. It follows a linear response. |
| Hard1 Hard2 Hard3 |
Makes it increasingly harder to produce high MIDI velocity values for the same key strike velocity (with Hard3 being the hardest). These maps work best for those with a heavy touch. |
| PianoTouch | Simulates the general velocity response of an acoustic piano, and is best suited for playing acoustic piano programs. |
| Easy Touch | Similar to the Light1/Light2/Light3 settings. Makes higher velocities easier to play, but allows more sensitive control over playing high velocities by not boosting the MIDI velocity for fast strike velocities as much as it does for medium strike velocities. |
| GM Receive | Mimics the velocity response commonly used by keyboards that use the General MIDI (GM) sound set. The GM Receive map makes medium strike velocities produce higher MIDI velocities compared to the Linear map. |
- Press PROGRAM or MULTI to exit the Global menu. Your setting selection will be remembered across power cycles.
Question:
When I step on the sustain pedal using a KB3 program, it is currently controlling the leslie rotor speed. How can I change that to traditional sustain operation?
Answer:
You have two options:
(A) Connect a second switch pedal
to the Forte “Switch Pedal 3” input. It comes preset to act as Sustain for the KB3 Programs (it will act as soft pedal for non-KB3 selections).
(B) Change the “Rotary Override” parameter (Global Mode) to “Button” only. Steps below:
-
- With the power off, connect a sustain/switch pedal into “Switch Pedal 1”, then power on.
- Press the GLOBAL mode button – you will see:
-
- Press the MAIN2 soft button:
- Press the MAIN2 soft button:
- Using the cursor navigation arrow buttons, highlight the “Rotary Override” parameter. By default it is set to “Button+Pedal”. Using the alpha wheel and/or Previous/- Next/+ buttons, change it to just “Button”:

Press Program to exit. With these settings, the switch pedal connected to Switch Pedal 1 will act as sustain for all KB3 organs and the rotary speed will be controlled by the ROTARY S/F button (aka Variation) above the Mod Wheel.
Question:
How can I delete a user Object (Multis/Program/Keymap/Sample etc) that I made/loaded?
Answer:
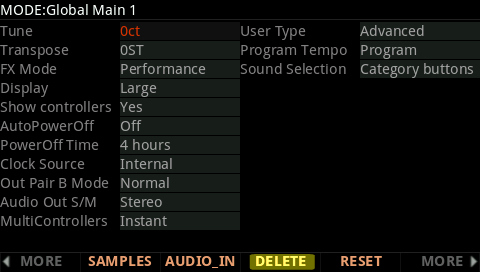
- Press GLOBAL – you’ll see:
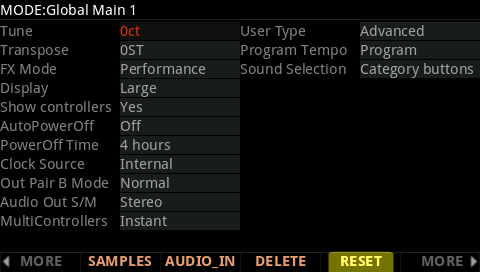
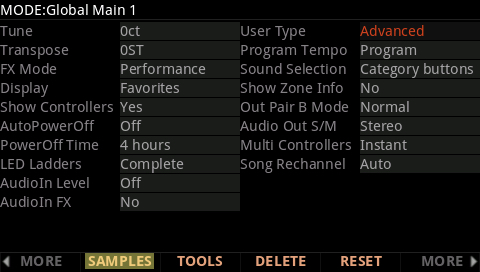
- Press either of the [MORE] buttons to find the [DELETE] soft button – then press [DELETE]:
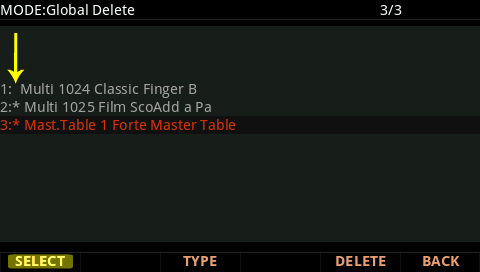
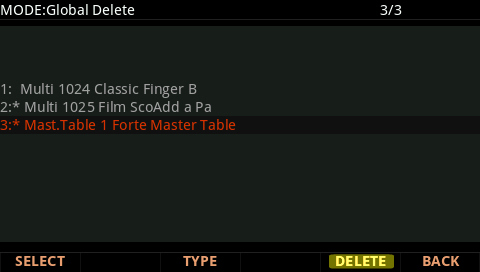
- Using the alpha wheel, -/+ and/or up/dn cursor arrow buttons, highlight each object to delete and press [SELECT]. This marks each object with an asterisk(*) indicating which items will be subsequently deleted:Ex: Here we have selected Multi #1025 and the Master Table to delete.
TIP: Pressing [TYPE] jumps you through the list from one type of object to the next, for ex., from Programs to Multis, to Chains, to Samples etc. making it easier to navigate a large list and find what you are looking for.
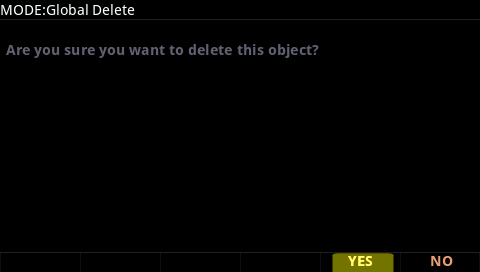
- Press [DELETE] and the selected objects will be deleted:
- Press [YES] to confirm:
- Press EXIT twice to exit Global mode.
Question:
How can I trigger certain layers of a program at full velocity, regardless of how hard the key is physically struck?
Answer:
-
- Go to the GLOBAL mode and set “User Type” to ‘Advanced’:

-
- Go to PROGRAM mode, select the program in question and press EDIT.
-
- Using the MORE soft buttons, navigate to the DSPCTL page. Highlight the “Level” parameter in the left column. Select the “VelTrk” parameter in the right column and set it to 0dB (see pic below).

-
- (optional) You may want to adjust the “Level” lower to compensate for the now louder layer triggering.
-
- Repeat for all layers as necessary.
- Exit and Save the program.
Question:
What are the basic functions of the effects editor in the Forte SE/7/8?
Answer:
Explore the FX processing power and full editing capabilities of the Kurzweil Forte 7/8/SE with this Quick Tip video. Learn how to select, modify and build effects chains in this 6 minute tutorial:
(Note: The Forte 7/8 UI is used for demonstration in this video. While the Forte 7/8 color display is different than the Forte SE display, the concepts/parameters discussed apply to the Forte SE as well.)
Download the handy “Effect Preset Guide” page featured in the video. This quick graphic shows you the general categories of individual FX presets available when building your own FX chains.
Question:
How does the Forte’s “Favorites” system work?
Answer:
Much like car radio station presets, the Forte lets you store your Favorite Programs/Multis for instant one-button recall. There are two modes to choose from: ‘Regular’ (offers 10 favorites) and ‘Advanced’ offering 500 (see further below).
REGULAR OPERATION (default setting) – 10 Favorites:
-
- Select the a Program or Multi you wish to store as a Favorite.Ex:
- Select the a Program or Multi you wish to store as a Favorite.Ex:

-
- Press and hold a given FAVORITES button for a few seconds to store the current Program or Multi to that button location.
- Press and hold a given FAVORITES button for a few seconds to store the current Program or Multi to that button location.

-
- You will see a pop-up message displayed as confirmation:Ex:
“Favorite 3 saved”.
- You will see a pop-up message displayed as confirmation:Ex:
- Go back to step 1 and repeat as needed.
To later recall the given Favorite, from Program or Multi mode, simply press the corresponding FAVORITES button. (Note: Individual “Fav Bank” objects can also be stored to disk for backup using the Advanced Store option)
TIP:
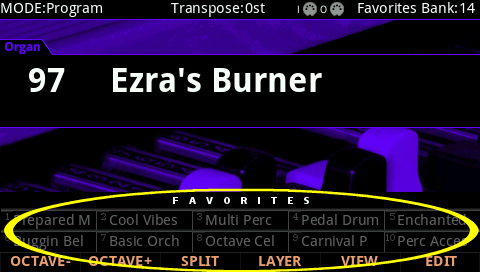
Press VIEW (once) to select the “Favorites” view mode.

In doing so, the names for the 10 stored Favorites will be displayed at the bottom of the screen, making it easier to remember what was stored in each location.
ADVANCED OPERATION – 500 Favorites:
Introduced at update v1.40, the Forte added support for storing/recalling 50 banks of Favorites – each “Bank” is comprised of 10 button selections. This gives you access to 500 Favorites via bank switching.
Here’s how it works:
- Press VIEW to enable “Favorites” view mode (see TIP above).
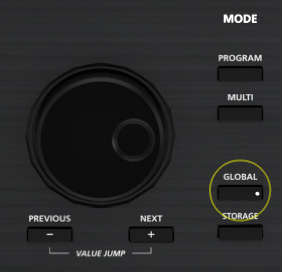
- Press the GLOBAL mode button.
- Set “User Type” to ‘Advanced’:
- Press PROGRAM or MULTI to exit.
- Using the CHANNEL/ZONE up/dn buttons to the left of the display, you can now flip through the 50 different Favorites banks. The current Favorites Bank number is displayed in the upper right hand corner of the screen:
You can now quickly access one of 50 banks, see what Program/Multi is stored in a given slot and make your selection.


Question:
Where can I obtain a list of the factory preset Programs & Multis for the Forte?
Answer:
Under the DOWNLOADS Tab on the Forte Product page (under ‘User Manuals’) you will find a link titled “Forte Factory Objects List”. The download contains both .pdf and .xls files listing all system objects (programs, multis, and effects chains).
In addition Appendix C and E of the Musician’s Guide (available on the Downloads page as well) also lists all of the factory presets.
Question:
I’d like to route a KB3 program to the B outs but also disable the internal Leslie effect as I plan on connecting into an external Leslie/sim. How can this be done?
Answer:
-
- Go to the GLOBAL mode and Enable “Advanced” User Type:
-
- Go to Program mode, select the desired KB3 program and press EDIT. For ex, here we are choosing “89 Classic B3”:
-
- Press [ FX ] page soft button:
-
- Using the cursor arrow buttons, highlight the current Insert effects chain:
-
- Press Favorites 1 (aka F1:EDIT):
Next you will see the individual FX chain components. Every FX chain is a bit different. To disable the internal Leslie, we need to remove any “299 Rotary Hi Lo Roto” blocks. Depending on the given chain you are editing you may see one or two “Rotary Hi Lo Roto” blocks – in our example here there are two:
-
- Using the cursor buttons, highlight the first “299 Rotary Hi Lo Roto” block and press [Remove]:
-
- As seen in this example above, if the FX Chain you are editing has two “Rotary Hi Lo Roto” block, then repeat the above and highlight the remaining “299 Rotary Hi Lo Roto” block and press [Remove] again. Following you will see (note both “299 Rotary Hi Lo Roto” blocks have been removed):
In addition to removing the Leslie rotary itself, you will likely want to disable the internal cabinet simulation as well, which is a separate process (generated by one or possibly two “298 VibChorStortCab” blocks). This will produce or truer, more balanced tone for your external amp/sim to work with, especially if you are running mono. However, the 298 VibChorStortCab block generates more than just the cabinet effect (also handling the vibrato/chorus circuit and distortion elements), so we cannot simply remove it entirely in this instance.
-
- To disable just the cabinet simulation portion of the 298 VibChorStortCab effect, press either corner [MORE] button to locate the [MOD1 ], [MOD2 ] and/or [MOD3 ] pages, then press each to check for a free unused FX MOD. Here in our example some free MODs could be found on the [ MOD 1 ] page. As as shown below, add a “Cab In/Out” mod for EACH existing 298 VibChorStortCab block. Again as our example has two we are adding TWO such Mods:
Note Box1 and Box2 are chosen as these correspond to FX Box 1 and FX Box 2 in the chain (each instance of the 298 VibChorStortCab effect,). Assign the “Param:” to “Cab In/Out” and “Adjust” to “Out”. This will disable the cabinet sim. If the FX Chain you are editing only has one VibChorStortCab block then you will only need one such MOD.
-
- Press Exit and Save your tweaked FX chain.
-
- (Optional) If you also need to route the resultant KB3 program to the separate B outs, then lastly, highlight and set each “Output” routing parameter to “B” (for Insert and any Auxes in use):
(TIP: if planning on using this KB3 in a Multi you can alternatively opt to route things at the Multi level instead using the ‘Out’ parameters on the MAIN and FX pages of your Multi).
- Press Exit and Save again to save the final Program, now using your custom effect chain.
You have now routed a KB3 sound to the B outs, minus the Leslie and cabinet simulation but have left the other KB3 performance features intact, such as drawbar controls, vibrato/chorus circuit and any tube distortion that may be employed.
Question:
Can I search the internal memory for select objects by name?
Answer:
Yes, the Forte offers a comprehensive search-string tool that permits searching many parameter fields by name, including:
- Multis
- Programs
- Keymaps
- Samples
- FX Chains
- FX Presets
- Program Control Sources
- Arp and Shift Patterns
- Intonation Maps
- Velocity Maps
- Pressure Maps
To do so, with the desired field selected, hold the Enter button and at the same time press any one of the alpha-numeric keypad buttons 2-9 (take note the button arrangement is much like a telephone keypad):
This will bring up the Search display:
Type in the string of characters you want to find using the alphanumeric pad.
For example, if you began in Program mode looking at the Program list and you want to find all Programs containing the word “Vintage”, you would type v-i-n-t and so on. This function is not case-sensitive; it will find upper and lower-case characters equally. When you’ve typed the string of characters you want to find, press OK. The Forte searches through the current list of objects or values, finds all items that match the string of characters
you typed, and displays the first one it finds.
Note in our example above we only typed a portion of the word. That works too. The result will be every program with ‘vint’ somewhere in its name will be part of the search results. Staying this same example, the first result displayed is “7 Vintage Upright”:
To navigate through the list of matches, hold ENTER and press either the PREVIOUS(-) OR NEXT(+) button (below the Alpha Wheel) to move to the next higher(+) or lower-numbered(-) object that matches your search.
Following our example, if we pressed ENTER and NEXT(+), incrementing up to the next higher match, we’d see Program “8 Vintage Grand”. Press ENTER and ext(+) again, you’d see “31 Vintage Squash” and so on. If we pressed ENTER and PREVIOUS(-) we would step backwards through the same search list.
As mentioned, the search tool works in other modes and fields as well.
Let’s search for an FX Chain. On the FX page of the Program Edit mode, highlight the ‘Insert’ field:
Then press and hold ENTER and type “h-a-l-l”:
Press OK when done typing to start the search – you will see something like:
If we pressed ENTER and NEXT(+), incrementing up to the next higher match, we’d see Insert “5012 Small Hall2″. Press ENTER and NEXT(+) again, you’d see the next ‘hall’ match, and so on as before. Again if we pressed ENTER and PREVIOUS(-) we would step backwards through the same search list.
Power User Tips
-
- It bares repeating, the above applies to many parameter fields throughout the Forte UI. Try it – look up an LFO as a Control Source for your filter cutoff assignment, or locate that Arp preset you can’t quite remember the full name of.
- The text strings you search for remain in memory until the Forte is turned off. Further, you can store and select a string of characters with each of the numeric buttons. Hold Enter and press one of the numeric buttons at any time to select the last string associated with that same numeric button. When the string appears, you can change it, or just press Enter to re-find that same string.
Question:
I am using my Forte with a DAW (or external controller) and need to understand what combination of MIDI Bank and Program change messages to send to it to call up the sounds I need.
Answer:
Here is what the Forte needs to receive when selecting programs via MIDI:
-
- MIDI Bank messageBy default*, the Forte uses MIDI Bank message cc#32 (aka Bank LSB) value = 0-127, to send/receive bank info.*(Bank Select: Ctl 0/32 – set in the Global / MIDI menu)
- MIDI Program Change messageFollowing the Bank message, a standard Program Change is used value= 0-127 to select the desired program from within the designated bank.
The table below shows the MIDI Bank (column 1) and Program Change (column 2) values needed to select any given Forte Program (column 3) via MIDI. Note all banks are 128 entries deep:
Values Sent To Forte Forte Program Selected MIDI Bank #
(cc#32 value)Program Change ID Range 0 0-127 1-127 Factory 1 0-127 128-255 Factory 2 0-127 256-383 Factory 8 0-127 1024-1151 User 9 0-127 1152-1279 User 10 0-127 1280-1407 User 11 0-127 1408-1535 User 12 0-127 1536-1663 User 13 0-127 1664-1791 User 14 0-127 1792-1919 User 15 0-127 1920-2047 User
Examples:
Ex 1: You want to call up #33 Rooftop 73 Rhds:
From your DAW (or alternate controller), you send:
MIDI Bank (cc32) = 0 *Program Change = 33 Ex 2: You want to call up #161 Big Old Jupiter:
From your DAW (or alternate controller), you send:
MIDI Bank (cc32) = 1 *Program Change = 33 *Note: 161-128= #33.
(ie Program #161 is the 33rd program in MIDI Bank 1.)
Ex. 3: You want to call up #1463 in the User bank:
From your DAW (or alternate controller), you send:
MIDI Bank (cc32) = 11 *Program Change = 55 *Note: 1463 – (128×11) = 55
(i.e. Program #1463 is the 55th program in MIDI Bank 11)
Question:
How can I select a certain Program to be the default when I first power up?
and
My instrument powers up with some undesired Program selection not of my choosing, how can I fix that?
Answer:
- From the Program mode, select the desired start-up Program.
- Press Global
- Press Program (to exit back to Program Mode).
Done. The Program you selected in step 1 above will now be the default start-up selection.
Question:
What are the basic functions of the step sequencer in the Forte SE/7/8?
Answer:
Explore the step sequencer in Kurzweil Forte7/8/SE with this Quick Tip video. Learn the basic functions and also how to create more complex sequences (dotted rhythms) in this 5 minute tutorial:
(Note: The Forte SE UI is used for demonstration in this video. While the Forte 7/8 display is different, the concepts/parameters discussed apply to the Forte 7/8 as well.)
For more information on the Forte series arpeggiator, download the newly updated Forte SE Musician’s Guide
.
Forte 7/8 users can download the demo program, Skool Bass, from the Legacy Synth Bass Soundbank.
Question:
How does the Forte’s real-time “Transpose” feature work?
Answer:
The Forte offers dedicated Transpose – / + buttons immediately above the Pitch and Mod Wheels:

The Transpose buttons can be used to change the tuning of notes played on the Forte keyboard in semitones (ST), also known as half steps. This is a convenient way to change the key of a song without learning to play it in a different key. (Note: the Transpose buttons also transpose MIDI notes sent to the USB and MIDI out ports).
Working in tandem with the physical Transpose buttons is the Transpose readout affixed at the top of the Program and Multi mode screens. This field maintains a constant readout of the current transpose value:

Press the Transpose – or + buttons to transpose the Forte keyboard down or up by one semitone. The top line of the display shows the current transposition value. The maximum transposition value possible is +/- 36 semitones.
Example 1 – here we have things transposed up 1 ST:

Example 2 – here we have things transposed down -3 ST:

The LEDs of the Transpose buttons themselves also offer indication whether the keyboard is currently transposed up (Transpose + LED is lit) or down (Transpose – LED is lit) or not at all (no buttons lit).
Example – here we have things transposed up:

TIPS:
- To transpose things up/down by octave use the OCTAVE- and OCTAVE+ soft buttons in the lower left of the screen:
- Pressing both Transpose – and + simultaneously (or both Octave soft buttons) will reset the transposition to 0.

Question:
How can I assign a switch pedal to navigate my stored Favorites?
Answer:
-
- With the power off, connect a sustain/switch pedal into “Switch Pedal 2″ (and/or 3), then power on.NOTE: while the Forte supports using either traditional 1/4″ (TS) or half-damper 1/4″ (TRS) switch pedals for piano-sustain, for this application you will want to only use traditional 1/4” (TS) pedals.
- Press the GLOBAL mode button – you will see:
-
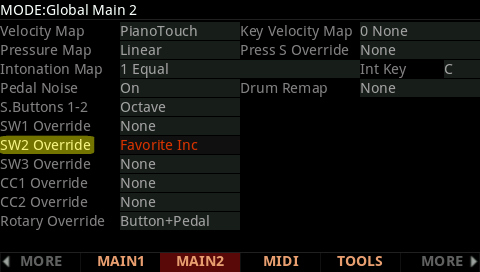
- Press the MAIN2 soft button:
- Press the MAIN2 soft button:
- Using the cursor navigation arrow buttons, highlight the “SW Override” parameter for your chosen pedal (SW2 or SW3). By default it is set to “None”. Using the alpha wheel and/or Previous/- Next/+ buttons, change it to “Favorite Inc” **:
TIPS:
– **Choose “Favorite Inc” to move forward through your Favorites. Choose “Favorite Dec” to move backwards through your Favorites.
– Use two separate pedals (one connected to SW2, one connected to SW3) and set one to “Inc” and one to “Dec” for two-way navigation.
– Enable ‘Advanced’ User Type and ‘Favorites View’ to access up to 500 Favorites.
- Press PROGRAM or MULTI to exit.
USAGE NOTES:
- The pedal will cycle/wrap around the 10 available Favorites button slots within the current Favorites bank.
- If using Advanced User Type, and multiple Favorites Banks, you will need to manually select the Favorites bank using the Chan/Zone buttons first, then you can use the pedal to walk through that current bank of 10 favorites.
- Complete details on the use of pedal overrides can be found in the Forte Musician’s Guide (pg. 12-11).
Question:
How do Algs and Cascade Mode work?
Answer:
Explore the Algorithm (ALG) page and its advanced DSP functions. This tutorial will teach you how to create signal chains using virtual wiring and synthesizer blocks (like oscillators and filters). Advanced instructions will show you how to cascade audio through multiple layers.
(Note: The Forte 7/8 UI is used for demonstration in this video. While the Forte 7/8 color display is different than the Forte SE display, the concepts/parameters discussed apply to the Forte SE as well.)
Song Mode/Sequencing
Troubleshooting
Question:
How can I restore my Forte back to the factory defaults (hard reset)?
Answer:
Caution: Hard resetting will erase all user memory ! Need be, back up any custom programming before proceeding.
There are two methods for performing a hard reset on the Forte:
GLOBAL MODE METHOD: (with the Forte powered up in normal operating modes)
-
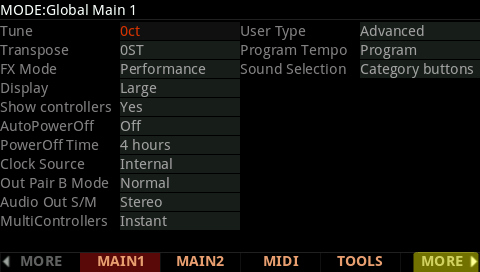
- Press the GLOBAL mode button, then press either “MORE” button:
- Press the GLOBAL mode button, then press either “MORE” button:
-
- Press the “RESET” soft button:
- Press the “RESET” soft button:
-
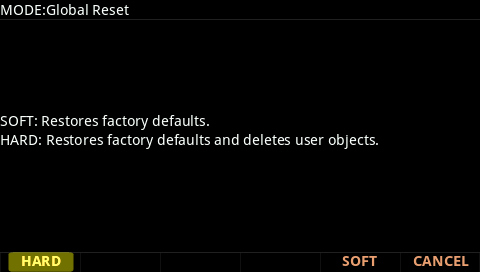
- There are two reset methods available.Press “SOFT” to only restore factory default settings but retain your custom Multi’s/Programs in tact.
Press “HARD” to completely reset the Forte back to factory defaults and erase all user Multis/Programs.
For example, we will press “HARD” to completely reset the Forte:
(Note: when pressing SOFT, the resetting of factory defaults occurs immediately -> step 4.)
- There are two reset methods available.Press “SOFT” to only restore factory default settings but retain your custom Multi’s/Programs in tact.
-
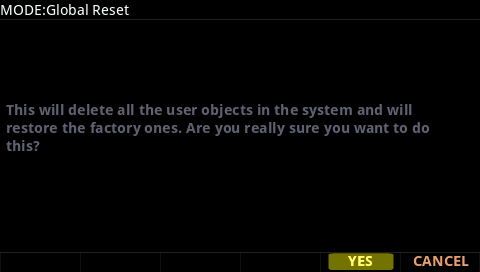
- Press “YES” to confirm:
- Press “YES” to confirm:
-
- A progress screen will appear confirming the reset procedure is underway.
- The Forte will clear the specified settings and reboot. The HARD process can take a few minutes to complete.
SYSTEM MODE METHOD: (useful if you are unable to perform the above Global menu method)
Note: Resetting via the System Mode completely resets the Forte back to factory defaults and erase all user Multis/Programs.
-
- Turn the unit Off.
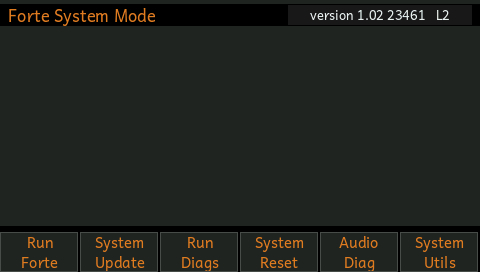
- Press and hold the ENTER button while you turn the power on (you can release the ENTER button once you see the System Mode loading).
-
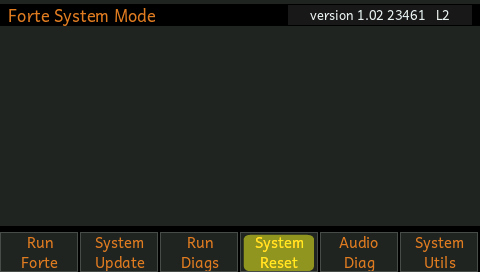
- Press “System Reset”:
- Press “System Reset”:
-
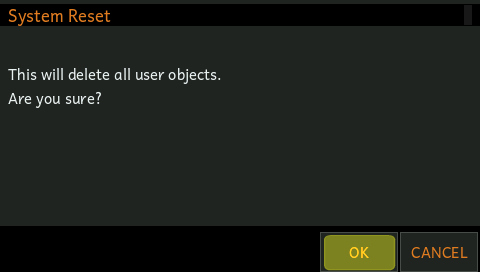
- Press “OK” to confirm:
- Press “OK” to confirm:
-
- Press “OK” to return to the main System Mode screen:
- Press “OK” to return to the main System Mode screen:
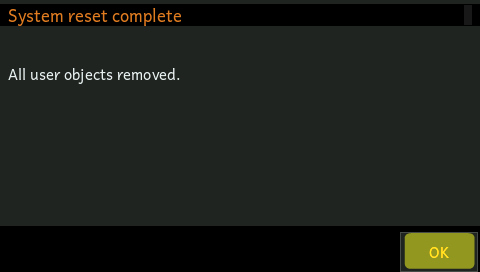
- Press “Run Forte”:

The Forte will then reboot, at which point it will be completely reset back to factory defaults.
Question:
How can I select a certain Program to be the default when I first power up?
and
My instrument powers up with some undesired Program selection not of my choosing, how can I fix that?
Answer:
- From the Program mode, select the desired start-up Program.
- Press Global
- Press Program (to exit back to Program Mode).
Done. The Program you selected in step 1 above will now be the default start-up selection.
Basic Concepts & User Interface
Question:
How can I customize the Forte’s touch sensitivity?
Answer:
-
- Press the GLOBAL mode button – you will see:
- Press the MAIN2 soft button:
- Using the cursor navigation arrow buttons, highlight the “Velocity Map” parameter. Using the alpha wheel and/or Previous/- Next/+ buttons, adjust to taste:
- Press the GLOBAL mode button – you will see:
The default map (Linear) provides the widest range of velocity expression, but you may want to choose a different map if the default does not suit your playing style. You can select from any of the following settings:
| Light1 Light2 Light3 |
Makes it increasingly easier to produce high MIDI velocity values for the same key strike velocity (with Light3 being the easiest). These maps work best for those preferring a light touch. |
| Linear | The Forte default map. Linear, allows MIDI velocities to pass unchanged. It follows a linear response. |
| Hard1 Hard2 Hard3 |
Makes it increasingly harder to produce high MIDI velocity values for the same key strike velocity (with Hard3 being the hardest). These maps work best for those with a heavy touch. |
| PianoTouch | Simulates the general velocity response of an acoustic piano, and is best suited for playing acoustic piano programs. |
| Easy Touch | Similar to the Light1/Light2/Light3 settings. Makes higher velocities easier to play, but allows more sensitive control over playing high velocities by not boosting the MIDI velocity for fast strike velocities as much as it does for medium strike velocities. |
| GM Receive | Mimics the velocity response commonly used by keyboards that use the General MIDI (GM) sound set. The GM Receive map makes medium strike velocities produce higher MIDI velocities compared to the Linear map. |
- Press PROGRAM or MULTI to exit the Global menu. Your setting selection will be remembered across power cycles.
Question:
How can I delete a user Object (Multis/Program/Keymap/Sample etc) that I made/loaded?
Answer:
- Press GLOBAL – you’ll see:
- Press either of the [MORE] buttons to find the [DELETE] soft button – then press [DELETE]:
- Using the alpha wheel, -/+ and/or up/dn cursor arrow buttons, highlight each object to delete and press [SELECT]. This marks each object with an asterisk(*) indicating which items will be subsequently deleted:Ex: Here we have selected Multi #1025 and the Master Table to delete.
TIP: Pressing [TYPE] jumps you through the list from one type of object to the next, for ex., from Programs to Multis, to Chains, to Samples etc. making it easier to navigate a large list and find what you are looking for.
- Press [DELETE] and the selected objects will be deleted:
- Press [YES] to confirm:
- Press EXIT twice to exit Global mode.
Question:
How does the Forte’s “Favorites” system work?
Answer:
Much like car radio station presets, the Forte lets you store your Favorite Programs/Multis for instant one-button recall. There are two modes to choose from: ‘Regular’ (offers 10 favorites) and ‘Advanced’ offering 500 (see further below).
REGULAR OPERATION (default setting) – 10 Favorites:
-
- Select the a Program or Multi you wish to store as a Favorite.Ex:
- Select the a Program or Multi you wish to store as a Favorite.Ex:
-
- Press and hold a given FAVORITES button for a few seconds to store the current Program or Multi to that button location.
- Press and hold a given FAVORITES button for a few seconds to store the current Program or Multi to that button location.
-
- You will see a pop-up message displayed as confirmation:Ex:
“Favorite 3 saved”.
- You will see a pop-up message displayed as confirmation:Ex:
- Go back to step 1 and repeat as needed.
To later recall the given Favorite, from Program or Multi mode, simply press the corresponding FAVORITES button. (Note: Individual “Fav Bank” objects can also be stored to disk for backup using the Advanced Store option)
TIP:
Press VIEW (once) to select the “Favorites” view mode.
In doing so, the names for the 10 stored Favorites will be displayed at the bottom of the screen, making it easier to remember what was stored in each location.
ADVANCED OPERATION – 500 Favorites:
Introduced at update v1.40, the Forte added support for storing/recalling 50 banks of Favorites – each “Bank” is comprised of 10 button selections. This gives you access to 500 Favorites via bank switching.
Here’s how it works:
- Press VIEW to enable “Favorites” view mode (see TIP above).
- Press the GLOBAL mode button.
- Set “User Type” to ‘Advanced’:
- Press PROGRAM or MULTI to exit.
- Using the CHANNEL/ZONE up/dn buttons to the left of the display, you can now flip through the 50 different Favorites banks. The current Favorites Bank number is displayed in the upper right hand corner of the screen:
You can now quickly access one of 50 banks, see what Program/Multi is stored in a given slot and make your selection.
Question:
Where can I obtain a list of the factory preset Programs & Multis for the Forte?
Answer:
Under the DOWNLOADS Tab on the Forte Product page (under ‘User Manuals’) you will find a link titled “Forte Factory Objects List”. The download contains both .pdf and .xls files listing all system objects (programs, multis, and effects chains).
In addition Appendix C and E of the Musician’s Guide (available on the Downloads page as well) also lists all of the factory presets.
Question:
Can I search the internal memory for select objects by name?
Answer:
Yes, the Forte offers a comprehensive search-string tool that permits searching many parameter fields by name, including:
- Multis
- Programs
- Keymaps
- Samples
- FX Chains
- FX Presets
- Program Control Sources
- Arp and Shift Patterns
- Intonation Maps
- Velocity Maps
- Pressure Maps
To do so, with the desired field selected, hold the Enter button and at the same time press any one of the alpha-numeric keypad buttons 2-9 (take note the button arrangement is much like a telephone keypad):
This will bring up the Search display:
Type in the string of characters you want to find using the alphanumeric pad.
For example, if you began in Program mode looking at the Program list and you want to find all Programs containing the word “Vintage”, you would type v-i-n-t and so on. This function is not case-sensitive; it will find upper and lower-case characters equally. When you’ve typed the string of characters you want to find, press OK. The Forte searches through the current list of objects or values, finds all items that match the string of characters
you typed, and displays the first one it finds.
Note in our example above we only typed a portion of the word. That works too. The result will be every program with ‘vint’ somewhere in its name will be part of the search results. Staying this same example, the first result displayed is “7 Vintage Upright”:
To navigate through the list of matches, hold ENTER and press either the PREVIOUS(-) OR NEXT(+) button (below the Alpha Wheel) to move to the next higher(+) or lower-numbered(-) object that matches your search.
Following our example, if we pressed ENTER and NEXT(+), incrementing up to the next higher match, we’d see Program “8 Vintage Grand”. Press ENTER and ext(+) again, you’d see “31 Vintage Squash” and so on. If we pressed ENTER and PREVIOUS(-) we would step backwards through the same search list.
As mentioned, the search tool works in other modes and fields as well.
Let’s search for an FX Chain. On the FX page of the Program Edit mode, highlight the ‘Insert’ field:
Then press and hold ENTER and type “h-a-l-l”:
Press OK when done typing to start the search – you will see something like:
If we pressed ENTER and NEXT(+), incrementing up to the next higher match, we’d see Insert “5012 Small Hall2″. Press ENTER and NEXT(+) again, you’d see the next ‘hall’ match, and so on as before. Again if we pressed ENTER and PREVIOUS(-) we would step backwards through the same search list.
Power User Tips
- It bares repeating, the above applies to many parameter fields throughout the Forte UI. Try it – look up an LFO as a Control Source for your filter cutoff assignment, or locate that Arp preset you can’t quite remember the full name of.
- The text strings you search for remain in memory until the Forte is turned off. Further, you can store and select a string of characters with each of the numeric buttons. Hold Enter and press one of the numeric buttons at any time to select the last string associated with that same numeric button. When the string appears, you can change it, or just press Enter to re-find that same string.
Question:
I am using my Forte with a DAW (or external controller) and need to understand what combination of MIDI Bank and Program change messages to send to it to call up the sounds I need.
Answer:
Here is what the Forte needs to receive when selecting programs via MIDI:
- MIDI Bank message
By default*, the Forte uses MIDI Bank message cc#32 (aka Bank LSB) value = 0-127, to send/receive bank info.
*(Bank Select: Ctl 0/32 – set in the Global / MIDI menu) - MIDI Program Change message
Following the Bank message, a standard Program Change is used value= 0-127 to select the desired program from within the designated bank.
The table below shows the MIDI Bank (column 1) and Program Change (column 2) values needed to select any given Forte Program (column 3) via MIDI. Note all banks are 128 entries deep:
Values Sent To Forte Forte Program Selected MIDI Bank #
(cc#32 value)Program Change ID Range 0 0-127 1-127 Factory 1 0-127 128-255 Factory 2 0-127 256-383 Factory 8 0-127 1024-1151 User 9 0-127 1152-1279 User 10 0-127 1280-1407 User 11 0-127 1408-1535 User 12 0-127 1536-1663 User 13 0-127 1664-1791 User 14 0-127 1792-1919 User 15 0-127 1920-2047 User
Examples:
Ex 1: You want to call up #33 Rooftop 73 Rhds:
From your DAW (or alternate controller), you send:
MIDI Bank (cc32) = 0 *Program Change = 33 Ex 2: You want to call up #161 Big Old Jupiter:
From your DAW (or alternate controller), you send:
MIDI Bank (cc32) = 1 *Program Change = 33 *Note: 161-128= #33.
(ie Program #161 is the 33rd program in MIDI Bank 1.)Ex. 3: You want to call up #1463 in the User bank:
From your DAW (or alternate controller), you send:
MIDI Bank (cc32) = 11 *Program Change = 55 *Note: 1463 – (128×11) = 55
(i.e. Program #1463 is the 55th program in MIDI Bank 11)
Question:
How can I select a certain Program to be the default when I first power up?
and
My instrument powers up with some undesired Program selection not of my choosing, how can I fix that?
Answer:
- From the Program mode, select the desired start-up Program.
- Press Global
- Press Program (to exit back to Program Mode).
Done. The Program you selected in step 1 above will now be the default start-up selection.
Question:
How does the Forte’s real-time “Transpose” feature work?
Answer:
The Forte offers dedicated Transpose – / + buttons immediately above the Pitch and Mod Wheels:
The Transpose buttons can be used to change the tuning of notes played on the Forte keyboard in semitones (ST), also known as half steps. This is a convenient way to change the key of a song without learning to play it in a different key. (Note: the Transpose buttons also transpose MIDI notes sent to the USB and MIDI out ports).
Working in tandem with the physical Transpose buttons is the Transpose readout affixed at the top of the Program and Multi mode screens. This field maintains a constant readout of the current transpose value:
Press the Transpose – or + buttons to transpose the Forte keyboard down or up by one semitone. The top line of the display shows the current transposition value. The maximum transposition value possible is +/- 36 semitones.
Example 1 – here we have things transposed up 1 ST:
Example 2 – here we have things transposed down -3 ST:
The LEDs of the Transpose buttons themselves also offer indication whether the keyboard is currently transposed up (Transpose + LED is lit) or down (Transpose – LED is lit) or not at all (no buttons lit).
Example – here we have things transposed up:
TIPS:
- To transpose things up/down by octave use the OCTAVE- and OCTAVE+ soft buttons in the lower left of the screen:
- Pressing both Transpose – and + simultaneously (or both Octave soft buttons) will reset the transposition to 0.
Global Mode
Question:
How can I customize the Forte’s touch sensitivity?
Answer:
-
- Press the GLOBAL mode button – you will see:
- Press the MAIN2 soft button:
- Using the cursor navigation arrow buttons, highlight the “Velocity Map” parameter. Using the alpha wheel and/or Previous/- Next/+ buttons, adjust to taste:
- Press the GLOBAL mode button – you will see:
The default map (Linear) provides the widest range of velocity expression, but you may want to choose a different map if the default does not suit your playing style. You can select from any of the following settings:
| Light1 Light2 Light3 |
Makes it increasingly easier to produce high MIDI velocity values for the same key strike velocity (with Light3 being the easiest). These maps work best for those preferring a light touch. |
| Linear | The Forte default map. Linear, allows MIDI velocities to pass unchanged. It follows a linear response. |
| Hard1 Hard2 Hard3 |
Makes it increasingly harder to produce high MIDI velocity values for the same key strike velocity (with Hard3 being the hardest). These maps work best for those with a heavy touch. |
| PianoTouch | Simulates the general velocity response of an acoustic piano, and is best suited for playing acoustic piano programs. |
| Easy Touch | Similar to the Light1/Light2/Light3 settings. Makes higher velocities easier to play, but allows more sensitive control over playing high velocities by not boosting the MIDI velocity for fast strike velocities as much as it does for medium strike velocities. |
| GM Receive | Mimics the velocity response commonly used by keyboards that use the General MIDI (GM) sound set. The GM Receive map makes medium strike velocities produce higher MIDI velocities compared to the Linear map. |
- Press PROGRAM or MULTI to exit the Global menu. Your setting selection will be remembered across power cycles.
Question:
When I step on the sustain pedal using a KB3 program, it is currently controlling the leslie rotor speed. How can I change that to traditional sustain operation?
Answer:
You have two options:
(A) Connect a second switch pedal
to the Forte “Switch Pedal 3” input. It comes preset to act as Sustain for the KB3 Programs (it will act as soft pedal for non-KB3 selections).
(B) Change the “Rotary Override” parameter (Global Mode) to “Button” only. Steps below:
-
- With the power off, connect a sustain/switch pedal into “Switch Pedal 1”, then power on.
- Press the GLOBAL mode button – you will see:
-
- Press the MAIN2 soft button:
- Press the MAIN2 soft button:
- Using the cursor navigation arrow buttons, highlight the “Rotary Override” parameter. By default it is set to “Button+Pedal”. Using the alpha wheel and/or Previous/- Next/+ buttons, change it to just “Button”:
Press Program to exit. With these settings, the switch pedal connected to Switch Pedal 1 will act as sustain for all KB3 organs and the rotary speed will be controlled by the ROTARY S/F button (aka Variation) above the Mod Wheel.
Question:
How does the Audio In with FX work on the Forte7/8/SE?
Answer:
Explore the AUDIO IN feature on the Forte7/8/SE with this Quick Tip video. Learn the basic functions as well as how to apply FX to the live input:
(Note: The Forte UI is used for demonstration in this video. While the Forte SE display is different, the concepts/parameters discussed apply to the Forte SE as well.)
Question:
How can I delete a user Object (Multis/Program/Keymap/Sample etc) that I made/loaded?
Answer:
- Press GLOBAL – you’ll see:
- Press either of the [MORE] buttons to find the [DELETE] soft button – then press [DELETE]:
- Using the alpha wheel, -/+ and/or up/dn cursor arrow buttons, highlight each object to delete and press [SELECT]. This marks each object with an asterisk(*) indicating which items will be subsequently deleted:
Ex: Here we have selected Multi #1025 and the Master Table to delete.
TIP: Pressing [TYPE] jumps you through the list from one type of object to the next, for ex., from Programs to Multis, to Chains, to Samples etc. making it easier to navigate a large list and find what you are looking for.
- Press [DELETE] and the selected objects will be deleted:
- Press [YES] to confirm:
- Press EXIT twice to exit Global mode.
Question:
What are the steps to load and make use of .WAV/.AIF files?
Answer:
This tutorial is in three parts:
Things to Know:
The Forte supports loading of raw .WAV and .AIF sample files. Both mono and stereo files can be loaded, 8 or 16 bit, with sample rates up to a maximum of 96 kHz. Once samples are loaded to the Fortes user sample flash memory, samples remain in the Forte even when the power is off, until they are manually deleted. Also, once samples are loaded to the Forte’s user sample flash memory, there is no load time for those user samples when turning on the Forte.
The initial loading of raw samples is not unlike loading regular Forte (.FOR) files. They can be loaded off USB thumb drive (flash drive) or via the direct-USB cable connection to your Mac/PC. However the direct-USB cable method is limited to roughly 20MB, as such using a thumb drive will be the better option when handling larger file sizes.
It is important to note that audio files (.wav/.aif) are just raw “ingredients”. Even after loading, they have not yet been “cooked” into any useable “recipe” yet (aka Program and Keymap). As such upon loading any source audio files, do not expect to find these samples magically appearing in Program mode. After loading you will need to first build a Keymap and Program using the loaded samples. After which, the Program (recipe) employing these new samples will become available as an ID selection in Program mode for normal use (details on one fast, easy method for doing this further below).
Loading:
The basic procedure of loading user data is outlined in the Forte “Loading User Data” tutorial.
NOTE: at step 6 in the above linked tutorial you will likely want to choose the FILL load method (which will place the sample at the first available (free) ID slot. If you have no user samples loaded this will be ID# 1024.
Previewing:
Once the sample file(s) is loaded, to make use of any loaded raw samples, a Program and Keymap must be constructed first. This can be done by one of two methods:
- Manual Keymap construction (see your owner’s manual Chapter 9 “Keymap and Sample Editing” for details).
This method is ideally suited for more advanced users and intricate mapping applications. - You can use the handy PREVIEW tool.
This method is ideal for those with simpler needs, wanting fast results.
-OR-
PREVIEW automatically makes a new ‘generic’ Program (and Keymap) for you, using any single sample. This method provides a quick way to begin making a new program which can be then, of course, be edited further if desired.
Here is how it works:
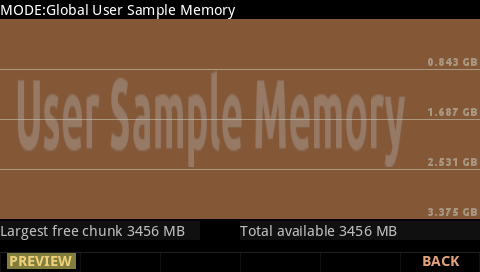
- Press the GLOBAL mode button, you will see:
- Press the left -or- right
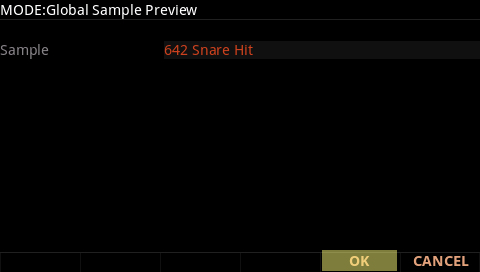
button. Locate and press [SAMPLES]: - Next, press the [PREVIEW] button:
- Select the desired sample. On this screen you will see a simple “Sample” field which allows you to scroll through ALL samples in memory (both ROM and User-loaded). Scroll through the list (and/or type via the keypad) to select the desired sample ID and press [OK ]. For example below we are selecting sample ID# 642 “Snare Hit”:
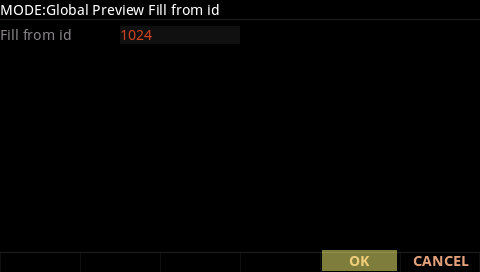
- Next choose the User ID # where you would like the final Program to reside. Here, for example, we are choosing program ID# 1024 (available user ID range = 1024-4095).
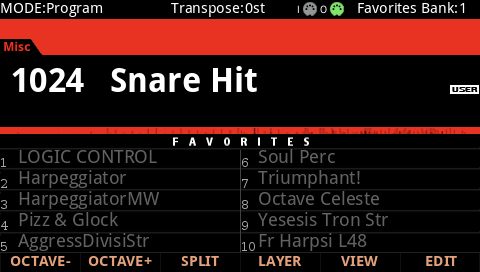
- Press EXIT three times (3x) to return to Program mode. Your new Program will be immediately available and named using the same name given the source sample file.
You will see a brief screen confirmation displaying “Preview OK” – indicating the Program was created. Note: if the ID you choose is already occupied the system will simply save your creation to the next available (higher) User ID slot.
Note:
By default, the sample will be initially stretched across the entire keyboard with C4 as the sample root (i.e. original sample pitch). See your owner’s manual for details on further Program/Keymap editing.
Question:
Can I search the internal memory for select objects by name?
Answer:
Yes, the Forte offers a comprehensive search-string tool that permits searching many parameter fields by name, including:
- Multis
- Programs
- Keymaps
- Samples
- FX Chains
- FX Presets
- Program Control Sources
- Arp and Shift Patterns
- Intonation Maps
- Velocity Maps
- Pressure Maps
To do so, with the desired field selected, hold the Enter button and at the same time press any one of the alpha-numeric keypad buttons 2-9 (take note the button arrangement is much like a telephone keypad):
This will bring up the Search display:
Type in the string of characters you want to find using the alphanumeric pad.
For example, if you began in Program mode looking at the Program list and you want to find all Programs containing the word “Vintage”, you would type v-i-n-t and so on. This function is not case-sensitive; it will find upper and lower-case characters equally. When you’ve typed the string of characters you want to find, press OK. The Forte searches through the current list of objects or values, finds all items that match the string of characters
you typed, and displays the first one it finds.
Note in our example above we only typed a portion of the word. That works too. The result will be every program with ‘vint’ somewhere in its name will be part of the search results. Staying this same example, the first result displayed is “7 Vintage Upright”:
To navigate through the list of matches, hold ENTER and press either the PREVIOUS(-) OR NEXT(+) button (below the Alpha Wheel) to move to the next higher(+) or lower-numbered(-) object that matches your search.
Following our example, if we pressed ENTER and NEXT(+), incrementing up to the next higher match, we’d see Program “8 Vintage Grand”. Press ENTER and ext(+) again, you’d see “31 Vintage Squash” and so on. If we pressed ENTER and PREVIOUS(-) we would step backwards through the same search list.
As mentioned, the search tool works in other modes and fields as well.
Let’s search for an FX Chain. On the FX page of the Program Edit mode, highlight the ‘Insert’ field:
Then press and hold ENTER and type “h-a-l-l”:
Press OK when done typing to start the search – you will see something like:
If we pressed ENTER and NEXT(+), incrementing up to the next higher match, we’d see Insert “5012 Small Hall2″. Press ENTER and NEXT(+) again, you’d see the next ‘hall’ match, and so on as before. Again if we pressed ENTER and PREVIOUS(-) we would step backwards through the same search list.
Power User Tips
- It bares repeating, the above applies to many parameter fields throughout the Forte UI. Try it – look up an LFO as a Control Source for your filter cutoff assignment, or locate that Arp preset you can’t quite remember the full name of.
- The text strings you search for remain in memory until the Forte is turned off. Further, you can store and select a string of characters with each of the numeric buttons. Hold Enter and press one of the numeric buttons at any time to select the last string associated with that same numeric button. When the string appears, you can change it, or just press Enter to re-find that same string.
Question:
How can I select Forte Multis via MIDI Bank/Program Change?
Answer:
Here are the steps:
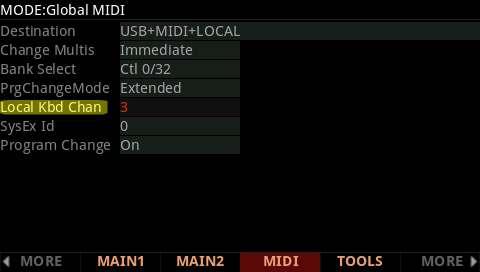
- Press the GLOBAL mode button.
- Press MIDI.
- Set “Local Kbd Chan” to the MIDI channel you plan to send the Bank/Pchg messages on. This will be the one and only channel that will be used for selecting Multis via MIDI.
For example, here we chose channel 3.
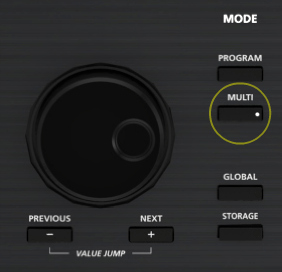
- Press Multi to enter Multi mode.
Once in Multi mode, below is what messages the Forte needs to receive (on the chosen Local Kbd Chan) in order to select any given Multi:
- MIDI Bank message
By default*, the Forte uses MIDI Bank message cc#32 (aka Bank LSB) value = 0-127, to send/receive bank info.
*(Bank Select: Ctl 0/32 – set in the Global/MIDI menu) - MIDI Program Change message
Following the Bank message, a standard Program Change is used value= 0-127 to select the desired program from within the designated bank.
The table below shows the MIDI Bank (column 1) and Program Change (column 2) values needed to select the designated Forte Multi (column 3). Note all banks are 128 entries deep:
Values Sent To Forte Forte Multi Selected MIDI Bank #
(cc#32)Program Change ID Range 0 0-127 1-127 Factory 1 0-127 128-255 Factory 2 0 256 Factory 8 0-127 1024-1151 User 9 0-127 1152-1279 User 10 0-127 1280-1407 User 11 0-127 1408-1535 User 12 0-127 1536-1663 User 13 0-127 1664-1791 User 14 0-127 1792-1919 User 15 0-127 1920-2047 User
Examples:
Ex 1: You want to call up #32 Euro Chords:
From your DAW (or alternate controller), on the chosen Local Kbd Chan (step 3 above) you send:
MIDI Bank (cc32) = 0 *Program Change = 32 Ex 2: You want to call up #182 Game ofTrombones:
From your DAW (or alternate controller), you send:
MIDI Bank (cc32) = 1 *Program Change = 54 *Note: 182-(128×1)= #54.
(ie Multi #182 is the 54th Multi in MIDI Bank 1.)Ex. 3:You want to call up #1977 in the User bank:
From your DAW (or alternate controller), you send:
MIDI Bank (cc32) = 15 *Program Change = 57 *Note: 1977 – (128×15) = 57
(i.e. Multi #1979 is the 57th Multi in MIDI Bank 15)
Question:
How can I assign a switch pedal to navigate my stored Favorites?
Answer:
- With the power off, connect a sustain/switch pedal into “Switch Pedal 2” (and/or 3), then power on.
NOTE: while the Forte supports using either traditional 1/4″ (TS) or half-damper 1/4″ (TRS) switch pedals for piano-sustain, for this application you will want to only use traditional 1/4″ (TS) pedals.
- Press the GLOBAL mode button – you will see:
- Press the MAIN2 soft button:
- Using the cursor navigation arrow buttons, highlight the “SW Override” parameter for your chosen pedal (SW2 or SW3). By default it is set to “None”. Using the alpha wheel and/or Previous/- Next/+ buttons, change it to “Favorite Inc” **:
TIPS:
– **Choose “Favorite Inc” to move forward through your Favorites. Choose “Favorite Dec” to move backwards through your Favorites.
– Use two separate pedals (one connected to SW2, one connected to SW3) and set one to “Inc” and one to “Dec” for two-way navigation.
– Enable ‘Advanced’ User Type and ‘Favorites View’ to access up to 500 Favorites. - Press PROGRAM or MULTI to exit.
USAGE NOTES:
- The pedal will cycle/wrap around the 10 available Favorites button slots within the current Favorites bank.
- If using Advanced User Type, and multiple Favorites Banks, you will need to manually select the Favorites bank using the Chan/Zone buttons first, then you can use the pedal to walk through that current bank of 10 favorites.
- Complete details on the use of pedal overrides can be found in the Forte Musician’s Guide (pg. 12-11).
Question:
How does the ‘Show Zone Info’ display work?
Answer:
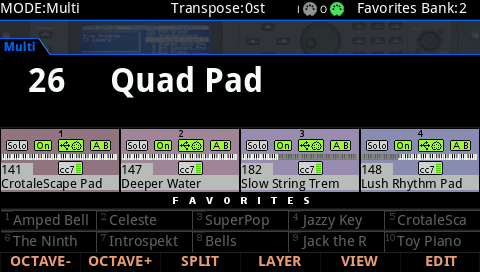
Starting with system update 2.10 there is a new Multi display mode which offers an overview of the current Multi’s zone status. At a glance, this makes keeping track of what zones are active and assigned to what much easier, all without having to enter the editor. Here’ how it works:
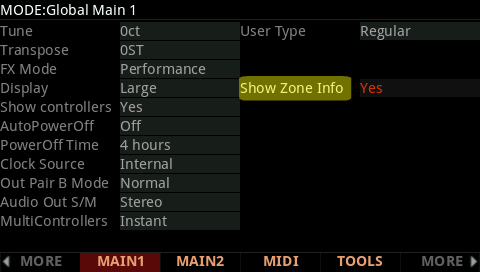
- Press the GLOBAL mode button.
- Set “Show Zone Info” to ‘Yes’:
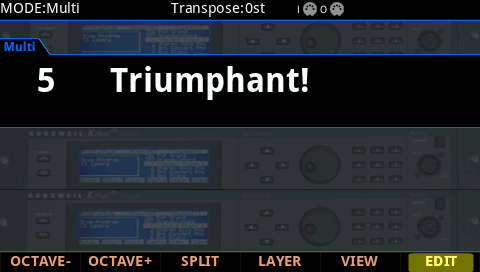
- Press MULTI to switch to MULTI mode.
- Select the desired Multi and note the display overlay:
For ex., here we chose Multi #26 – a 4-zone multi and, as such, 4 zone fields are now displayed:
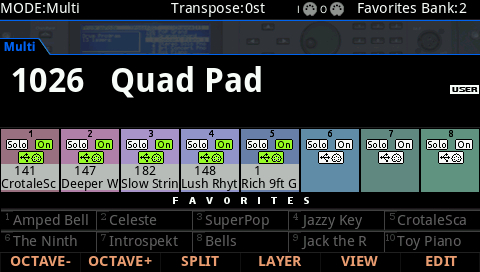
As the number of zones employed increases the display will reconfigure accordingly:
With 5-8 zones:
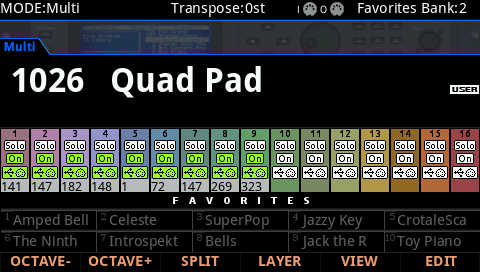
With 9-16 zones:
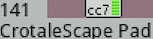
- Each field displays the following status icons related to that zone:
Note, as the number of zones increases, some data is not available:
Solo white = solo off / red = solo on
Zone On/Off green = on (local destination) / white = muted / orange = on (MIDI only)
MIDI/USB Destination green = transmitting / white = not transmitting (MIDI only, USB only, Both)
Audio Output Pair green = active / white = not active (A only, B only, Both)
Key Range white = active region
Program Program name/ID assigned
Volume (cc7) Green meter indicates volume level
Expression (cc11) Green meter indicates expression pedal level. When the “Show Controllers” parameter (Global MAIN1) is set to ‘Yes (Incl. pedals)’ the cc11 icon appears. cc11 controls the pre-insert FX program level.


Multi Mode
Question:
How can I access all 16 zones in Multi mode?
Answer:
The Forte’s default state offers up to 4 zones per Multi. Update v1.30 expanded this to 16 zones. Here’ how it works:
- Press the GLOBAL mode button.
- Set “User Type” to ‘Advanced’:
- Press MULTI to switch to MULTI mode.
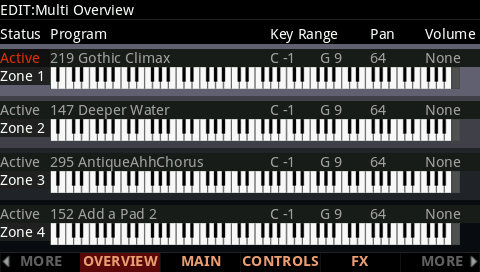
- Select the desired Multi and press EDIT.
For ex., here we chose Multi #5:
As you can see, Multi 5 already has 4 zones active:
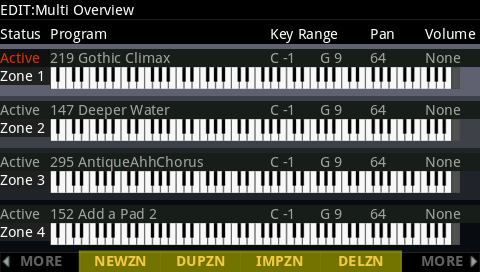
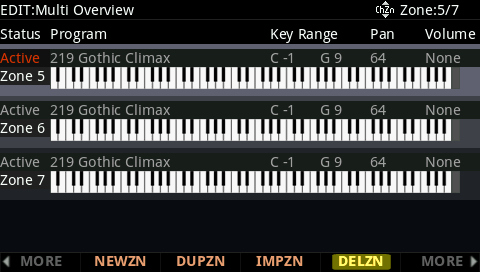
- Press either the MORE Left or Right corner soft-button twice. You will see the zone tool soft buttons used to manage creating/deleting zones – “New Zone”, “Duplicate Zone”, “Import Zone” and “Delete Zone”:
NEWZN = creates a new/empty zone.
DUPZN = creates a new zone by duplicating the currently selected zone.
IMPZN = creates a new zone by importing a zone from another Multi.
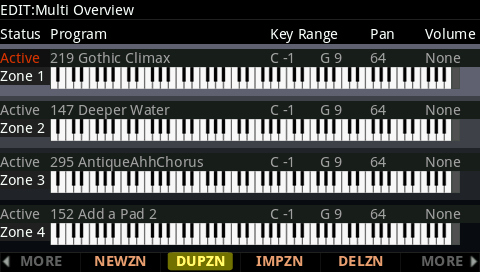
DELZN = deletes the currently selected zone. - For example, let’s use DUPZN to duplicate Zone 1 to create some new zones – use the Channel/Zone buttons to select Zone 1:
TIP: by duplicating a zone that may contain similar settings to what you want for your new zone, you can save some repeat programming steps.
- Press DUPZN:
A pop-up message, “Zone duplicated” will be displayed as confirmation.
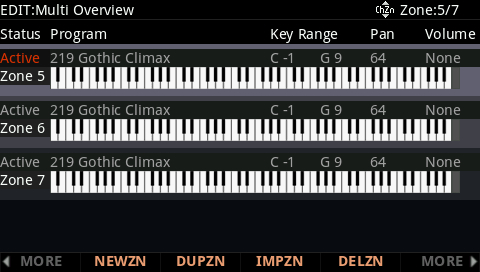
For illustration, below we created 3 new zones by pressing DUPZN 3 times. Note you now see Zones 5, 6 and 7. You can repeat this up to a max of 16 zones.
- Use the CHANNEL/ZONE buttons to then navigate through the zones in groups of 4 to edit each zone as needed. A Current Zone/Total Zone counter is displayed in the upper right hand corner of the screen to facilitate keeping track of things:
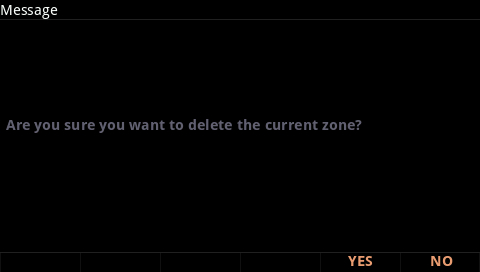
- To delete any unwanted zones, use the Channel/Zone and/or cursor arrows to select the desired zone and press DELZN – for example, here we are deleting Zone 5:
A confirmation screen will be displayed asking if you are sure. Press Yes to delete or No to cancel.
- Following, press SAVE and store your Multi as usual.


How can I customize the Forte’s touch sensitivity?
Answer:
-
- Press the GLOBAL mode button – you will see:
- Press the MAIN2 soft button:
- Using the cursor navigation arrow buttons, highlight the “Velocity Map” parameter. Using the alpha wheel and/or Previous/- Next/+ buttons, adjust to taste:
- Press the GLOBAL mode button – you will see:
The default map (Linear) provides the widest range of velocity expression, but you may want to choose a different map if the default does not suit your playing style. You can select from any of the following settings:
| Light1 Light2 Light3 |
Makes it increasingly easier to produce high MIDI velocity values for the same key strike velocity (with Light3 being the easiest). These maps work best for those preferring a light touch. |
| Linear | The Forte default map. Linear, allows MIDI velocities to pass unchanged. It follows a linear response. |
| Hard1 Hard2 Hard3 |
Makes it increasingly harder to produce high MIDI velocity values for the same key strike velocity (with Hard3 being the hardest). These maps work best for those with a heavy touch. |
| PianoTouch | Simulates the general velocity response of an acoustic piano, and is best suited for playing acoustic piano programs. |
| Easy Touch | Similar to the Light1/Light2/Light3 settings. Makes higher velocities easier to play, but allows more sensitive control over playing high velocities by not boosting the MIDI velocity for fast strike velocities as much as it does for medium strike velocities. |
| GM Receive | Mimics the velocity response commonly used by keyboards that use the General MIDI (GM) sound set. The GM Receive map makes medium strike velocities produce higher MIDI velocities compared to the Linear map. |
- Press PROGRAM or MULTI to exit the Global menu. Your setting selection will be remembered across power cycles.
Question:
How can I delete a user Object (Multis/Program/Keymap/Sample etc) that I made/loaded?
Answer:
- Press GLOBAL – you’ll see:
- Press either of the [MORE] buttons to find the [DELETE] soft button – then press [DELETE]:
- Using the alpha wheel, -/+ and/or up/dn cursor arrow buttons, highlight each object to delete and press [SELECT]. This marks each object with an asterisk(*) indicating which items will be subsequently deleted:Ex: Here we have selected Multi #1025 and the Master Table to delete.
TIP: Pressing [TYPE] jumps you through the list from one type of object to the next, for ex., from Programs to Multis, to Chains, to Samples etc. making it easier to navigate a large list and find what you are looking for.
- Press [DELETE] and the selected objects will be deleted:
- Press [YES] to confirm:
- Press EXIT twice to exit Global mode.
Question:
What are the basic functions of the effects editor in the Forte SE/7/8?
Answer:
Explore the FX processing power and full editing capabilities of the Kurzweil Forte 7/8/SE with this Quick Tip video. Learn how to select, modify and build effects chains in this 6 minute tutorial:
(Note: The Forte 7/8 UI is used for demonstration in this video. While the Forte 7/8 color display is different than the Forte SE display, the concepts/parameters discussed apply to the Forte SE as well.)
Download the handy “Effect Preset Guide” page featured in the video. This quick graphic shows you the general categories of individual FX presets available when building your own FX chains.
Question:
How does the Forte’s “Favorites” system work?
Answer:
Much like car radio station presets, the Forte lets you store your Favorite Programs/Multis for instant one-button recall. There are two modes to choose from: ‘Regular’ (offers 10 favorites) and ‘Advanced’ offering 500 (see further below).
REGULAR OPERATION (default setting) – 10 Favorites:
-
- Select the a Program or Multi you wish to store as a Favorite.Ex:
- Select the a Program or Multi you wish to store as a Favorite.Ex:
-
- Press and hold a given FAVORITES button for a few seconds to store the current Program or Multi to that button location.
- Press and hold a given FAVORITES button for a few seconds to store the current Program or Multi to that button location.
-
- You will see a pop-up message displayed as confirmation:Ex:
“Favorite 3 saved”.
- You will see a pop-up message displayed as confirmation:Ex:
- Go back to step 1 and repeat as needed.
To later recall the given Favorite, from Program or Multi mode, simply press the corresponding FAVORITES button. (Note: Individual “Fav Bank” objects can also be stored to disk for backup using the Advanced Store option)
TIP:
Press VIEW (once) to select the “Favorites” view mode.
In doing so, the names for the 10 stored Favorites will be displayed at the bottom of the screen, making it easier to remember what was stored in each location.
ADVANCED OPERATION – 500 Favorites:
Introduced at update v1.40, the Forte added support for storing/recalling 50 banks of Favorites – each “Bank” is comprised of 10 button selections. This gives you access to 500 Favorites via bank switching.
Here’s how it works:
- Press VIEW to enable “Favorites” view mode (see TIP above).
- Press the GLOBAL mode button.
- Set “User Type” to ‘Advanced’:
- Press PROGRAM or MULTI to exit.
- Using the CHANNEL/ZONE up/dn buttons to the left of the display, you can now flip through the 50 different Favorites banks. The current Favorites Bank number is displayed in the upper right hand corner of the screen:
You can now quickly access one of 50 banks, see what Program/Multi is stored in a given slot and make your selection.
Question:
Where can I obtain a list of the factory preset Programs & Multis for the Forte?
Answer:
Under the DOWNLOADS Tab on the Forte Product page (under ‘User Manuals’) you will find a link titled “Forte Factory Objects List”. The download contains both .pdf and .xls files listing all system objects (programs, multis, and effects chains).
In addition Appendix C and E of the Musician’s Guide (available on the Downloads page as well) also lists all of the factory presets.
Question:
Can I search the internal memory for select objects by name?
Answer:
Yes, the Forte offers a comprehensive search-string tool that permits searching many parameter fields by name, including:
- Multis
- Programs
- Keymaps
- Samples
- FX Chains
- FX Presets
- Program Control Sources
- Arp and Shift Patterns
- Intonation Maps
- Velocity Maps
- Pressure Maps
To do so, with the desired field selected, hold the Enter button and at the same time press any one of the alpha-numeric keypad buttons 2-9 (take note the button arrangement is much like a telephone keypad):
This will bring up the Search display:
Type in the string of characters you want to find using the alphanumeric pad.
For example, if you began in Program mode looking at the Program list and you want to find all Programs containing the word “Vintage”, you would type v-i-n-t and so on. This function is not case-sensitive; it will find upper and lower-case characters equally. When you’ve typed the string of characters you want to find, press OK. The Forte searches through the current list of objects or values, finds all items that match the string of characters
you typed, and displays the first one it finds.
Note in our example above we only typed a portion of the word. That works too. The result will be every program with ‘vint’ somewhere in its name will be part of the search results. Staying this same example, the first result displayed is “7 Vintage Upright”:
To navigate through the list of matches, hold ENTER and press either the PREVIOUS(-) OR NEXT(+) button (below the Alpha Wheel) to move to the next higher(+) or lower-numbered(-) object that matches your search.
Following our example, if we pressed ENTER and NEXT(+), incrementing up to the next higher match, we’d see Program “8 Vintage Grand”. Press ENTER and ext(+) again, you’d see “31 Vintage Squash” and so on. If we pressed ENTER and PREVIOUS(-) we would step backwards through the same search list.
As mentioned, the search tool works in other modes and fields as well.
Let’s search for an FX Chain. On the FX page of the Program Edit mode, highlight the ‘Insert’ field:
Then press and hold ENTER and type “h-a-l-l”:
Press OK when done typing to start the search – you will see something like:
If we pressed ENTER and NEXT(+), incrementing up to the next higher match, we’d see Insert “5012 Small Hall2″. Press ENTER and NEXT(+) again, you’d see the next ‘hall’ match, and so on as before. Again if we pressed ENTER and PREVIOUS(-) we would step backwards through the same search list.
Power User Tips
-
- It bares repeating, the above applies to many parameter fields throughout the Forte UI. Try it – look up an LFO as a Control Source for your filter cutoff assignment, or locate that Arp preset you can’t quite remember the full name of.
- The text strings you search for remain in memory until the Forte is turned off. Further, you can store and select a string of characters with each of the numeric buttons. Hold Enter and press one of the numeric buttons at any time to select the last string associated with that same numeric button. When the string appears, you can change it, or just press Enter to re-find that same string.
Question:
How can I select Forte Multis via MIDI Bank/Program Change?
Answer:
Here are the steps:
- Press the GLOBAL mode button.
- Press MIDI.
- Set “Local Kbd Chan” to the MIDI channel you plan to send the Bank/Pchg messages on. This will be the one and only channel that will be used for selecting Multis via MIDI.
For example, here we chose channel 3.
- Press Multi to enter Multi mode.
Once in Multi mode, below is what messages the Forte needs to receive (on the chosen Local Kbd Chan) in order to select any given Multi:
- MIDI Bank message
By default*, the Forte uses MIDI Bank message cc#32 (aka Bank LSB) value = 0-127, to send/receive bank info.
*(Bank Select: Ctl 0/32 – set in the Global/MIDI menu) - MIDI Program Change message
Following the Bank message, a standard Program Change is used value= 0-127 to select the desired program from within the designated bank.
The table below shows the MIDI Bank (column 1) and Program Change (column 2) values needed to select the designated Forte Multi (column 3). Note all banks are 128 entries deep:
Values Sent To Forte Forte Multi Selected MIDI Bank #
(cc#32)Program Change ID Range 0 0-127 1-127 Factory 1 0-127 128-255 Factory 2 0 256 Factory 8 0-127 1024-1151 User 9 0-127 1152-1279 User 10 0-127 1280-1407 User 11 0-127 1408-1535 User 12 0-127 1536-1663 User 13 0-127 1664-1791 User 14 0-127 1792-1919 User 15 0-127 1920-2047 User
Examples:
Ex 1: You want to call up #32 Euro Chords:
From your DAW (or alternate controller), on the chosen Local Kbd Chan (step 3 above) you send:
MIDI Bank (cc32) = 0 *Program Change = 32 Ex 2: You want to call up #182 Game ofTrombones:
From your DAW (or alternate controller), you send:
MIDI Bank (cc32) = 1 *Program Change = 54 *Note: 182-(128×1)= #54.
(ie Multi #182 is the 54th Multi in MIDI Bank 1.)Ex. 3:You want to call up #1977 in the User bank:
From your DAW (or alternate controller), you send:
MIDI Bank (cc32) = 15 *Program Change = 57 *Note: 1977 – (128×15) = 57
(i.e. Multi #1979 is the 57th Multi in MIDI Bank 15)
Question:
What are the basic functions of the step sequencer in the Forte SE/7/8?
Answer:
Explore the step sequencer in Kurzweil Forte7/8/SE with this Quick Tip video. Learn the basic functions and also how to create more complex sequences (dotted rhythms) in this 5 minute tutorial:
(Note: The Forte SE UI is used for demonstration in this video. While the Forte 7/8 display is different, the concepts/parameters discussed apply to the Forte 7/8 as well.)
For more information on the Forte series arpeggiator, download the newly updated Forte SE Musician’s Guide
.
Forte 7/8 users can download the demo program, Skool Bass, from the Legacy Synth Bass Soundbank.
Question:
How does the Forte’s real-time “Transpose” feature work?
Answer:
The Forte offers dedicated Transpose – / + buttons immediately above the Pitch and Mod Wheels:
The Transpose buttons can be used to change the tuning of notes played on the Forte keyboard in semitones (ST), also known as half steps. This is a convenient way to change the key of a song without learning to play it in a different key. (Note: the Transpose buttons also transpose MIDI notes sent to the USB and MIDI out ports).
Working in tandem with the physical Transpose buttons is the Transpose readout affixed at the top of the Program and Multi mode screens. This field maintains a constant readout of the current transpose value:
Press the Transpose – or + buttons to transpose the Forte keyboard down or up by one semitone. The top line of the display shows the current transposition value. The maximum transposition value possible is +/- 36 semitones.
Example 1 – here we have things transposed up 1 ST:
Example 2 – here we have things transposed down -3 ST:
The LEDs of the Transpose buttons themselves also offer indication whether the keyboard is currently transposed up (Transpose + LED is lit) or down (Transpose – LED is lit) or not at all (no buttons lit).
Example – here we have things transposed up:
TIPS:
- To transpose things up/down by octave use the OCTAVE- and OCTAVE+ soft buttons in the lower left of the screen:
- Pressing both Transpose – and + simultaneously (or both Octave soft buttons) will reset the transposition to 0.
Question:
How can I assign a switch pedal to navigate my stored Favorites?
Answer:
- With the power off, connect a sustain/switch pedal into “Switch Pedal 2” (and/or 3), then power on.
NOTE: while the Forte supports using either traditional 1/4″ (TS) or half-damper 1/4″ (TRS) switch pedals for piano-sustain, for this application you will want to only use traditional 1/4″ (TS) pedals.
- Press the GLOBAL mode button – you will see:
- Press the MAIN2 soft button:
- Using the cursor navigation arrow buttons, highlight the “SW Override” parameter for your chosen pedal (SW2 or SW3). By default it is set to “None”. Using the alpha wheel and/or Previous/- Next/+ buttons, change it to “Favorite Inc” **:
TIPS:
– **Choose “Favorite Inc” to move forward through your Favorites. Choose “Favorite Dec” to move backwards through your Favorites.
– Use two separate pedals (one connected to SW2, one connected to SW3) and set one to “Inc” and one to “Dec” for two-way navigation.
– Enable ‘Advanced’ User Type and ‘Favorites View’ to access up to 500 Favorites. - Press PROGRAM or MULTI to exit.
USAGE NOTES:
- The pedal will cycle/wrap around the 10 available Favorites button slots within the current Favorites bank.
- If using Advanced User Type, and multiple Favorites Banks, you will need to manually select the Favorites bank using the Chan/Zone buttons first, then you can use the pedal to walk through that current bank of 10 favorites.
- Complete details on the use of pedal overrides can be found in the Forte Musician’s Guide (pg. 12-11).
Question:
How does the ‘Show Zone Info’ display work?
Answer:
Starting with system update 2.10 there is a new Multi display mode which offers an overview of the current Multi’s zone status. At a glance, this makes keeping track of what zones are active and assigned to what much easier, all without having to enter the editor. Here’ how it works:
- Press the GLOBAL mode button.
- Set “Show Zone Info” to ‘Yes’:
- Press MULTI to switch to MULTI mode.
- Select the desired Multi and note the display overlay:
For ex., here we chose Multi #26 – a 4-zone multi and, as such, 4 zone fields are now displayed:
As the number of zones employed increases the display will reconfigure accordingly:
With 5-8 zones:
With 9-16 zones:
- Each field displays the following status icons related to that zone:
Note, as the number of zones increases, some data is not available:
Solo white = solo off / red = solo on
Zone On/Off green = on (local destination) / white = muted / orange = on (MIDI only)
MIDI/USB Destination green = transmitting / white = not transmitting (MIDI only, USB only, Both)
Audio Output Pair green = active / white = not active (A only, B only, Both)
Key Range white = active region
Program Program name/ID assigned
Volume (cc7) Green meter indicates volume level
Expression (cc11) Green meter indicates expression pedal level. When the “Show Controllers” parameter (Global MAIN1) is set to ‘Yes (Incl. pedals)’ the cc11 icon appears. cc11 controls the pre-insert FX program level.
Product Comparisons
Sample
Question:
What are the steps to load and make use of .WAV/.AIF files?
Answer:
This tutorial is in three parts:
Things to Know:
The Forte supports loading of raw .WAV and .AIF sample files. Both mono and stereo files can be loaded, 8 or 16 bit, with sample rates up to a maximum of 96 kHz. Once samples are loaded to the Fortes user sample flash memory, samples remain in the Forte even when the power is off, until they are manually deleted. Also, once samples are loaded to the Forte’s user sample flash memory, there is no load time for those user samples when turning on the Forte.
The initial loading of raw samples is not unlike loading regular Forte (.FOR) files. They can be loaded off USB thumb drive (flash drive) or via the direct-USB cable connection to your Mac/PC. However the direct-USB cable method is limited to roughly 20MB, as such using a thumb drive will be the better option when handling larger file sizes.
It is important to note that audio files (.wav/.aif) are just raw “ingredients”. Even after loading, they have not yet been “cooked” into any useable “recipe” yet (aka Program and Keymap). As such upon loading any source audio files, do not expect to find these samples magically appearing in Program mode. After loading you will need to first build a Keymap and Program using the loaded samples. After which, the Program (recipe) employing these new samples will become available as an ID selection in Program mode for normal use (details on one fast, easy method for doing this further below).
Loading:
The basic procedure of loading user data is outlined in the Forte “Loading User Data” tutorial.
NOTE: at step 6 in the above linked tutorial you will likely want to choose the FILL load method (which will place the sample at the first available (free) ID slot. If you have no user samples loaded this will be ID# 1024.
Previewing:
Once the sample file(s) is loaded, to make use of any loaded raw samples, a Program and Keymap must be constructed first. This can be done by one of two methods:
- Manual Keymap construction (see your owner’s manual Chapter 9 “Keymap and Sample Editing” for details).
This method is ideally suited for more advanced users and intricate mapping applications. - You can use the handy PREVIEW tool.
This method is ideal for those with simpler needs, wanting fast results.
-OR-
PREVIEW automatically makes a new ‘generic’ Program (and Keymap) for you, using any single sample. This method provides a quick way to begin making a new program which can be then, of course, be edited further if desired.
Here is how it works:
- Press the GLOBAL mode button, you will see:
- Press the left -or- right
button. Locate and press [SAMPLES]: - Next, press the [PREVIEW] button:
- Select the desired sample. On this screen you will see a simple “Sample” field which allows you to scroll through ALL samples in memory (both ROM and User-loaded). Scroll through the list (and/or type via the keypad) to select the desired sample ID and press [OK ]. For example below we are selecting sample ID# 642 “Snare Hit”:
- Next choose the User ID # where you would like the final Program to reside. Here, for example, we are choosing program ID# 1024 (available user ID range = 1024-4095).
- Press EXIT three times (3x) to return to Program mode. Your new Program will be immediately available and named using the same name given the source sample file.
You will see a brief screen confirmation displaying “Preview OK” – indicating the Program was created. Note: if the ID you choose is already occupied the system will simply save your creation to the next available (higher) User ID slot.
Note:
By default, the sample will be initially stretched across the entire keyboard with C4 as the sample root (i.e. original sample pitch). See your owner’s manual for details on further Program/Keymap editing.
Storage Mode
Question:
How can I load user Programs/Multis into the Forte?
Answer:
Forte compatible files can be loaded from either a USB flash/thumb drive or directly from a computer via USB cable connection.
“LOAD” Procedure:
- Connections and File Preparation:
If wanting to load from a USB flash/thumb drive (USB Device) plug a flash/thumb drive (containing the desired file) into the Forte back-panel USB “Storage” port.
OR
If wanting to load directly from your computer (*PC Virtual Drive) connect a USB cable between the Forte’s USB “Computer” port and a free USB port on your computer.
*When choosing the PC Virtual Drive, a temporary removable USB drive representing the “Forte” will mount on your computer when the USB cable is connected. If you are using a Windows based PC you may also see a message indicating ‘device drivers’ are being installed. This is normal and only happens the first time you use this connection.
Once the PC Virtual Drive appears on your computer copy the desired Forte file(s) to it.
- On the Forte, press the front panel STORAGE mode button.
- Using the Alpha Wheel, Previous/Next and/or Cursor buttons, select either “USB Device” or “PC Virtual Drive” pursuant to your connections above:
- Press “LOAD”:
(in our example here we are using a USB Device)
- As needed, use the Alpha Wheel, Previous/Next, Cursor and/or Parent/Open buttons to navigate to and highlight the file you wish to load:
(If needed, press SELECT to mark(*) more than one file for loading).
- Press either “FILL” or “OVWRITE” (overwrite) to choose how you want the data to load into the system – there are two methods available:
FILL: Loads Programs/Multis sequentially into EMPTY user ID slots, filling in any gaps. No existing Programs/Multis will be erased. OVWRITE (only .FOR files): Replaces existing User bank contents.
∇
∇
In choosing FILL, objects will load starting from the specified ID#. Use the data wheel or numeric keypad to set the starting ID#. Press FILL to proceed. If choosing OVWRITE you will be prompted to choose between either overwriting all existing user Programs/Multis currently in user memory (press YES) -or- selectively merging the Multis/Programs in the file with the current user memory (press NO-MERGE).
(For further details, see chpt. 13 in the Forte Musician’s Guide ).
- A brief “Indexing…” message will be displayed while things are loaded followed by “Objects loaded OK”. You will then return to the main Storage mode screen.
- Press Exit or any of the other mode buttons (Program, Multi or Global) to leave Storage mode.
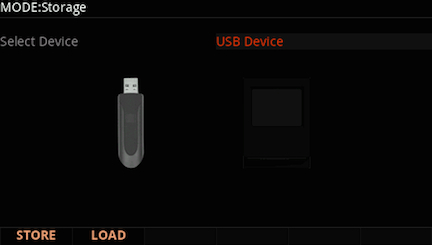
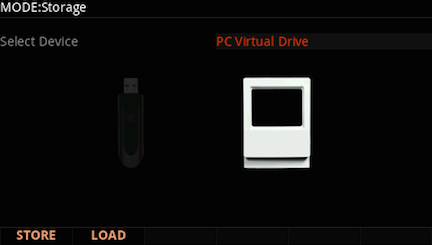
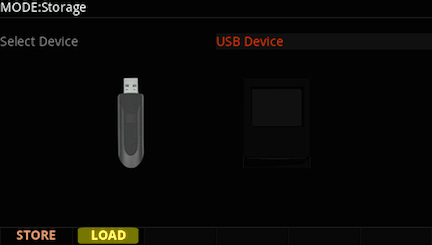
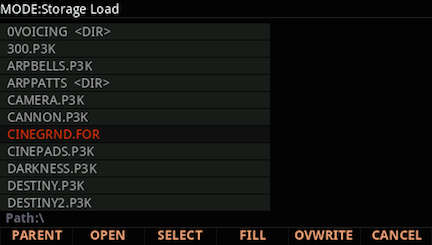
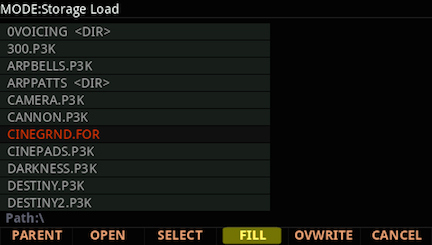
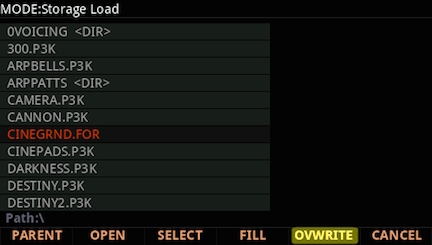
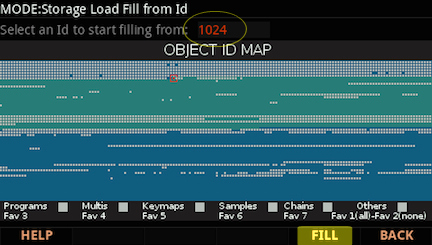
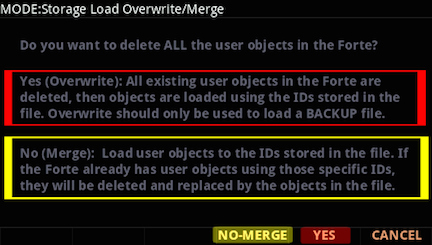
Notes:
|
Question:
How can I save (backup) all of my Forte user data?
Answer:
The Forte saves all data from both User Banks (Program and Multis) into one file with an “.FOR” extension. Forte files can be saved to either a USB flash/thumb drive or directly to a computer via USB cable connection.
“STORE” Procedure:
- Connections:
If wanting to save to a USB flash/thumb drive (USB Device) plug a flash/thumb drive into the Forte back-panel USB “Storage” port.
OR
If wanting to save directly to your computer (*PC Virtual Drive) connect a USB cable between the Forte’s USB “Computer” port and a free USB port on your computer.
(*If choosing the PC Virtual Drive, a temporary removable USB drive representing the “Forte” will mount on your computer when the USB cable is connected. If you are using a Windows based PC you may also see a message indicating ‘device drivers’ are being installed. This is normal and only happens the first time you use this connection).
- Press the front panel STORAGE mode button.
- Using the Alpha Wheel, Previous/Next and/or Cursor buttons, select either “USB Device” or “PC Virtual Drive”:
- Press “STORE”:
(in our example here we are using a USB Device)
- Press ALL (to save all user objects):
- Select the directory to save your file to. Whether saving to a USB Device or the PC Virtual Drive, the simplest approach here is to just press “OK” to store your file to the current directory (in our example below the drive is initially empty).
Alternatively you can get more organized and use the Parent/Open/NewDir tools to create new directories as well as navigate inside any existing directory (see chpt. 11 in the Forte Musician’s Guide for complete details).
- Name your file. Use the alpha wheel and/or alphanumeric keypad to enter characters. Use the soft buttons beneath the display to move the cursor and manage character positions. Then press “OK” to save the file to disk:
- A brief “Storing…” message will be displayed while the file is saved. Once completed you will return to the Storage mode screen.
IMPORTANT: If saving to the PC Virtual Drive, it is important that you copy the file from the temporary removable ‘Forte’ drive to your computer’s hard drive for long term storage. Once you power down the Forte, the temporary removable PC Virtual Drive will unmount from your computer and its contents will be erased.
- Press Exit or any of the other mode buttons (Program, Multi or Global) to leave Storage mode.
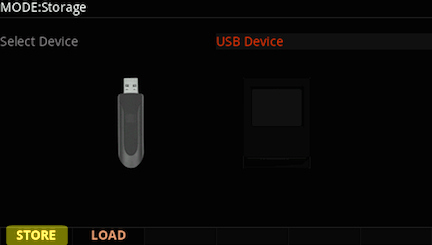
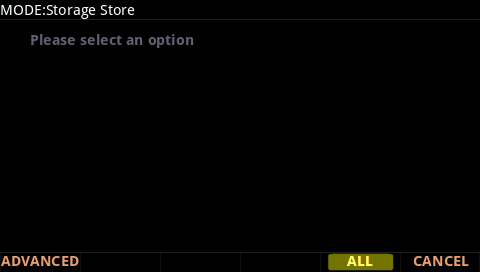

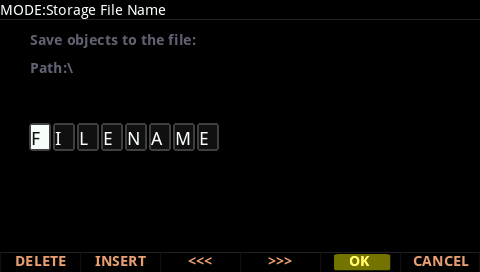
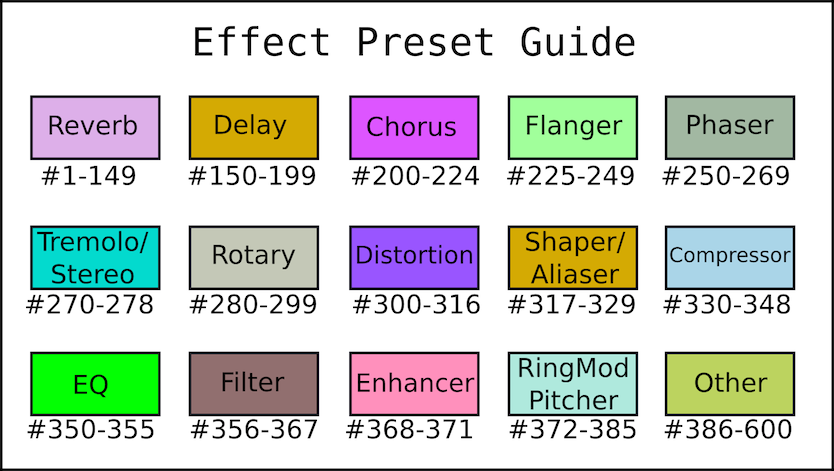
Notes:
|