Question:
What is the best way to organize and quickly recall my favorite Programs/Setups?
Answer:
All references to the “PC3” apply equally to the PC3, PC3K, PC3A and X-Pro models.
You have several options for corralling and retrieving your favorite Programs and Setups in the PC3, but Quick Access Mode (chpt 8 in the PC3 Musician’s Guide) is generally ideal for this, and is especially well-suited for live performance.
With QA Mode, you can “bookmark” up to 10 favorites (programs and/or setups) that can be viewed and immediately accessed from one comprehensive screen at the touch of a button.
Each group of 10 entries is referred to as a “QA Bank” and can be named for easy identification. The PC3 comes equipped with numerous factory QA Banks to get you started but of course the real power comes in assembling your own (more on that below).
Selecting QA Banks
Press the front-panel “Q Access” Mode button you will see something like:
There are three front-panel methods for selecting a desired QA Bank:
- Use the Chan/Layer buttons (left of the display) to scroll through banks (up/down) sequentially.
- Use the bank selection shortcut: press the +/- or Clear button on the alphanumeric pad, and you’ll be prompted to enter a bank number. Type the desired number on the alphanumeric pad, then press Enter (or scroll to your selection with the data wheel). Press OK.

The designated bank is selected, and you return to the Quick Access mode page.
- QACategory: Favorite*– Introduced in v2.10 (does not apply to X-Pro models): Each of the 16 Category buttons can store/recall a quick access bank*. Similar to storing station presets on a car radio, press+hold any Category button (Piano 1, Piano 2 etc) for approx. 2-3 sec to store the current QA Bank as a “favorite” (a brief message displays on screen confirming). A quick/normal press of the same button recalls this Bank at anytime (from QA Mode). This new option offers fast, one-button access to your 16 favorite quick access banks. Thus with two button presses you can access up to 160 of your most needed Programs and/or Setups.

* “QACategory” parameter (MasterMode:MAIN) must be set to “Favorite” (system default). To save your QA Favorites across power cycles be sure to press Master then Exit (to leave Master mode). This action stores your preferences to the system Master Table.
TIP: switching QA Banks does not itself activate a new Program/Setup. This permits “surfing” to the next Program/Setup without interrupting the selection currently being performed (and sounding).
Selecting QA Entries
Once you have selected the desired QA Bank, you can then select any of the 10 on-screen entries using various methods:
- Numeric Keypad: You will note, the layout of the entries on screen match the alphanumeric keypad layout one-for-one. In other words pressing “1” selects the entry in the upper left had corner of the screen. Pressing the “9” selects the entry in the lower right hand corner, and so forth. This makes for very fast and intuitive selection.
- Cursor Keys, Data Wheel, +/- Buttons: usual data input methods can all be used to move about the screen up/dn, left/right.
- Foot Pedal: a simple foot switch can be used to advance through the on-screen QA entries. For details see Using a Foot Switch Pedal to Increment Quick Access Entries
Editing/Creating QA Banks
Creating your own QA bank starts with editing an existing bank.
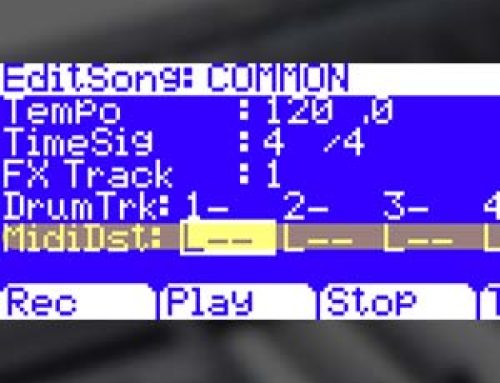
1) To start from an empty template select “QA Bank 99 Basic QA Bank”:
2) Press EDIT:
3) Using the Chan/Layer buttons, select an Entry slot to fill.
Note the current “Entry” counter displayed in the top-right corner which reflects the currently selected Entry slot.
The highlighted selection on the left is this slot’s current occupant (“None” to start with in our ex.)
4) Push the TYPE soft button to toggle the selection list to display “Programs” or “Setups” as needed.
The list on the left displays either all Programs -or- all Setups currently in memory (both factory and user).
5) Using the Alpha Wheel, -/+ buttons, or alphanumeric keypad select the desired Program/Setup.
In our example here we have assigned Setup #41 to Entry 1.
6) Go back to step 3 and repeat, as needed, for all 10 Entries.
7) Press SAVE when finished:
The standard save dialog appears allowing you to designate a location to save to, name the Bank, etc.: