Question:
How can I create a basic keyboard split and/or layer?
Answer:
All references to the “PC3” apply equally to both the PC3, PC3K and X-Pro models.
The PC3 Setup mode is the ideal place to construct performance splits and layers. Each Setup permits the combination of up to 16 unique program zones.
(complete parameter details can be found in Chpt 7 of the User Manual).
Here is the basic flow for the creation of Setups:
1) Press the SETUP Mode button
2) Select Setup “128 Default Setup” (a good starter template)
3) Press EDIT
4) Select your “Program” for this zone:
5) Set the “Channel” number as needed (the defaults are zone 1 = chan 1, zone 2 = chan 2, and so on)

6) (for creating Splits) Press [KEYVEL] and narrow the key range (LoKey and HiKey) as needed.
Intuitive Entry Shortcut: in addition to manually changing these Key values, you can also highlight the field in question, press and hold down the ENTER button while striking the desired note on the keyboard to set it as the field value.
7) Press [<more] twice
8) Press [NewZn] – this creates a new zone (note the zone count in the upper right hand corner advancing)
9) Press [more>] twice
10) Press [CH/PRG] , and go back to step 4, now working on the next zone. Continue on, repeating these steps for all desired additional zones (up to 16 max).
11) Press EXIT and SAVE this Setup to any empty location (renaming if you wish).
You have now assembled a basic combination of sounds into one easy-to-recall Setup (your Setup will appear in Setup mode at the ID# assigned in step 11 above).
Power User Tips:
- To create more setups in this same vein: simply edit this one made here, and change the sound selections on each zone. Re-save to a NEW ID location, effectively making a copy with just the new sound selections made.
- Selecting the zone to edit: in the Setup Editor, press the Chan/Layer buttons (left of the screen) to select the desired zone to work on – the upper right hand corner of the display reflects the current and total zone count (current/total). In the example below we are editing Zone 1 of a total of 4.

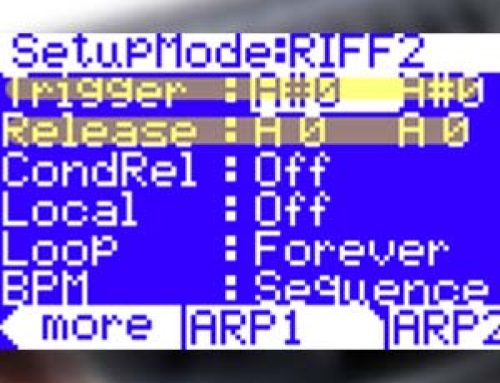
- Transpose a Zone:- in the Setup Editor, using the Chan/Layer buttons, select the zone to edit- on the [KEYVEL] page, set “Transpose” as needed:
(in our example here we have transposed Zone 1 up an octave – 12 ST)
![]()
- Disabling the sustain pedal for left-hand bass:In most split-bass layouts, you would typically want to disable the sustain pedal in the bass zone so that use of the sustain pedal only affects your right-hand parts (by default, the pedal is active in all zones in our tutorial here):- in the Setup Editor, using the Chan/Layer buttons, select the “bass” zone- on the [FT SW1] page, set OnControl and OffControl to ‘OFF’.
- KB3 Programs in Setup Mode:- only ONE KB3 program can be used at a time and, by default, can only be used on MIDI channel 1. This default channel can be changed to any channel (by way of the “KB3Chan” parameter on the [COMMON] page).
– per Setup you can choose whether the buttons above the Sliders operate as Zone Mutes (default) or as typical KB3 controls. To set this preference, set the “Mutes” parameter on the [COMMON] page to either ‘Zone Mutes’ or ‘KB3 Control’.
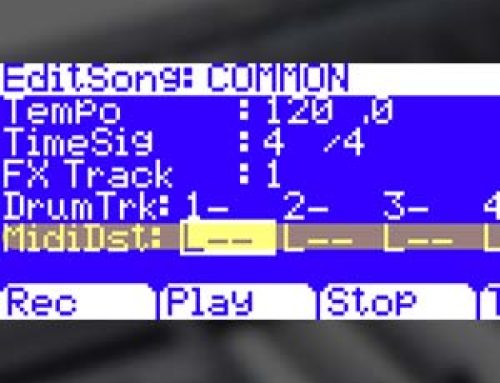
- If incorporating external MIDI devices:- in the Setup Editor, using the Chan/Layer buttons, select the zone to edit- press [CH/PRG]- set the “Destination” for each zone to either ‘LOCAL’ (for internal PC3 sounds):

or ‘MIDI’ (for triggering external units):
For external MIDI only zones, set “BankMode”, “MIDIBank” and “MIDIProg” as needed to select the desired sound from the slaved unit.
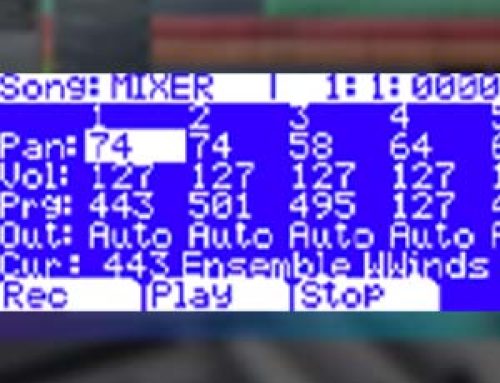
- Setting Zone Volumes: to set a static volume for a given zone, in the Setup Editor, simply go to the [PANVOL] page and set the “EntryVolume” to taste:
Note: optional, but important – it is recommended setting the “ExitVolume” to 127 to assure full volume is restored on this channel when navigating away from this Setup. Similar applies to any Pan settings though you would want to use an ExitPan of 64 (for center).
- Use the Sliders as volume faders: as an alternative to the static volume setting detailed above, you can assign the PC3 sliders to act as per-zone volume controls to offer real-time adjustment over the mix.- in the Setup Editor, using the Chan/Layer buttons, select the desired zone- press [Slider]- set the desired Slider “Dest” to Volume (cc7 ) (to do this, highlight Dest field and type “7” and Enter on the alpha keypad). Set an Entry value (Ent) to set the initial volume level.

Be aware this is just for the current zone – repeat for each zone as needed; be sure to use a different slider for each zone for independent zone control.
Note: optional, but important – it is recommended setting the Slider “Exit” to 127 to assure full volume is restored on this channel when navigating away from this Setup.