Question:
I want to create a Piano/Bass split where the bass is layered with a ride cymbal. What are the steps?
Answer:
There is no stock preset Setup with that exact combination, but it is fairly simply to edit one that is close and add this.
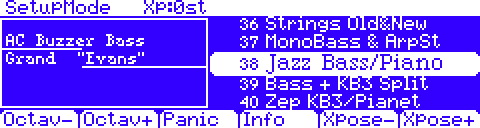
- In SETUP mode select Setup #38 Jazz Bass/Piano:

This is a basic piano/upright bass split. It’s just missing the ride layer (what we will add below). Alternatively you can use any Bass/Piano split you may have already built as a starting point.
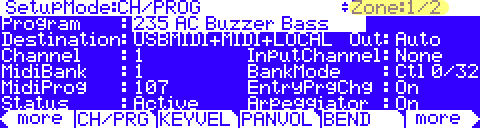
- Press EDIT, you will see:
Note: Zone 1 in our example is the bass so will already be on screen (upper right hand corner shows 1/2). If using your own Setup be sure to select your Bass zone now (which may or may not be Zone 1).
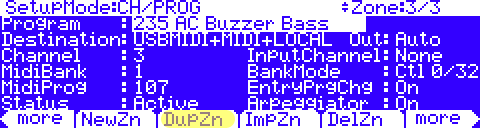
- Press the LEFT MORE button 2x – then press [DupZn] (i.e. duplicate zone):
This will create a duplicate of the bass zone which we will edit to add the the cymbal, borrowing the current bass zone’s attributes (key range, pedal use etc).
Note: the upper right hand corner of the screen now shows one additional zone; in our example here 3/3.
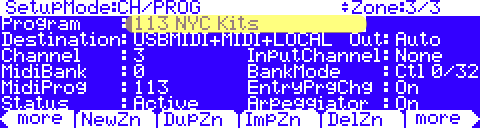
- For this zone (zone 3 – the ride) select program #113 NYC Kits (you can select any drum kit with a ride cymbal – this is just an example):
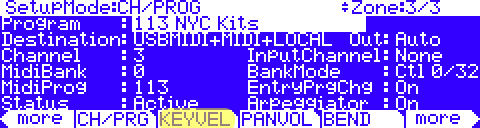
- Press the RIGHT MORE button 2x – then press [KEYVEL]:
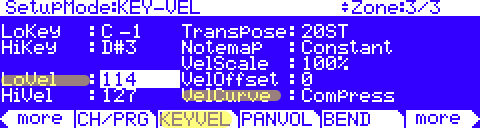
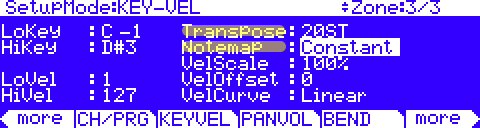
- Set the ‘Transpose’ to “20ST” and the ‘Notemap’ to “Constant”:
Doing so maps the one ride cymbal key trigger across the zone’s entire key range. You’ll note you now have ride cymbal layered with the bass.
- Press EXIT and then YES when prompted to “Save Setup”?
Done. Of course there are lots of other things you could tweak here but these are the basics.
Power User Tips
- Mute Zone Button: To quickly silence the ride cymbal, press the Zone 3 mute button (above slider C). It will turn orange. Press it again to unmute (it will turn green).
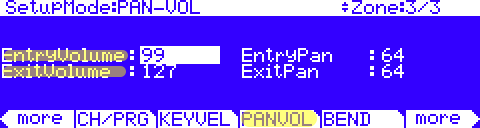
- Set the Volume Level for the Ride Cymbal Zone: To set a static volume level for the ride, in the Setup Editor, select the ride zone (zone 3 in our ex), go to the [PANVOL] page and set the “EntryVolume” to taste:
Note: optional, but important – it is recommended setting the “ExitVolume” to 127 to assure full volume is restored on this channel when navigating away from this Setup. Similar applies to any Pan settings though you would want to use an ExitPan of 64 (for center).
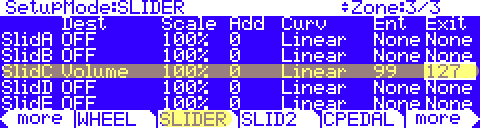
- Assign Slider C to act as a Volume Control for the Ride Cymbal Zone: As an alternative to the static volume setting detailed above, you can instead assign a slider to act as a dedicated, real-time zone volume control: in the Setup Editor, select the ride zone (zone 3 in our ex)- press [SLIDER]- set the desired Slider “Dest” to Volume (cc7) – (to do this, highlight Dest field and type “7” and Enter on the alpha keypad). Set an Entry value (Ent) to set the initial volume level. In our example we are using Slider C:
Note: optional, but important – it is recommended setting the Slider “Exit” to 127 to assure full volume is restored on this channel when navigating away from this Setup.
- Tweak the Zone Velocity Parameters to Tailor the Ride Cymbal Performance: For fun, experiment with the velocity response of the ride cymbal zone to evoke different performance behaviors. In our example below we have increased the LoVel range to 114. In this manner, only ride cymbal notes struck with a velocity of 114 or higher will sound, giving you the ability to play lower velocity bass notes without the ride triggering on each and every note (making the ride more of an accent). Further we have altered the VelCurve, setting it to ‘Compress’ to give the cymbal a more consistent strike level when it does sound. Need be, using one of the above techniques, you can then adjust the ride cymbal zone volume to make it sit in the mix.
No right or wrong, just ideas (be sure to read in the owner’s manual, starting on pg. 7-9, for further details on all the zone velocity tools available).