Question:
How can I customize the PC4’s sliders, knobs, buttons, wheels and pedals to control my DAW and/or virtual instruments?
Answer:
Getting the PC4’s physical controller to activate various features/parameters in your DAW requires two basic steps:
- In your DAW: define the necessary MIDI CC number needed to trigger the desired function;
- On the PC4: assign that same MIDI CC number to the chosen physical controller (slider, knob, button, wheel, etc) you want to use to activate the given DAW/VI parameter.
This article will address step 2, assigning the various physical controllers on your PC4 to transmit the needed DAW/VI MIDI values. For step 1, please refer to your specific DAW and/or VI documentation as to what MIDI CC’s it may use, or allow assignment of, for controlling its various features.
The PC4 offers 53 assignable MIDI controllers in total, ranging from pedals, to sliders, knobs, buttons and the piano keys themselves. Each controller itself is further classified as either Switch type or Continuous type. A Switch (switch pedal, button or key) transmits two values (one for On and one for Off) and Continuous controllers (wheels, knobs, and sliders, etc) transmit 128 values (0-127). In the table below Switch type controllers are labeled in black. Continuous controllers are in blue:
| Wheels | Ribbon | Pedals | Sliders | Knobs | Buttons | Keys |
|---|---|---|---|---|---|---|
| ModWheel | Section 1 | Sw. Pedal 1a | Slider A | Knob 1 | Variation | Pressure |
| Pitch Wheel Up | Section 2 | Sw. Pedal 1b | Slider B | Knob 2 | Switch 1 | Key 1 |
| Pitch Wheel Down | Section 3 | Sw. Pedal 2a | Slider C | Knob 3 | Switch 2 | Key 2 |
| Sw. Pedal 2b | Slider D | Knob 4 | Switch 3 | Key 3 | ||
| CC Pedal 1 | Slider E | Knob 5 | Switch 4 | Key 4 | ||
| CC Pedal 2 | Slider F | Knob 6 | Switch 5 | Key 5 | ||
| Slider G | Knob 7 | Switch 6 | Key 6 | |||
| Slider H | Knob 8 | Switch 7 | Key 7 | |||
| Slider I | Knob 9 | Switch 8 | Key 8 | |||
| Switch 9 | Key 9 | |||||
| Key 10 | ||||||
| Key 11 | ||||||
| Key 12 |
Tip: Before beginning, it is strongly suggested you develop a list of those parameters/functions in your DAW or VI’s that you want to control along with the designated MIDI CC number for each. Then determine what PC4 controllers (from the above table) you want triggering each DAW/VI function. With this plan in hand, you can then simply go one by one, assigning each as needed.
Below we will construct a custom PC4 Multi template to house your custom DAW/VI controller assignments.
| 1. Go to Multi mode and select Multi 2046 “PC4 Control” as a starting point: | 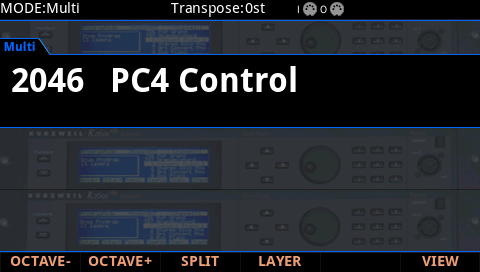 |
| 2. Press EDIT, and on the OVERVIEW page set the Program for Zone 1 to “0 None”: | 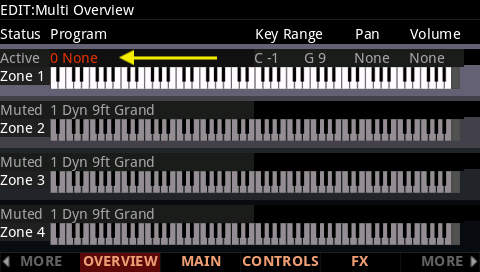 |
| 3. Following, select the MAIN page and set the Destination to “USB” or “MIDI” (depending on your physical cable connections to your computer), and set EntryProgChng to “Off”: | 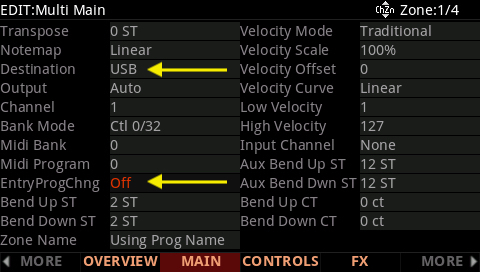 |
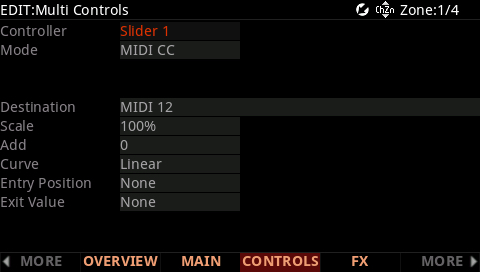
4. Next, select the CONTROLS page. This page is where all of the physical controller assignments will get defined:
Select the desired physical control by either:
a) Scrolling through the “Controller” list at the top of the screen to locate the desired controller, or
b) Use Intuitive Entry to quickly jump to the desired controller (note this works for all controllers except the 12 key triggers). To use Intuitive Entry, select the Controller field, press+hold the keypad ENTER button while you move/activate the desired controller. This will auto-select the given controller.
Switch and Continuous controllers have slightly different programming parameters. We’ll look at each individually here:
-Continuous Controller-
Note: These are the basics. In the Advanced Tips section below we’ll look at some creative uses of Scale/Add/Curve. |
|
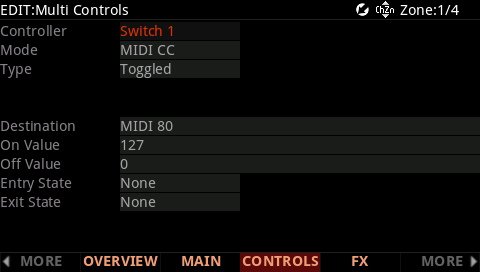
-Switch Controller-
|
|
Test each controller as you assign it, double checking it activates the desired function in your DAW/VI.
5. Go back to Step 4a/b and repeat for each physical controller-to-parameter pairing you wish to make.
6. When done, it is advisable that you scroll through all of the PC4’s controllers and disable any you know you are NOT using that may have been enabled by default in this template. To disable any controller simply set its Mode field to “Off”.
7. Press SAVE and name the Multi when finished. Now whenever you are working with your DAW/VI’s, select this Multi.
ADVANCED TIPSContinuous Controller Scaling Does that fader, knob or CC pedal not trigger the chosen parameter smoothly enough? Need it to operate over a narrower range? in reverse? Continuous controllers offer 3 additional parameters that can be used to tailor their output to perform in a variety of useful ways: “Scale”: Reduce or increase the output range, expressed as a percentage. Values lower than 100% decrease the range; values greater than 100% increase it. “Add”: Uniformly add or subtract a fixed amount to the output (+/-127). This effectively acts as an offset. “Curve”: Select from 9 different shapes ranging from Linear, Compressed, Expanded, Reversed, etc.. Velocity Scaling Need to increase or decrease the key velocity (ie sensitivity)? Similar to the above you can tweak the velocity output in a number of ways to best marry with the VI and specific program or passage you may be playing. On the MAIN page there are four Velocity adjustment parameters that serve this purpose: “Velocity Mode”: Choose between “Traditional” (which reveals the following 3 additional parameters) or “Fixed”, the later allowing you to specify a singular/fixed velocity value ranging from 0-127. “Velocity Scale”: Reduce or increase the output range, expressed as a percentage. Values lower than 100% decrease the dynamic range; values greater than 100% increase it. “Velocity Offset”: Uniformly add or subtract a fixed amount to the output (+/-127). “Velocity Curve”: Select from 9 different dynamic shapes ranging from Linear, Compressed, Expanded, Reversed, etc.. Multiple Multis Want more faders/knobs/buttons? Or maybe need a separate set of controls for each VI you use? Use multiple Multis, each purpose built with its own customized CC assignments tailored to a given DAW window, VI or performance style. Store each of these as a Favorite and easily switch between these task-specific Multi templates on the fly. Performance Arps Need a fast string ostinato? synth pattern? or maybe a harp glissando? Create a specific Multi that uses the PC4’s Arps to enhance your performance. Key Triggers Key Triggers (1-12) are switch controllers designed to act as either a simple switch OR to allow you to play chords from a single key. When setting the “Mode” to Chord, added parameters appear on screen allowing you to designate the trigger “Key” along with settings for building a chord of up to 8 notes. This facilitates playing larger chords with ease. This same approach can also be used to create epic drum/percussion hits triggering up to 8 of your favorite VI drum hits simultaneously, each with its own velocity setting for creating the perfect balance. |