K2500 OVERVIEW |
Discontinued Model
Downloads and support materials maintained here as a courtesy to owners.
FAQS |
Audio Output
Disk Mode, Drives & SCSI
When I turn on my unit, the display says “About to Load Startup File”, and then switches to “Problems Loading Disk” or other error message.
Answer:
The problem is that the Startup parameter on the Disk Mode page has been enabled, set to a SCSI ID number, Floppy, or SMedia (K2661), and you do not have a Boot Macro on the specified disk. If you set it to Off, these messages will not show up when you turn on the unit.
A Boot Macro is located at the root level of a disk, which will load automatically when you turn on the unit. By setting the Startup parameter to a value other than Off, you cause the Kurzweil to look for a file called BOOT.MAC on the root level of the specified disk and load that file when you turn on the unit. If you have created a Boot Macro and still see these messages, check to make sure the Boot Macro is saved at the root level on your disk, and that Startup is set to the correct SCSI ID number of your drive (or to floppy, or SMedia if you are using those instead).
For more information on Macros and the Boot Macro, please see the “Using Macros” tutorial here. Additional information can also be found in the disk mode chapter of your manual.
Question:
What are the basic guidelines in using my K2 with SCSI devices?
Answer:
- Never, ever plug or unplug SCSI cables when your equipment is turned on. SCSI cables carry power. The act of plugging or unplugging cables causes momentary short circuits, which can result in damage to the internal circuitry of your SCSI device. The only damage that usually occurs to SCSI hardware comes from static electricity “zapping” SCSI connector pins when the cables are disconnected. The silver colored shell of the SCSI connector on the end of the cable is connected to ground and is safe to touch, but the brass colored pins inside eventually lead to the SCSI interface chip and are vulnerable. One should discharge static from one’s body before touching SCSI connectors by touching the 1/4″ jacks on the rear of the Kurzweil or another grounded metal object. Any devices connected to the SCSI bus should be turned off when plugging or unplugging SCSI cables.
- Including a minimum of 1 foot for internal cabling of each device in the chain, the total length of the chain should not exceed 18 feet. There are some people who suggest that you shouldn’t go over 10 feet, but in our experience, if you use good cables and follow the rules of SCSI, you can create a chain up to 18 feet in length (which is what the SCSI specification says is allowed).
- No single cable length in the chain should exceed 8 feet.
- The first and last device in the chain must be terminated. Poor termination is a common cause of SCSI problems. Having more than two terminators on the bus will overload the bus drivers. This will not cause permanent damage to the hardware. However, poor termination can corrupt the data on your disk. There are two “exceptions” to this rule. If the chain is less than 18 inches only 1 terminator is needed. If the chain is 10 feet or more, the chain may need to be terminated at the 10 feet point, using a pass through terminator. The reason that we say you “may need” to do this is that we have found that some people don’t seem to require a third terminator, while others can’t get a longer SCSI chain to work without one. The Kurzweil comes internally terminated, and so you will normally want it to be on one end of the chain. The K2000 and K2661 keyboards must be at the end of the chain since they only have one SCSI port. (If you are hooked up in a chain with a computer, the computer will always be the other end of the chain.) If you need to have the Kurzweil in the middle of the chain, the termination must be removed. This should be done by an authorized service center. In the case of the K2000, it involves removing termination resistors. In the case of the K2500, there are several different possibilities – some have termination resistors that must be removed, others have jumpers that get moved. The newest K2500s and all K2600s have a termination switch on the back, so you can disable termination yourself. If you install an internal drive in the Kurzweil, termination must be removed from the Kurzweil. If the Kurzweil is at the end of the chain, termination resistors should be removed from the K2000 and the termination left on the internal drive. This makes the drive at the end of the chain. If you install an internal drive and the Kurzweil is in the middle of the chain, termination must be removed from both the Kurzweil and the drive. If you add an internal drive and the Kurzweil is not hooked to any other devices, termination should still be removed from the Kurzweil. (See the rule about a chain less than 18 inches, above.) External drives may or may not be internally terminated. If a drive is not terminated and is on the end of the chain, you can purchase an external termination clip, which plugs onto the second SCSI port (most drives will have two ports). Some drives also have an automatic termination feature – if you only have a single SCSI cable plugged in, the drive terminates itself, but if you plug in a second SCSI cable, termination is turned off.
- Use only true SCSI cables – high quality, twisted pair, shielded SCSI cable. Do not use RS232 or other non SCSI cables. The majority of SCSI cables we’ve tested were poorly made and could cause damage to data transferred to and from the disk. Nearly all the SCSI data problems we have encountered have been due to bad cables that didn’t twist pairs of wires properly. Good cables that use twisted pairs of wires and twist each SCSI signal wire with a ground wire are essential to reliable data transfers to and from the disk drive.
- Impedance mismatching between cables from different manufacturers can cause problems. Avoid this when possible by getting all your cables from the same manufacturer.
- Each device in the chain (including internal hard drives) must have its own unique SCSI ID. For the SCSI1 and SCSI2 protocols, there are 8 ID numbers (0-7). For SCSI3, there are 16 ID numbers. The Kurzweil is SCSI1 and SCSI2 compatible. If you have a SCSI3 device, it should be backwards compatible with SCSI1 and SCSI2, but you should make sure to set the ID numbers to 0-8 if you want the Kurzweil to be able to access that device. The default Kurzweil ID is #6. Macintoshes use ID 7 and SCSI cards for PCs are also normally set at 7. The internal drive of a computer is normally set at 0. For an external drive, there will usually be an external switch which allows you to choose the ID, although with some drives, it may have to be done by opening the drive and changing jumper pins. Most drives will allow you to choose any ID, although there are some which limit your choices – for example the Zip drive only gives you the choice of 5 or 6. You can change the SCSI ID of the Kurzweil on the MIDI Receive page, but we recommend leaving it at 6 and changing your other devices if needed, since each time you hard reset the Kurzweil, it returns to 6. If you forget to change it after a reset and have a SCSI ID conflict, you can lock up your SCSI chain and forget the reason why. One thing to watch out for if having a hard drive installed in the Kurzweil – many fixed drives come set with their default at 6 (the same as the Kurzweil). Make sure your service tech knows to set the ID to a different number (this is normally done by moving jumper pins on the drive). One curious side effect of this problem – if the internal drive is set to the same number as the Kurzweil and you have nothing else in the SCSI chain, then you will see the drive show up on every ID except for its own (the Kurzweil shows up on that ID, since it is also on the ID). If you do have more than one device with the same ID, the Kurzweil may lock up when you scroll through the SCSI numbers in Disk mode, or if you are in a chain with a computer, it may not boot up at all. If you have more than one Kurzweil, they can be on the same chain and both be able to access any drive in the chain (though not at the same time). Make sure to change the ID on one of them. If you are having problems getting the Kurzweil to see a device on the chain, sometimes just changing its ID to a different number may fix the problem, even there was no device ID conflict before. There is no logic to this phenomenon – it’s just another SCSI weirdness. As a general rule, we recommend only changing the ID of a drive when the system is powered off. It is possible (although unlikely) that data could be corrupted if the ID of a drive is changed while it is turned on.Theoretically all eight SCSI IDs can be used, however, we often hear of users having problems with more than 5 IDs. This may be more of a result of not following all the other rules (especially concerning cables), but some SCSI devices seem to be picky. We have also gotten reports from users who state that they can only get their SCSI chain to work when their devices are hooked up in a specific order. Other than having the two ends of the chain terminated, order should not matter, and yet it does for some people. This may be due to impedance variations in the various units, varying internal cable lengths, etc. The bottom line is that if you are having problems getting your chain to work and you have followed all the other rules, try changing the order of the devices.
- If the Kurzweil is in a chain with the computer, power up the Kurzweil and other devices before booting up the computer. Some people report that they can’t get their computer to boot up if the Kurzweil or other devices are turned off, while others are able to do this Your best bet is to have everything turned on.
- Like with any disk that is read to and written from many times, the data on a Kurzweil disk can become fragmented. If the disk becomes severely fragmented, there is a chance that the file allocation table can become corrupted and some or all of the files unreadable. For this reason, we recommend that every so often you back up all your data to another drive and reformat your disk. Or, if the disk was formatted in DOS from a computer you can run an optimizing/deframenting a program to maintain disk health.
Question:
How can I burn a CDROM of Kurzweil data for loading into my K2?
Answer:
If you want to burn your own CD-ROM for your Kurzweil, you will need to be aware of the following information:
For K2000 Series Models with version 3.87, or K2500 Series Models with version 2.88B (Non-KDFX) or 4.21B (KDFX) or later, or any K2600/2661 Series
These versions add support for ISO 9660, making it extremely easy to burn a CD-ROM. You should consult your CD-Writer software for instructions on how to burn a CD-ROM in ISO-9660 format. Of course, your computer will need to be able to read the disk that contains the data you want to burn on to the CD-ROM. There are a few rules you should be aware of for burning an ISO-9660 disk.
ISO9660 support key points:
- The Kurzweil OS supports CD-ROM XA (Mode 2) as well as CD-ROM (Mode 1)
- The Kurzweil OS supports multi-session CD’s, but some older CD-ROM drives may not support multi-session. In this case you will only see the first session.
- File naming conventions that work: ISO-9660 level 1, MS DOS, and Joliet.
- Do not select “use Macintosh extensions” when making ISO-9660 CD’s.
- Do not select “append version numbers” when making ISO-9660 CD’s.
- The maximum “path-length” (total file name, including directory names and slashes) is 63 characters, which means that files in highly nested directories may not be loadable.
- Unicode characters do not display correctly.
For All K2000 and K2500 Series Models with older OS versions
These older versions don’t support the ISO-9660 format, which is often used by computers. So to burn a CD, you must make a disk image copy of the DOS or Kurzweil formatted source disk that has your files. In essence, you will need to have another drive which is used as “staging” drive. By making a disk image copy, you copy sector by sector the exact format and data on the staging drive.
There are a couple of issues to be aware of. First of all, if you have a drive on which you have been constantly loading files, editing them, and resaving them back to the disk, you are likely to have a fair amount of disk fragmentation. Although not necessarily essential, it is recommended that the staging drive be defragmented. If the disk is currently in DOS format (instead of being formatted by the Kurzweil), you can use disk utilities program to defragment the disk. If the disk is in Kurzweil format, or you don’t have a disk utility program, then the solution is to use the Kurzweil to backup all the data to another drive, reformat your staging drive, then restore the data to the staging drive using the Backup or Copy functions.
The second issue concerns drive size. If your staging drive is less than the maximum size of a CD-ROM (650 Mb), then you can simply make the disk image copy. But if the staging drive is larger than 650 Mb, then you need to be able to only copy a certain portion of the staging drive. In this case, defragmenting the drive is absolutely essential. Since a disk image copy simply copies data sector by sector, without regard to what is in those sectors, all of the data for your CD must be contained within the first 650 Mb of sectors on the disk. Also, your CD-ROM burning software will need to have the ability to copy only a specified part of the staging drive when doing a disk image copy. You will want to consult your CD-ROM burning software to find out how to burn a disk image copy.
K2x00 CD-ROM Image Maker is a freeware program for the PC, created by Bernard Perbal, which allows you to create a disk image file.
Question:
What SCSI CDROM and other removable drives are compatible for use with my K2?
Answer:
The K2 series supports the use of SCSI-1 or SCSI-2 compatible devices. SCSI drive compatibility and capacity issues have been improved during the lifetimes of these products. To have the best possible compatibility, we strongly recommend downloading and installing the current version of the Operating system if you have a K2500, K2600 or K2661.
For K2000/K2vx owners, who must purchase the update and have it installed by a service center, we strongly recommend updating if you have a version prior to 3.52.
CD-ROMs – Most are compatible. One exception is NEC drives – most older NEC drives will not work, although some newer NEC drives were reported to work. Problems have also been reported with the Plextor 12x CD-ROM.
- For versions of the K2000 3.18 or earlier and the K2500 2.13 or earlier, drives must be able to support 512 bytes per sector. Drive mechanisms from the following manufacturers are known to support this format: Sony, Toshiba, Chinon, Plextor, Aiwa, and Matsushita. (Chinon drives not compatible with a K2000 with v2 or earlier.) Faster speed may not work in these older versions of the OS – you may have to look for an older, slower speed drive.
CD-ROM Speed – Most of the newer, faster drives will work, but will not perform any faster than slower models.
- For the K2600, and the K2500 starting with v2.52, drives up to 8x will perform faster than a slower version. Drives faster than 8x will function correctly but not perform faster.
- For the K2000 with v3.87, drives up to 4x will perform faster than a slower version. Drives faster than 4x will function correctly but not perform faster.
- For versions of the K2000 previous to 3.87, and versions of the K2500 previous to 2.52, drives faster than 2x will not perform any faster than a 2x drive.
Writeable CD-ROMs – supported in later versions of the operating system for reading disks only. You can’t burn a CD from the Kurzweil. Our page on Burning a CD-ROM disk contains more details.
- Supported for the K2600, the K2500 with versions 2.88 or higher, and K2000 version 3.87.
- Not supported for versions of the K2500 previous to 2.88 or the K2000 previous to 3.87.
Iomega (Bernoulli, Zip, and JAZ) – Compatible. However, these drives are designed so that they go to sleep if the cartridge is not accessed after a specified time.
- For versions of the K2000 3.18 or earlier and the K2500 2.13 or earlier, this auto sleep function will cause the Kurzweil to lock up, either immediately or when Load is pressed. To avoid this problem, eject the disk when not in use. This prevents the drive from going into sleep mode, and therefore prevents the lockup.
Syquest – Compatible.
Orb – Compatible
Magneto Opticals – Most 230 Meg drives and cartridges are compatible. Media must be hard formatted as 512 bytes per sector. Larger drives use a format of 1024 or greater bytes per sector and therefore will not work.
Tape Based Drives – Not supported.
Question:
I have a Kurzweil format CD-ROM. I put it into my computer and received a message saying it could not read the disk.
Answer:
There are two problems with putting the CD in your computer:
- The first is that initially in their development, the K2 series units (K2000+K2500) did not support the ISO-9660 format, which is often used by computers for a CD-ROM format. As most commercially available Kurzweil soundware CDROMs were created in these “early years”, your computer must be able to deal with a CD that is not in ISO-9660.
- The second problem has to do with the formatting of the disk itself. The disk will be a disk image copy of the DOS or Kurzweil formatted source disk that originally contained the data. Our disk format is similar to but not fully implemented DOS. So if the disk was taken from a Kurzweil formatted source disk, the computer may or may not recognize that format, depending on the drivers or software running in your computer.
Note: For user-created disks made with a K2500 with an OS version 2.88 or later for non-KDFX units or 4.21 or later for KDFX units or with a K2600/2661:
Starting with these versions, we added support the ISO-9660 format, so if the disk was burned using IS0-9660, the computer should be able to read the disk. However, remember again that most commercially available CD-ROMs were created prior to the addition of this ability and instead were burned as disk image copies, so you are still likely to run into the situation described above.
Question:
What CDROM sample disks are suitable for use with the K2?
Answer:
Many 3rd party companies have released CDROMs in K2000/K2500/K2600 format. Please see our Developer Listing for info on some of these companies.
Aside from native titles, the K2 can also read Roland S series, Ensoniq EPS, and Akai S1000/3000 series, format CDROMs (version 3 or later required for the K2000). It is important to understand that with foreign formats, the samples and keymaps will be read, but not the other program information (envelopes, filter settings, modulation routings etc.). For a CDROM of loops, sound effects, or any file where there is little or no programming added to the sample, you will be able to obtain good results very easily – but for a CDROM file that has an extensive amount of programming, the samples will convert correctly but the programs may sound different. Some programming effort may be required to duplicate the programs as they were on the original sampler. Also, file loading times are slower for conversions from other formats. If given the choice between a native Kurzweil format CDROM or a foreign format disk, you will want to choose the Kurzweil disk.
In addition to prefabricated soundware titles, the K2 can also import raw .WAV and AIFF sample files. If you have a CDROM of .WAV or AIFF files, they are typically formatted in ISO-9660 format. If you have current versions of the operating system for your K2500 or K2000 or a K26000, you will be able to read these disk. Older versions (for the K2000 and K2500) do not support ISO-9660, but if you use your computer to copy the files from the CDROM to a DOS formatted disk, you will be able to read them.
Question:
How can I get a K2 sequence into an external sequencer?
Answer:
The easiest way to export a K2 sequence to another sequencer is to save the file as a .MID file to floppy disk (SMedia for K2661 users) and then insert that disk in your computer for copying (may require adding a USB-floppy or USB-SMedia drive to your computer).
On the K2, the steps to generate a .MID file are:
- Go to Disk mode
- Press [ SAVE ]
- Press [EXPORT]
- Press the [ MIDI ] soft button. You will see a list of all Songs currently in the K2’s memory
- Highlight the song you want exported and and press [ OK ]
- Follow through the rest of the save dialogs (naming and selecting Type 0 or 1 file type)
Model-Specific Notes:
K2000 require OS v3.87 in order to save a Type 1 .MID. Older versions can only export a Type 0 file.
K2500 require OS 2.52 or better in order to save a Type 1 .MID. Older versions can only export a Type 0 file.
K2600/2661 units can save Type 0 or Type 1 files regardless of OS revision.[/fusion_text]
What’s the Difference Between Type 0 and Type 1?
Type 1 files contain separate information for each track. For a Type 0 file, however, all the tracks are merged into a single track, although MIDI channel information is still retained. When a Type 0 file is loaded into a sequencer, it will take each channel’s information and put it on a separate track. So for a typical sequence with one track per MIDI channel, it will normally not matter if the sequence is saved as Type 0 or Type 1. But if your source sequence has several tracks assigned to the same MIDI channel (for example several drum tracks playing the same program on the same channel, but with an individual drum sound on each track), then it is best to export it as a Type 1 file. If exported as Type 0, all tracks assigned to the same channel will be merged into a single track when the .MID file is loaded.
An Alternative Way to Move a Sequence to Another Sequencer
If your external sequencer can’t read a .MID file, or you have some reason for not wanting to export it in that format, you can record a sequence in real time from the K2 to another sequencer. Make sure that the Control parameter on the MIDI Transmit page is set to Both and that the tracks in the song are all assigned to Local + MIDI (each Track Destination parameter on the Song Edit COMMON page will be set to “-“). On the Song Mode MISC page, make sure Sync is set to Transmit or Both. On the external sequencer, set it to sync to an External Clock. Set up the tracks on the external sequencer to match all the channels being used on the K2 sequence and make sure it is set to Multi-Record. (This will allow you to record multiple channels of information in one pass. If the sequencer can’t do this, you will have to make one pass for each MIDI channel.) Then press Record on the external sequencer and Play on the K2. The data will be recorded in real time.
[/fusion_toggle]
Question:
What are the steps to format a floppy disk?
Answer:
- Write enable (tab in the down position-window closed) a blank disk or one you wish to erase; place it in the drive.
- Press the DISK button.
- Press the soft button under Format. (you may need to press the [more] buttons to locate this selection)
- Respond to the question “Format this disk?” by pressing the soft button under the YES response.
- The display will allow you to select whether the disk should be formatted as a 720K or 1.4M disk. Make your selection depedning on the type of disk you are using (1.4M HD disks are most common)
- Respond YES to the question asking “This will erase everything. Continue?”
- Press the YES button again when the display asks a final time “Are you really sure?”.
- When formatting is done, in later model OS’s, you may next be prompted to “format another floppy?” (yes/no), otherwise the display will return to its previous state.
Question:
What SCSI hard drives are compatible for use with my K2?
Answer:
The K2 series were originally designed to support the use of SCSI-1 or SCSI-2 compatible devices (note the use of Ultra160 drives is also feasible with some modifcations, see here).
SCSI hard drive compatibility and capacity issues have been improved during the lifetimes of these products. To have the best possible compatibility, we strongly recommend downloading and installing the current version of the Operating system if you have a K2500, K2600 or K2661.
For K2000/K2vx owners, who must purchase the update and have it installed by a service center, we strongly recommend updating if you have a version prior to 3.52 (if you update to the current version 3.87, one advantage is that SCSI Load and Save times will be 2-3 times faster.)
OS Specific Compatibility:
K2500 (without KDFX) v2.98 or later
K2500 (with KDFX) 4.44 or later
K2600 v2.0 or later
K2661 any:
The K2500/K2600 can address up to 8 Gig of hard-disk space, in 2 Gig partitions. This is true for any hard disk formatted with the DOS-compatible FAT-16 format. Hard disks larger than 8 G can be formatted to make 8 G (in four partitions) accessible to the K2500/K2600. When properly partitioned, the K2500/K2600 files on your hard disk should be accessible to both the K2500/K2600 and your personal computer, if you’re using one. We strongly recommend that you partition your hard disk from the K2500/K2600, although it’s possible to partition it from a PC. We don’t recommend formatting from a Mac, but a Mac will be able to recognize a Kurzweil formatted drive.
K2000/K2vx v3.52 or later
K2500 v2.13 through v2.96
K2500 (with KDFX) v4.0 through 4.32
K2600 v1:
These versions will work with a drive that is 2048Mb (2 Gig), or less. These figures apply to the available space AFTER the drive has been formatted. If a larger drive is formatted in DOS from a computer, and the first partition is kept within the above limits, that drive will function with the Kurzweil, since these versions do not support partitioning and therefore the Kurzweil only sees the first partition. If a larger drive is formatted from the Kurzweil, the drive will be formatted to 2048 Mb and the rest of the drive capacity ignored.
K2000/K2vx 3.18 or earlier
K2500 v2.08 or earlier:
These versions will work with a drive that is 1023Mb (1 Gig), or less These figures apply to the available space AFTER the drive has been formatted. If a larger drive is formatted in DOS from a computer, and the first partition is kept within the above limits, that drive will function with the Kurzweil, since the Kurzweil only sees the first partition. (K2000 requires v3 or later for DOS compatibility – if you have an older version, the drive must be formatted from the Kurzweil.)
For the K2000/K2vx with an OS of 3.18 or earlier, the following limitation applies to units without the PRAM option installed. For Backup and Copy functions, the combined size of the 2 drives must not exceed 1023 MB. This limit does not apply if PRAM is installed.
Internal Drive Installation Specifications:
Installation of an internal drive requires a hard drive installation kit.
- The K2000, K2vx, K2000R and K2500R require the HDC-1 kit.
- The K2500 keyboards require the HDC-25K kit.
- The K2600 racks require the HDC-26R kit.
- The K2600 keyboards require the HDC-26K kit.
- The K2661 does not support an internal hard drive – only external.
These kits do not contain a SCSI hard drive.The internal hard drive must be installed by an authorized service center.The following specifications apply:
- Operating Temp: 50 [C] 122 [F]; for K2000/K2vx Keyboards: 55 [C] 131 [F]
- Height: 25.4mm [1″]
- Width: 101.6mm [4″]
- Length: 146mm [5.75″]
- Mounting: Industry Standard 3.5″ x 1″ Drive
Power Consumption Specs:
The following charts show power consumption requirements for the various models. Regarding the K2000/K2vx Keyboard models, the low power consumption requirements mean that in practical terms, most drives above 800 Meg will draw too much power.
For the K2000, K2000VP, & K2vx Keyboards:
| +5VDC | +12VDC | |
| Start Up: | <.625A | <1.0A |
| Read/Write: | <.625A | <.75A |
| Seek: | <.625A | <.75A |
| Idle: | <.625A | <.75A |
For the K2000 Rack:
| +5VDC | +12VDC | |
| Start Up: | <1.0A | <1.5A |
| Read/Write: | <1.0A | <1.0A |
| Seek: | <1.0A | <1.0A |
| Idle: | <1.0A | <1.0A |
For the K2500 and K2600 Rack and Keyboards:
| +5VDC | +12VDC | |
| Start Up: | <2.0A | <3.0A |
| Read/Write: | <1.0A | <1.5A |
| Seek: | <1.0A | <1.5A |
| Idle: | <1.0A | <1.5A |
Drive Vendors:
Finding suitable drives (especially those with low enough power consumption to be used as an internal drive for the K2000 keyboard and rack) can be very difficult these days.
Therefore we recommend the following web sites as possible sources for older, smaller drives. Of course, there is no telling how long these older drives will continue to be available.
Question:
How can I save a multi-timbral setup?
Answer:
We don’t store multi-timbral objects in our architecture. However, you can save this information to disk by saving the Master table, which consists of the parameters on the Master, Effects, Sample, Song Mode MISC, and all 3 MIDI pages, including what program is on each channel. Think of this sort of like a “snap-shot” of all 16 channels and their current settings. When you load the file with that Master Table, the multi-timbral configuration will be recalled.
Procedure:
- go to Disk Mode
- select the disk you wish to save to (Current Disk field)
- press [ SAVE ]
- scroll to the near the bottom of the bank list and select “Master”
- press [ OK ]
- if asked “Save dependent objects?”, press [ Yes ]**
- name the file (optional but recommended)
- choose directory (optional)
- press [ OK ]
**If any RAM programs are currently assigned to a MIDI channel, or the Current Song is a RAM Song (anything other than Song 1), or any other RAM objects are assigned on the Master or MIDI pages, the Kurzweil will ask if you want to save dependent objects. If you answer yes, all RAM programs, songs, keymaps, etc. currently being accessed will be saved along with the Master Table.
Note: you can also do a sysex dump of the Master Table to an external device capable of recording sysex. Dependent Objects, however, are not dumped automatically along with the Master Table.
Question:
Can I load a K2000 file into a K2500/K2600 or vice versa?
Also I am trying to load a K2500/K2600 file into my K2000 and it does not see the file on the disk.
Answer:
Loading K2000 files into the K2500/K2600
The K2500/K2600 can load the .KRZ files created by the K2000 without any problems. However, there are a few differences to be aware of:
ROM Drum samples. While most of the samples in the base ROM are compatible between the K2000 and the K2500/K2600, the drum samples are not. The K2500/K2600 drums are made from new recordings and a slightly different selection of drums is offered (e.g., three ambient snares instead of four). Furthermore, all drums and percussion were grouped in one multi-root sample in the K2000 (Sample #20 Drums and Percussion), but in the K2500/K2600 they are available as separate samples addressed by number. For this reason, K2000 programs which use Drum keymaps will not normally work correctly on the K2500/K2600.
ROM Effects programs. The original K2000 effects were reprogrammed for greater s/n ratio, and reorganized for ease of use or even revoiced for the K2500. The Effect page in the program editor always points to an Effect program, and has several parameters for real-time control. Typically, programs developed for the 2000 series will use factory default effects. When these programs are loaded into a K2500, they will not call the correct effect. However, the K2vx and K2000VP feature the same preset effects as the K2500/K2600, so if the program was created on one of these instruments, the effects will sound identical on the K2500. The K2600 does not have the Digitech effects in it, so this is not an issue for the K2600. Instead, when loading a file into the K2600 from a K2000 (or a K2500 without KDFX), the K2600 will automatically create KDFX settings to mimic the Digitech effects.
ROM Keymaps. An effort was made to keep instrument keymaps in the same order as in the K2000 because the keymap must be correct for a program to sound correct. Keymaps 20-30 and 173-176 have been replaced and subtle improvements in volume have been made to others. Programs using these keymaps will either say “Not Found” or call up a different Keymap.
Sequencing Issues. If a song was created on the original K2000 and it uses the ROM presets, it will of course not call up the correct programs. If the song was created on a K2vx or K2000VP and you load it into a K2500, it should play the song correctly, although you may find some differences with the drums. (Of course, if it requires any sounds from the optional ROM blocks and you do not have those blocks in your K2500/K2600, the song will not be able to play those sounds.) The K2600 has all new programs, so once again, any program changes calling up ROM programs will not call up the correct sounds.
For all of the above reasons, we have created a K2000 compatibility disk for the K2500/K2600 which addresses these issues and is included in the box with the other factory disks. The K2600 also has a K2500 compatibility file. Instructions on how to use these files can be found in Appendix B of the K2500/K2600 Reference Manual. The compatibility files (and manunals) for the K2500 and K2600 can be downloaded from each respective product download area.
Loading K2500/K2600 files into the K2000
In general, K2500/K2600 files can be loaded into a K2000. However, there are some critical issues to be aware of:
- Setups from a K2500/2600 can’t be loaded into a K2000 due to differences between Setups in the two units.
- Programs saved in a K2500 with the KDFX option or in a K2600 can’t be loaded into a K2000 with an OS version 3.54 or lower. Version 3.87 can load in the program. Of course, all of the KDFX information is ignored, and you will probably want to select an appropriate effect and turn up the wet/dry mix.
- The K2500 saves files with a .K25 extension; the K2600 saves them with a .K26 extension; the K2000 saves them with a .KRZ extension. However, the file formats are the same. If the K2000 has v3.18 or later, it will recognize the .K25 and .K26 extensions. If the K2000 has an earlier version, it does not recognize that extension and therefore can’t see the file on the disk. However, if you use a computer to change the extension from .K25/.K26 to .KRZ, it can then load the file.
- As described in the previous section, the drum samples in the K2500/K2600 are different then those in the K2000. Any programs which use the ROM drum samples will not play on the K2000.
- As described in the previous section, the preset Digitech Effects are different in the K2500 than the original K2000. Because of this, any programs which use a preset effect will not sound correct, and since the K2600 does not have the Digitech effect, the KDFX info is ignored. In both situations, you will probably want to select an appropriate effect and turn up the wet/dry mix.
- A few K2500/K2600 programming parameters or parameter values are not available for the K2000. If these parameters are left at their defaults, the program will load in identically. For some parameters, the K2000 will simply choose its normal value if the K2500/K2600 value is not available. For a couple of other parameters, such as Impact, a value other than the default will cause the program not to be loaded if the K2000 has version 3.54 or earlier of the operating system. Versions higher than 3.54 will load in the program. (Any other programs in the file will be loaded.)
Question:
When I try and load a file I get the message “Not Enough Memory to Complete This Load”. How can I tell how much memory I have available? and how can I load what I need to load?
Answer:
Not enough memory to complete this load.


                                   OK
|
This messge indicates that you do not have enough PRAM memory to load the selected item.
The key to managing your memory is to first realize that there are two types of user memory in the K2, PRAM and Sample RAM, and each serves a different purpose.
Sample RAM vs. PRAM
You can see the memory you have available by going to either the Master or Disk mode menus. In our example here, we have gone to Disk mode. Depending on your model, your screen will look similar to this:
DiskMode Samples:131072K Memory:1502K CurrentDisk:Floppy Startup:Off Library:Off Verify :Off Load Save Macro Delete more> |
PRAM:
PRAM is battery backed memory and its gauge is displayed in the upper right hand corner (Memory:). It is used for saving user objects such as programs, keymaps, setups, QA banks, and sequences. In fact, everything that can be named and saved goes into the battery backed RAM except for the actual audio sample data. When the K2 is powered off, the battery kicks in to retain those items in PRAM.
For the K2000, the total memory allocated to all of these objects is 120K expandable to 760K with the PRAM option.
For the K2500, it is 256k, expandable to 1280k with the PRAM option.
For the K2600, it is 486k, expandable to 1502k with the PRAM option.
For the K2661, the total memory is 1502K, and there is no PRAM expansion option.
Sample RAM:
Sample memory (SIMMs) is NOT battery backed (i.e. volatile) and its gauge is displayed in the top center of the display (Samples:). Its sole purpose is to hold user audio data (samples) while the power is on. Its contents erases when the unit is powered off. Programs, keymaps, setups, QA banks and sequences cannot access this memory; it is reserved strictly for RAM sample data.
The K2000 can have up to 64MB of sample RAM.
The K25 and K26 series units hold up to 128Mb.
Memory Management
So if you get a message saying not enough memory to load it simply means you do not have enough PRAM left to load the file in question. The next thing to figure out then is how to still find a way to load the desired file(s).
One brute force solution is to purchase and install the appropriate PRAM kit for your unit. With the exception of the K2661 (which has no PRAM expansion) you can significanlty increase your PRAM storage capacity by way of this option.
A more economical approach (and/or if you already have the PRAM expansion) would be to do a little house cleaning, deleting from RAM objects not really needed at the moment. There are several ways to go about this:
-
- Broad method: you could hard reset the machine and delete all user memory, providing you with a clean slate and full PRAM to work with. Of course you would want to save to disk any custom content not already backed up before prroceeding as hard resetting will clear any objects you have made or loaded. (Reset procedures: K2000, K2500 , K2600 , K2661)
OR
- A more selective approach: use the Master menu, Object/Delete tool to hand-pick the items you wish to clear from memory (see the “Object Utilities” section in the Master Mode chapter of your manual for details).
Question:
What kind of sample files can the K2 Series import, and what information is imported?
Answer:
The K2 can import files from Akai S900, S1000, and S3000 series, Roland S700 series, and Ensoniq ASR series samplers via SCSI. Akai and Ensoniq files can also be imported via floppy (excluding the K2661 which does not have a floppy drive). Only the sample and keymap information is imported. No programming parameters (LFOs, Envelopes, Filter settings, etc.) are imported, so they must be reprogrammed on the Kurzweil once the file is imported.
In addition, the K2 can import WAV and AIFF files from DOS formatted disks as well as ISO-9660 CDROMs (latest unit OS’s required). The Kurzweil can also send and receive samples via SCSI using the SMDI (SCSI Musical Data Interchange) protocol, used by some sample editing software.
Question:
Are Ultra 160 SCSI drives compatible with the K2 series models?
Answer:
As technology progresses, it is becoming harder to find drives that are directly compatible with the Kurzweil K2000/K2500/K2600/K2661 products. Although originally designed to work with SCSI-1/2 devices, it is possible to use later-design SCSI drives, such as the Ultra 160 SCSI drives. However, it is necessary to use adapters, and to set the drive for (SE) Single Ended operation. The SCSI interface on the Kurzweil is a SCSI-1 8 bit single ended interface. Newer drives such as the Ultra 160 have a 16 bit interface, and operate with LVD (low voltage differential) connections. It is possible to connect the 8 bit drive controller used in our products to a 16 bit drive. The drive will not be as fast, but it will work. The unused 8 bits on the drive must be terminated. An adapter or cable with high-byte termination is used for this purpose.
Connection Issues between the Ultra160 drives and the Kurzweil.
Kurzweil:
- SE. Data is Single Ended. The drive must be set for compatibility.
- Narrow (8-bit) bus.
- Internal connector; 50 pin Male.
- External connector; 25 pin D type Female.
Ultra 160 Drives:
- LVD though SE capable. Data is Low Voltage Differential, though most drives can be set for Single Ended. This is important and necessary, as the drive needs to be set to SE mode to work with any of our products.
- Wide (16-bit) bus. It is possible to connect a wide drive to a narrow interface, though an adapter is required that will terminate the high byte that is not connected to the 8-bit interface on the Kurzweil.
- Connector style HD 68 pin Female or SCA 80 pin Female.
Adapters & Cables
As stated above, it is important that when going from the Kurzweil to an Ultra 160 drive, the cable or adapter has high byte termination. We recommend RAM Electronics as a source for cables an adapters which are correctly terminated. If you choose another source for your cables or adapters, please be sure to confirm that they are high byte terminated. In addition, there is a a secondary issue if using an adapter for an internal drive. All of the Kurzweil products (except the K2600R) have limited space to mount the SCSI drive. Drive adapters must be physically small to fit. Several adapters that we tested would not fit in the Kurzweil. In the connection examples below, we have given the RAM Electronics part numbers for the various cables and adapters you might use.
How to connect an internal SCSI Ultra 160 drive SCSI Ultra 160 Drive with HD68 pin header.
- Make sure to check the power requirements for the drive and check them against the K2 limits (listed here). Generally, only the K2500/2600 keyboards and K2600R can power an Ultra 160 drive.
- IDC 50 Female to 50 Female cable. Connect one side of this cable to the internal SCSI header, and on to the adapter (described next).
- IDC50 Male to HD68 Male adapter with high byte termination (Ram Electronics SM-058).
- Connect the SM-058 adapter to the drive.
- Make sure that the drive is set for SE mode. This will probably be done with a jumper on the drive. Check the drive literature. Some drives have a jumper setting for Narrow (8 bit) operation. Make sure that this jumper is in place.
SCSI Ultra 160 Drive with SCA80 pin header.
Note: All of the Kurzweil products (except the K2600R) have limited space to mount the SCSI drive. Drive adapters must be physically small to fit. We have not yet found a single high byte terminated adapter that converts from IDC50 Male to SCA80 Male. Therefore, you need a 50-68 pin adapter plus a 68-80 pin adapter, and both these adapters will not physically fit in any product except the K2600R. For this reason, we recommend using a drive with 68 pin connectors, and use a single adapter such as the SM-058. If you do have a K2600R and use a drive with an 80 pin connector, the following would apply:
- Make sure to check the power requirements for the drive and check them with the K2 power requirements.
- DC 50 Female to 50 Female cable. Connect one side of this cable to the internal SCSI header, and on to the adapter (described next).
- IDC50 Male to HD68 Male adapter with high byte termination (Ram Electronics SM-058).
- HD68 Female to SCA80 Female (Ram Electronics SM-043). Connect this to the SM-058 adapter.
- Connect the SM-043 adapter to the drive.
- Make sure that the drive is set for SE mode. This will probably be done with a jumper on the drive. Check the drive literature. Some drives have a jumper setting for Narrow (8 bit) operation. Make sure that this jumper is in place.
How to connect an external SCSI Ultra 160 drive SCSI Ultra 160 Drive with HD68 pin header.
- DB25 Male to HD 68 Male cable (Ram electronics SCN-44012).
- Make sure that the drive is set for SE mode. This will probably be done with a jumper on the drive. Check the drive literature. Some drives have a jumper setting for Narrow (8 bit) operation. Make sure that this jumper is in place.
SCSI Ultra 160 Drive with SCA80 pin header.
- DB25 Male to HD 68 Male cable (Ram electronics SCN-44012).
- HD68 Female to SCA80 Male adapter with high byte termination (Ram electronics SM-018). Connect to cable and to drive.
- Make sure that the drive is set for SE mode. This will probably be done with a jumper on the drive. Check the drive literature. Some drives have a jumper setting for Narrow (8 bit) operation. Make sure that this jumper is in place.
Question:
How do I create a Macro file ? How do I get the K2 to autoload a file?
Answer:
How To Create a Macro:
A macro is basically a shopping list instructing the Kurzweil to load a predetermined set of files. In order to create a Macro there first must exist, on the disk in question, the files that you want the macro to load. Starting from the assumption that these files already exist, do the following:
- From DISK mode, press [Macro]
- Press [On]
- Set the Current Disk to the SCSI ID or floppy as applies.
- Press [Load]
- Select the first file you want the Macro to load; press [OK]
- Select the Bank where you want this file to load into.
- Press [Macro]
- Choose the Load method that you want the system to proceed with. (i.e. Overwrt, Append, etc.)
- Go to step 4 and repeat until all the files you want the macro to load have been entered.
- Once all the files are entered into the macro recorder, press [Save]
- Press [Macro], press [All]
- Name your Macro, choose a directory, and put it to disk.
- That’s it! Now press [Macro] again, and press [Off]
- Answer [Yes] to “Reset Macro?”. Done.
Now anytime you load that .MAC file, it will load all of the items that have been specified within it.
How To Create a “BOOT.MAC” File:
A BOOT.MAC file is simply a macro that will “auto-load” when the instrument is turned on. Do the following:
- Create your macro (follow the steps above on how to build a Macro) – In step 12 name it “BOOT” (without the quotes)
- Save “BOOT” to the root level directory (i.e. PATH=)
- On the DISK mode page, set “Startup:” to the SCSI ID (or floppy) of the device where this BOOT.MAC was saved
- That’s it! Every time you turn on the unit, it will load BOOT.MAC
Using SysEx To Automate Macro Loading:
First you will need to create a Macro (see above) that will do what you want. You can then save that Macro to disk.
The machine will load the Macro that’s in memory (not from disk) when it receives a certain sysex command. Here’s how. If the Macro you want is currently what is in memory, go to step 3. Otherwise, start with step 1:
- Clear any existing Macro in memory, and make sure Macro is On.
If Macro is Off, press DISK, [Macro], [On].
If Macro is On and contains info, turn Macro Off, then On again. (Press DISK, [Macro], [Off], [Yes], [Macro], [On].) - Get the Macro to be loaded into memory.
Press [Load], then select the Macro file you want, hit [OK], [Macro]. (Pressing [Macro] tells it to load the macro information into the Macro Recorder without actually loading the files.) - Record the Macro Object into your external sequencer via sysex.
Press MASTER, [Object], [Dump], scroll to “Table 35 Macro” in the list and press [OK] to dump. (Make sure your sequencer is recording.) - Record a “Load Current Macro” command into your sequencer via sysex.
While still on the Dump page and while the Macro object is still selected from step 3, pressing the right cursor button brings up the dialog “Send Sys/Ex Load Macro command?” If you then press [Yes], it sends the message. (Make sure your sequencer is recording.) - Leave enough time in the sequence for loading to complete before sending any note or controller data.
Having done this, on sequence playback, first the Macro object gets loaded into RAM as a sysex message, replacing whatever Macro object was already in the Macro Recorder. Then another sysex message (the “Load Macro Command”) causes it to load the current Macro and thus the files specified within it.
MIDI Controllers
Question:
What pedals can I use with my Kurzweil instrument?
Answer:
Switch Pedals
A foot switch pedal from any manufacturer is compatible with our keyboards. Japanese pedals are wired in reverse polarity from American pedals. But all our products check the pedal polarity on power up and reverse themselves if needed, so as long as the pedal is plugged in before you turn on the unit, any pedal will work (be certain to not step on the pedal during power up as this can interfere with the auto-calibration).
In addition, some keyboards use mono jacks for each switch pedal input, whereas other keyboards use a single stereo jack for two pedals.
The PC3 Series, K2 Series, K1 series, PC2 Series, SP2 Series, SP5, PC88, and KME61 use mono jacks for each pedal. The standard single pedal available from Kurzweil is the KP-1.
The SP4, SPS4-8, PC1, SP3X, SP76/88 Series, Rumour/Mangler, Mark ProOneiS, Mark ProTwoiS, RG Series, and Troubador use a single stereo jack for dual pedal units (not sold by Kurzweil). It is still possible to plug a single, mono plug pedal into these units but you will only have access to one of the pedals. If the pedal is plugged in all the way, it will be the Left pedal, and if the plug is pulled out slightly, it will be the right pedal. A stereo (M) to dual-mono (F) “Y” adapter can also be employed to permit the use of two, single pedals.
Continuous Controller Pedals
Our keyboards require a pedal with a TRS 1/4″ connector and 10k linear potentiometer. Most manufacturers EXCEPT Yamaha and Korg make pedals with the same specifications and should work. Yamaha and Korg pedals typically use an exponential potentiometer and therefore will not work correctly. The CC-1 pedal is available from Kurzweil. You can order a pedal through your “local Kurzweil dealer.
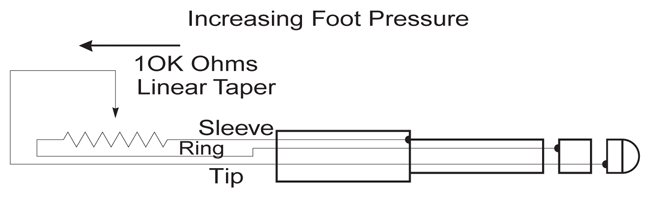
CC-1 Wiring Spec
The Control Pedal must be wired to a single stereo (TRS) 1/4″ plug as follows:
- Wiper to tip connection of 1/4″ plug
- Top end of resistance element to Ring connection
- Bottom end of resistance to Sleeve connection
Question:
I have a K2500/K2600/K2661. How do I assign the pedals, sliders, wheels, ribbons, etc. for Programs?
Answer:
The important thing to understand is that any physical controller (pedals, sliders, wheels, ribbons, buttons, etc.) can be assigned to send just about any MIDI message. In the case of a Setup, each controller can send any message on each zone. Therefore, a single controller could send just one message on one MIDI channel, or 8 different messages on 8 different channels, or the same message on 8 different channels, or any combination of the above.
When you are in Program Mode, (or playing a program in another mode) then the message sent by that physical controller is determined by the setup chosen for the “CtlSetup” (Control Setup) parameter (on the MIDI XMIT-Transmit Page). This setup functions globally no matter what program is called up (in fact it always functions unless you are currently playing a Setup). Since the keyboard only sends on one MIDI channel when you are not playing a Setup, only the settings for Zone 1 are used in the Control Setup. In other words, you can choose any Setup in the unit to function as the Control Setup, but it will only look at the Zone 1 settings. (In practical terms, it’s much more logical to create a single zone setup for use as the Control Setup, but you can actually call up any setup in the unit.)
To determine what message is being sent by each physical controller, highlight the “CtlSetup” parameter on the MIDI XMIT (Transmit) page, then press Edit. You will now be in the Setup Editor, the same as if you had gone to Setup mode and pressed Edit. Scroll through the pages and you can see what controller numbers are assigned to each physical controller. Our default Setup #97 (which we have also named “Control Setup”) has the physical controllers assigned to typical assignments.
This approach of having a Control Setup that you can choose has several advantages. For example, though it is often nice to use aftertouch (pressure), many sounds don’t respond to it, and if you are recording into the sequencer playing a sound that doesn’t respond to aftertouch, it is best to turn it off, so you don’t record a whole bunch of controller messages which don’t affect the sound but do eat up memory. You can create a control setup with the [PRESS] page “Dest” (Destination) set to Off, then switch to that custom Control Setup when you need to, and switch back to the regular Control Setup when you do want aftertouch. Another example would be to create various setups with specific parameter values for the arpeggiator. Then you could have different arpeggiator settings that could be used in Program Mode, just by switching the Control Setup.
Question:
How do I set up my K2500/K2600 to use a breath controller?
Answer:
There are two issues you have to deal with. First of all, you have to assign the breath controller jack to send some type of MIDI controller message. Second, you will then have to go and edit programs to have them do some specific thing (whatever you want) when you send that MIDI controller message.
To assign the breath controller jack to send some type of controller message: You do this in the Setup Editor. If you are playing a Setup, then you would have to edit each zone in the setup that you wanted to send info from the breath controller. If you are playing programs, then you have to edit the Control Setup. (For more info on using the Control Setup, read this page.)
To assign the Breath Controller jack to send something you would go into the Setup editor and go to the CPEDAL page, (since the breath controller uses the same settings as the CC Pedal 2). So for the CPed2, you would set the Destination parameter to send the MIDI Controller that you want.
You can assign that to Volume (controller #7) and therefore use the breath controller to send MIDI Volume control, but this really isn’t the best way, since MIDI volume control will affect everything called up on that channel. So if you have turned volume down on that channel with the breath controller in the Control Setup and then switch to a different program in which you don’t want to use the breath controller, you will be stuck – volume will remain turned down unless you blow into the breath controller.
Therefore it is best to assign the breath controller to a controller without a predefined function and then edit your programs to respond to that controller number. If you look at the Default Control Setup (#97), you will see that CPed2 is assigned to Breath (which is controller #2). So when you blow into the breath controller, it sends controller #2, and any program edited to respond to that controller will respond as such.
Unfortunately, this means that if you want to create your own programs that will respond to breath control in a specific way, you will need to learn about V.A.S.T. programming and how it works. For info on this, we recommend several things. First of all, do some of the tutorials in chapter 19 of the manual so you get an understand of the basic concepts of synth programming. In addition you will find some tutorials here on our web site. Once you have an understanding of basic programming you can use it to apply to what you want to do with the breath controller.
Also, download the file TGFILEBC.KRZ . This file has a bunch of programs which use the Breath Controller. If you call up those programs and go into the editor and look to see where Breath is assigned as a control source. If you do this once you have a basic knowledge of V.A.S.T., you should be able to pickup on all the programming techniques used in these programs extremely quickly.
Finally, we suggest contacting Patchman Music. They specialize in selling programs designed to work with breath control, and may also be able to give you some programming advice.
Question:
My sustain pedal is no longer functioning. How can I correct that?
Answer:
Probably a simple fix.
First, power off your unit and verify that the pedal you are attempting to use is plugged into the jack marked “Switch Pedal 1” and NOT into “CC Pedal1”. Once this is verified, turn the unit on. Do NOT step on the pedal while it boots up.
Try the pedal again. If things are still not operational, next go into the MIDI XMIT page. Press MIDI, then [XMIT ].
MIDIMode:TRANSMIT CtlSetup:97 ControlSetup Channel :1 ProgChng :On Transpos:0ST Buttons :Off Control :Both ChgSetups:KeyUp VelocMap:1 Linear PressMap:1 Linear XMIT RECV CHANLS PrgChg RsetCh Panic |
Verify that the ControlSetup parameter (top of the screen) is set to “97 ControlSetup”. This item is the very thing that determines what all of your sliders, pedals, buttons, wheels, etc. do while outside of Setup mode.
If changing the ControlSetup back to 97 does not help (or if it is already on 97) then next try doing a Hard Reset (MASTER menu [Reset]). This will clear all the user RAM and put the machine back to factory defaults so be sure to back up any custom data to disk before proceeding. At that point any settings changed on the unit will be back to “new” condition.
Short of something being physically broken, you should now have sustain functionality back. If not, the next test would be to borrow/purchase another switch type pedal as a comparison. Pedals fail far more often than jacks do. If a second, known-working pedal also fails to operate, following the above guidelines, then the unit may have a problem and will need service to rectify it.
If you feel you need service, please feel free to visit our on-line service center look up database to help locate an “authorized KMS service center near you.
Product Comparisons
Quick Access Mode
Setup Mode
Transpose & Tuning
Basic Concepts & User Interface
Effects
Operating System Updates
Program Mode
Sampling
Song Mode/ Sequencing
Troubleshooting
DOWNLOADS |
User Manuals
K2500 Performance Guide – 7.1 MB
Owner’s Manual
2000-01-01
K2500 Reference Guide – 3.3 MB
Supplemental Reference
2000-01-01
KDFX User Guide – 811 KB
Manual Addenda
2000-01-01
KDFX Version 2 Supplement – 456 KB
Manual Addenda – (for use with: K2600 OS v3 and above / K2500 version 5 and above)
2000-01-01
K2500 SIMM Specs – 25.7 KB
Manual Addenda
2000-01-01
KB3 Mode – 210 KB
Manual Addenda
2000-01-01
Live Mode – 114 KB
Manual Addenda
2000-01-01
Disk Partitioning – 119 KB
Manual Addenda
2000-01-01
KDFX Algorithm Reference – 1.0 MB
Supplemental Reference
2000-01-01
OS/Object File Updates (NON-KDFX UNITS)
Operating system and Object file updates for K2500/X/R units WITHOUT the KDFX option installed
(installation instructions and revision history included within the downloads)
K2500 v3.02 OS Update – 633 KB
K25V302.ZIP – For Units Without KDFX
2000-01-01
K2500 v3.50 Base ROM Objects – 91.8 KB
OBJ350.ZIP – For Units Without KDFX
(for a stock unit with no ROM options installed)
2000-01-01
K2500 v3.60 Base + Piano ROM Objects – 97.1 KB
OBJP360.ZIP – For Units Without KDFX
(for a unit with the only the Piano ROM block installed)
2000-01-01
K2500 v3.70 Base + Piano + Orchestral ROM Objects – 136 KB
OBJO370.ZIP – For Units Without KDFX
(for a unit with both the Piano & Orchestral ROM blocks installed)
2000-01-01
K2500 v3.80 Base + Piano + Contemporary ROM Objects – 152 KB
OBJC380.ZIP – For Units Without KDFX
(for a unit with both the Piano & Contemporary ROM blocks installed)
2000-01-01
K2500 v3.90 Base + Piano + Contemporary + Orchestral ROM Objects – 191 KB
OBJF390.ZIP – For Units Without KDFX
(for a unit with all ROM options, Piano, Contemporary & Orchestral installed)
2000-01-01
OS/Object File Updates (KDFX EQUIPPED UNITS)
Operating system and Object file updates for K2500/X/R units WITH the KDFX option installed
(installation instructions and revision history included within the downloads)
K2500 v5.01 OS Update – 762 KB
K25V501.ZIP – For Units With KDFX
2000-01-01
K2500 v5.00 Base ROM Objects – 348 KB
K25_BASE_OBJECTS_500.ZIP – For Units With KDFX
(contains all of the objects for a unit without any ROM Blocks or Sampling Option)
2000-01-01
K2500 v4.03 Options Objects – 125 KB
K25_OPTIONS _OBJECTS_403.ZIP – For Units With KDFX
(contains all of the option objects for the Piano, Orchestral, & Contemporary ROM Blocks, plus the Live Mode objects)
2000-01-01
Compatibility (Converter Files)
(loading/usage instructions are included within the downloads)
K26PRGSU – 689 KB
Contains all K2600 base ROM v3 objects
(K25 Series: requires minimum OS v2.96 (non-KDFX)/ 4.32 (KDFX)
(K2000 Series: requires OS 3.87)
2000-01-01
K25TOK2K – 2.1 MB
Contains all K2000 objects
2000-01-01
K2SETUPS – 2.2 MB
Contains all K2000 Setup objects
2000-01-01
K2VXPRGS – 75.4 KB
Contains K2VX 600 & 700’s bank objects. (Requires both the Contemporary & Orchestral ROMs.)
2000-01-01
Compatibility (General MIDI files)
(loading/usage instructions are included within the downloads)
K25GM2 – 1.8 MB
For a K2500 w/ NO Optional ROM Blocks (requires a minimum of 2MB of sample RAM)
2000-01-01
K25GMA2 – 1.5 MB
For a K2500 w/ Orchestral & Piano ROM Blocks (requires a minimum of 2MB of sample RAM)
2000-01-01
K25GMF2 – 1.2 MB
For a K2500 w/ Piano, Orchestral & Contemporary ROM Blocks (requires a minimum of 2MB of sample RAM)
2000-01-01
FARM Files (extra presets)
(Note: These FARM files are to be LOADED into RAM through Disk mode. For instructions on how to load files though Disk mode, please see your Musician’s Guide Manual.)
K25FARM – 252 KB
K2500 FARM (loads in all K2500)
2000-01-01
OPRGSDEM – 193 KB
Orchestral FARM (requires Orchestral ROM)
2000-01-01
CPRGSDEM – 241 KB
Contemporary FARM (requires Contemporary ROM)
2000-01-01
PPRGSDEM – 38.3 KB
Piano FARM (requires Piano ROM daughterboard)
2000-01-01
K25VOCODER – 9.6 KB
Vocoder (requires KDFX and Sampling Options)
2000-01-01
KDFXAccessoryDisk – 497 KB
KDFX and LIVEMODE (works for all K2600)
(Requires KDFX option for K25xx series. Live Mode files requires the Sampling Option)
2000-01-01