PC2X OVERVIEW

Discontinued Model
Downloads and support materials maintained here as a courtesy to owners.

Following on the design of our award winning PC88, the PC2 features outstanding sound and impressive master controller capabilities. Our new Easy Split & Layer feature makes it fast and easy to create quick layers and splits. The PC2 series comes in both the PC2 76 note and PC2X 88 note keyboards. A rack version, the PC2R, is also available.

Outstanding New Sounds

The PC2X features many incredible new sounds not found on any previous Kurzweil models, including a triple strike stereo grand piano, our new lush stereo strings, newly recorded multi-strike classic electric pianos (both Classic Tine EPs and Wurlitzer(TM)), brass sections, drums, percussion, voices (featuring Kurzweil’s outstanding Take 6 vocal samples), and more. It also features Kurzweil’s KB-3 modeled tone wheel organ mode, giving you ultra-realistic tone wheel organ programs. Orchestral Sounds include String Sections, Solo Strings, Woodwinds, Orchestral Brass, Jazz Brass, Orchestral Ensembles, Choir, Organ, Harp, Nylon String Guitar, Orchestral Percussion, and Ethnic Percussion. Additional sound include mallet percussion, guitar, bass, Clavinet(TM), harpsichord, synth sounds, and more.

The PC2X comes with 400 fantastic sounding preset programs (256 regular programs, 128 Orchestral ROM programs, and 16 KB3 programs). All programs can be edited, allowing for changes to timbre, envelopes, and LFOs. They can then be stored to any of the 256 user locations (128 for regu lar programs and 128 for KB3 programs). And with 64 voices of polyphony, expandable to 128 voices, you’ll never run out of polyphony for playing all of the marvelous sounds.

The Orchestral ROM block comes with 2 banks of 128 programs. Our own unique programs are installed in the Flash ROM. A General MIDI bank is also available, which can be loaded into the User bank. Or, if desired, you can install the GM bank of sounds as presets into the Flash ROM, and then load our unique bank of sounds into the User bank.

Up to 4 programs can be layered/split to create full, rich, and expressive sounds and combinations called setups. The PC2X ships with 32 great sounding setups with room for 128 user created setups as well. It’s easy and quick to make sophisticated setups with layered and split sounds.

Beyond the wealth of built-in factory progams, the PC2X has room for an additional expansion ROM block, the Classic Keys ROM, which add 128 fantastic new preset programs and 32 new preset Setups into ROM memory.

Fantastic Effects

The PC2X includes dual effects processors which feature preset effects of the same quality as found in our highly regarded KDFX for the K2500/K2600 series instruments. A multiple bus architecture allows separate send levels per MIDI channel for an effect level, and a reverb level. Effects include reverb, chorus, delays, distortion, rotary, phasor, flanging, dynamics processing, and much more.

Control At Your Fingertips

The PC2X will make a great master controller for your entire studio or performing rig. A PC2X MIDI Setup can have up to 4 zones, transmitting on up to 4 different MIDI channels. A large number of physical controllers can be programmed on a per zone basis, allowing you to send any MIDI controller message on any zone. Physical controllers include: 4 sliders, two wheels, 3 footswitch pedal inputs, 2- CC pedal inputs, a Breath Controller input, 600 mm Ribbon Input (for use with Kurzweil’s Ribbon Controller), Mono-pressure, and 5 programmable panel switches. Each zone can be set to play the PC2X’s own sounds, or an external MIDI device, or both. Of course, you can set the note range for each zone to create splits and layers, as well as customizing velocity response per zone. All controllers can be scaled both positively and negatively and can have offset values as well as entry and exit values to set their ‘state’ upon program or setup selection.

The built in arpeggiator can be synced to an external MIDI clock and many different latch modes and play orders. This flexibility allows for the creation of endless varieties of arpeggios and percussion patterns.

High Quality Audio Output

The PC2X gives you pristine quality audio, with both balanced analog (24-bit DACs) and digital audio outputs. Digital audio is sent at a rate of 48kHz. It can be switched between Pro (AES/EBU) and Consumer (S/PDIF) formats and can be switched between 16, 18, 20, and 24 bit resolution.

All specifications subject to change without notice.

SPECS

All specifications subject to change without notice.

PC2X Features

Keyboard: 88-note, two-piece weighted keyboard with mono pressure.
Display: 2×20 character LCD w/ rear panel contrast knob
Polyphony: 64-voice, dynamically allocated (upgradeable to 128 with the Polyphony Expansion option).
Multitimbral: 16 parts (one per MIDI channel)
Factory Presets: 536 Internal programs (incl. Orchestral ROM set). Expandable to 668 via Classic Keys Expansion and optional GM Bank install.
Factory MIDI Setups: 32 factory programmed MIDI setups expandable to 96 via Expansion ROM Blocks. 128 user programmable MIDI setups, each with 4 independent zones, effects and arpeggiator settings.
General MIDI: available with the Orchestral ROM expansion (included in all units sold in the USA).
KB3 Mode: Kurzweil’s proprietary modeled tone wheel organ technology.
User Memory: 256 locations for User created preset programs (128 for regular programs and 128 for KB3 programs)
ROM Expansion Slots: 2
Effects: Dual Processors (A & B) offering: 58 Reverbs, 6 Delays, 10 Choruses, 6 Flangers, 3 Phasors, 4 Shapers, 2 Enhancers, 8 Filtered Effects, 4 Distortions, 1 Mono>Stereo, 3 Wide Stereo, 4 Compressors, 2 Panners, 7 Rotarys, Stereo Tremolo, and 44 combination effects chains utilizing Kurzweil1s unique Laserverb
Effects Routing: All 16 MIDI channels can send to A and to B in any amount. Also there is a global send from A to B for serial effects chaining.
User Controllable EQ: Global 3-Band
MIDI: In, Out, Thru (hardware switchable to copy of MIDI Out).
Controllers: Pitch wheel, modulation wheel, 4 front panel sliders, 5 front panel switches (momentary or toggle, software selectable), 2 continuous control pedal inputs, 3 footswitch inputs, mono pressure, breath controller input, Super Ribbon input.
Arpeggiator: Full-featured MIDI note arpeggiator with multiple latch modes, selectable play order, velocity, duration, tempo, and sync functions.
Outputs: Two 1/4″ balanced TRS analog (24-bit DACs), RCA digital w/ selectable format (AES/EBU, S/P-DIF), bit width (16, 18, 20, 24), and dithering.
FREE OS Updates: Flash ROM upgradeable (via system exclusive dumps).

PC2X Specifications

Height: (4.31″) (10.95 cm)
Depth: (14.02″) (35.60 cm)
Length: (54.31″) (137.95 cm)
Weight: (50 lb.) (23 kg)
Power: 9.0VDC / 2.0A external supply

AUDIO


Base ROM


Classic Keys ROM Option


Orchestral ROM Option


FAQs

Basic Concepts & User Interface

Question:
I hard reset and/or otherwise unknowingly erased my user User RAM bank which was previously filled with the General MIDI (GM) sound set. How can I reinstall those sounds?

Answer:

The solution is you need to reload the General MIDI (GMRAM.mid) file into the user bank. This is done by playing the GMRAM.mid file from a MIDI sequencer into the MIDI IN of the PC2.

The GMRAM file can be found on the CDROM that came with your unit (or perhaps with the Orchestral ROM Expansion if purchased separately) along with specific instructions on how to install/reload things.

The “GMRAM.mid” file can be found in the “ram” folder (file path: ram/pcr1_gm/).

Software installation instructions can be found in the “manuals” folder on the same CDROM in the documents titled “pcr1user.pdf” and “ROMinst.pdf”.

If for some reason you no longer have the CDROM, you can download the necessary file and instructions here on this website.

Select your model,

…then, on the subsequent page, under “GM RAM & Extra Sounds”, you will find the GMRAM file along with a link to the ROM 1 User’s Guide which details the installation procedure.

Question:
I am trying to save certain settings I have altered in the Global menu but when I power down, they seem to be lost. How can I store all of my custom Global settings?

Answer:

Unfortunately there is no way to store all of the PC2 Global settings. Some will be remembered across power cycles yet others are always reset to default.

The following are those that are NOT remembered across power cycles and must be manually set with each power up as needed:

  • EQ
  • Local
  • Clock
  • FX Chg Mode
  • Bank Select
  • Xmit Buttons

Internal Voices/Program Mode

Question:
I hard reset and/or otherwise unknowingly erased my user User RAM bank which was previously filled with the General MIDI (GM) sound set. How can I reinstall those sounds?

Answer:

The solution is you need to reload the General MIDI (GMRAM.mid) file into the user bank. This is done by playing the GMRAM.mid file from a MIDI sequencer into the MIDI IN of the PC2.

The GMRAM file can be found on the CDROM that came with your unit (or perhaps with the Orchestral ROM Expansion if purchased separately) along with specific instructions on how to install/reload things.

The “GMRAM.mid” file can be found in the “ram” folder (file path: ram/pcr1_gm/).

Software installation instructions can be found in the “manuals” folder on the same CDROM in the documents titled “pcr1user.pdf” and “ROMinst.pdf”.

If for some reason you no longer have the CDROM, you can download the necessary file and instructions here on this website.

Select your model,

…then, on the subsequent page, under “GM RAM & Extra Sounds”, you will find the GMRAM file along with a link to the ROM 1 User’s Guide which details the installation procedure.

Question:
How can I set the Pitch Bend Range for individual programs via MIDI?

Answer:

Pitch Bend Range can be set by sending MIDI controller messages. Specifically, you do it with Registered Parameters (cc# 100 and 101).

On the MIDI channel in question, you need to send:

MIDI cc101 = 0
MIDI cc100 = 0
MIDI cc6 = value of desired bend range (in semitones)

Example: Lets say you want to set the bend range to 2 semi-tones. First you send cc# 100 with a value of 0; then cc#101 with a value of 0. This turns on reception for setting pitch bend with the Data controller (#6). Then you send cc# 6 with a value of 2 (in semitones; this will give you a whole step up and a whole step down from the center).

Once you have set the bend range the way you want, then you send controller 100 or 101 with a value of 127 so that any further messages of controller 6 (which you might be using for other stuff) won’t change the bend range.

Setup Mode

Question:
I am having problems assigning a KB3 Program in a Setup – the buttons controlling the various KB3 functions no longer work.

Answer:

In the PC2, when you go to KB3 Mode, you are in a special mode that has the sliders and buttons acting in a unique manner, sending specific MIDI controller messages to perform the KB3 functions. Once you put the KB3 program into Setup, you will need to program the buttons, sliders and pedals to the correct MIDI controller numbers in order for them to work the same way they do when in KB3 Mode.

Luckily, we have already done this for you, with Setup #16 “KB3 Setup”. This setup is a good template that combines a KB3 program with a bass and a ride cymbal. The setup is designed to give you easy control over the drawbar settings for the KB3 program, and has the buttons assigned to the controller numbers needed for KB3 functions.

There are some issues involved with putting a KB3 program into a Setup:

Drawbar Issues

The first issue is that there are only 4 Sliders which are used for the 8 drawbars. In KB3 Mode a dedicated button switches between having the slider control the first 4 or second 4 drawbars. But in Setup Mode, that Button is used as a Solo button, for soloing a zone. For this reason two zones are needed within the Setup if you want to have control over all eight drawbars.

Here’s how it works. When you select this setup, Zone 1 is soloed (the Solo LED is on, and the Zone 1 LED is red). Sliders A­D control the settings for Drawbars 1­4. When they’re adjusted the way you want them, press Zone 2. You’ll hear the same organ, because Zone 2 uses the same program. Remember, Sliders A­D control Drawbars 5­8. The Mod Wheel always controls Drawbar 9 with either zone soloed. If you want to edit this Setup to use a different KB3 program, you need to remember to assign your program to both zones, or the organ sound will change as you switch between the two soloed zones. When all the drawbars are set the way you want them, press Solo to exit from solo mode, and you’ll hear the bass and ride cymbal. At this point, both Zone 1 and Zone 2 are muted (their LEDs are amber). Press either Zone 1 or Zone 2, one or more times until its LED turns green, activating the zone. Now the organ plays in the upper range, and the bass/ride plays in the lower range. You can still use Sliders A­D to control the drawbars (Drawbars 1­4 when Zone 1 is active, and Drawbars 5­8 when Zone 2 is active). If you activate both zones, Sliders A­D control the drawbars in pairs (PC2R: Green Knob A controls Drawbars 1 and 5, and so on). However, with both zones active, you will get two notes played for each key you press, so you would normally never want to have both zones active at the same time.

If you are not concerned with changing all 8 of the Drawbars in real time, or just want to use the Drawbar settings defined within the KB3 Program, you can delete the second zone in this setup (turn the zone off in the MIDI transmit page), or assign the zone to a non-KB3 program (change the zone to a different MIDI channel, choose a different program for that zone, and clear the controller assignments by pressing Controllers, then Copy, then the right arrow button until it says “Clear Zone X?”, then Enter). In this situation, the Sliders could still be used to control any 4 of the drawbars that you want. By default, the sliders would control the first 4 drawbars, but you could chose any 4 drawbars you want by assigning the sliders to the specific MIDI controller numbers used for the specific drawbars. The chart on page B-10 of the PC2 manual shows which controller numbers are used for which drawbars. Deleting the second zone obviously gives you the advantage of having an extra zone for layering or splitting with other programs, and it also prevents any doubled notes that would occur if you accidentally have both Zone 1 and 2 active at the same time, as described above.

Button Issues

In KB3 Mode, the 4 buttons above the sliders are used for various specific KB3 functions, but in Setups Mode, these buttons are used for muting or soloing zones. Therefore these functions have been moved to other buttons:

Function Setup Button Assignment
Percussion On/Off: Button 5 (above the Mod wheel)
Percussion Pitch (High/Lo): Button 4 (above the Pitch wheel)
Percussion Loud/Soft: Controlled by section 3 of the Ribbon (you must have the ribbon controller plugged in for this to work, obviously)
Percussion Decay (Fast/Slow): Not assigned to any controller
Rotary On/Off: Same button assignment in the Setup. In addition, Switch Pedal 3 can also be used to control Rotary On/Off (this is same in KB3 Mode)
Vibrato/Chorus* On/Off: Same button assignment in the Setup.

*The Vibrato/Chorus depth button works a little differently. In KB3 Mode, this button switches between 3 Vibrato and 3 Chorus settings. Since the button only has two states in Setup Mode (On or Off), you can only choose between two different settings. By default, the button switches between Vibrato 1 and Chorus 3. But by editing the On Value and Off Value parameters for that button, you can switch between any two settings (the On Controller and Off Controller parameters are both 93 – you only change the On value and Off value).

To select other settings, use the following values:

Vibrato 1 = 0 Chorus 1 = 79
Vibrato 2 = 36 Chorus 2 = 100
Vibrato 3 = 58 Chorus 3 = 122

Effects Issues

If you are starting with the KB3 Setup, then you will be starting with a Setup in which Zone 1 has a KB3 program assigned. If you decide to add a KB3 program to a different Setup and program the controllers yourself, then you should make sure that you put the KB3 program in Zone 1 of the Setup.

Here is why: While some of the KB3 oriented functions that can be controlled by a physical controller are actual KB3 parameters, others are actually controlling the Effects Processor (These are Leslie Slow/Fast, Vibrato/Chorus On/Off and Vibrato/Chorus Select). Because the Effects are Global to the Setup, only one zone can send controller info to the effects processor for real time control. The MIDI Channel which controls the effects processor is determined by the settings of the FX Chg Mode and FX Channel parameters (see page 5-25 in the manual). By default, they are set to Auto and Current, and you probably want to leave them set that way. If they are set to those values then the MIDI channel assigned to Zone 1 is what is controlling the effects. Therefore, you want to assign the pedals or buttons that will control the Leslie and Vib/Chor parameters to Zone 1, EVEN IF THE KB3 PROGRAM IS ASSIGNED TO A DIFFERENT ZONE. Any pedals or other controllers which you are using to control the regular KB3 parameters should be assigned to the zone that has the KB3 program in it, but the effects control must be done from Zone 1.

Global Mode

Question:
I am trying to save certain settings I have altered in the Global menu but when I power down, they seem to be lost. How can I store all of my custom Global settings?

Answer:

Unfortunately there is no way to store all of the PC2 Global settings. Some will be remembered across power cycles yet others are always reset to default.

The following are those that are NOT remembered across power cycles and must be manually set with each power up as needed:

  • EQ
  • Local
  • Clock
  • FX Chg Mode
  • Bank Select
  • Xmit Buttons

MIDI Controllers

Question:
What pedals can I use with my Kurzweil instrument?

Answer:

Switch Pedals

A foot switch pedal from any manufacturer is compatible with our keyboards. Japanese pedals are wired in reverse polarity from American pedals. But all our products check the pedal polarity on power up and reverse themselves if needed, so as long as the pedal is plugged in before you turn on the unit, any pedal will work (be certain to not step on the pedal during power up as this can interfere with the auto-calibration).

In addition, some keyboards use mono jacks for each switch pedal input, whereas other keyboards use a single stereo jack for two pedals.

The PC3 Series, K2 Series, K1 series, PC2 Series, SP2 Series, SP5, PC88, and KME61 use mono jacks for each pedal. The standard single pedal available from Kurzweil is the KP-1.

The SP4, SPS4-8, PC1, SP3X, SP76/88 Series, Rumour/Mangler, Mark ProOneiS, Mark ProTwoiS, RG Series, and Troubador use a single stereo jack for dual pedal units (not sold by Kurzweil). It is still possible to plug a single, mono plug pedal into these units but you will only have access to one of the pedals. If the pedal is plugged in all the way, it will be the Left pedal, and if the plug is pulled out slightly, it will be the right pedal. A stereo (M) to dual-mono (F) “Y” adapter can also be employed to permit the use of two, single pedals.


Continuous Controller Pedals

Our keyboards require a pedal with a TRS 1/4″ connector and 10k linear potentiometer. Most manufacturers EXCEPT Yamaha and Korg make pedals with the same specifications and should work. Yamaha and Korg pedals typically use an exponential potentiometer and therefore will not work correctly. The CC-1 pedal is available from Kurzweil. You can order a pedal through your “local Kurzweil dealer.
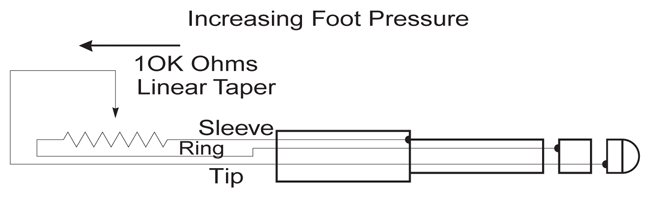
CC-1 Wiring Spec

The Control Pedal must be wired to a single stereo (TRS) 1/4″ plug as follows:

  • Wiper to tip connection of 1/4″ plug
  • Top end of resistance element to Ring connection
  • Bottom end of resistance to Sleeve connection

CCpedal_Wiring.gif

Question:
How can I set the Pitch Bend Range for individual programs via MIDI?

Answer:

Pitch Bend Range can be set by sending MIDI controller messages. Specifically, you do it with Registered Parameters (cc# 100 and 101).

On the MIDI channel in question, you need to send:

MIDI cc101 = 0
MIDI cc100 = 0
MIDI cc6 = value of desired bend range (in semitones)

Example: Lets say you want to set the bend range to 2 semi-tones. First you send cc# 100 with a value of 0; then cc#101 with a value of 0. This turns on reception for setting pitch bend with the Data controller (#6). Then you send cc# 6 with a value of 2 (in semitones; this will give you a whole step up and a whole step down from the center).

Once you have set the bend range the way you want, then you send controller 100 or 101 with a value of 127 so that any further messages of controller 6 (which you might be using for other stuff) won’t change the bend range.

Troubleshooting

Question:
I hard reset and/or otherwise unknowingly erased my user User RAM bank which was previously filled with the General MIDI (GM) sound set. How can I reinstall those sounds?

Answer:

The solution is you need to reload the General MIDI (GMRAM.mid) file into the user bank. This is done by playing the GMRAM.mid file from a MIDI sequencer into the MIDI IN of the PC2.

The GMRAM file can be found on the CDROM that came with your unit (or perhaps with the Orchestral ROM Expansion if purchased separately) along with specific instructions on how to install/reload things.

The “GMRAM.mid” file can be found in the “ram” folder (file path: ram/pcr1_gm/).

Software installation instructions can be found in the “manuals” folder on the same CDROM in the documents titled “pcr1user.pdf” and “ROMinst.pdf”.

If for some reason you no longer have the CDROM, you can download the necessary file and instructions here on this website.

Select your model,

…then, on the subsequent page, under “GM RAM & Extra Sounds”, you will find the GMRAM file along with a link to the ROM 1 User’s Guide which details the installation procedure.

Question:
How can I restore my PC1/PC2 to its factory defaults?

Answer:

Caution: Hard resetting will erase all user memory! Need be, save any custom programming via sys-ex dump before proceeding.

There are two methods for performing a hard reset on a PC2/PC1 Series keyboard:

    • Global Menu Method:
      1. press GLOBAL
      2. press >>> until you see “Reset PC2?” or “Reset PC1” (2nd to last item in menu)
      3. press [Yes] twice

-OR-

  • Boot Diagnostic Method: (useful if your screen is blank and cannot perform the Global menu method)
    1. turn the unit on
    2. when the display says “Please Wait”, press and release the Panic button.
    3. press the right arrow button >>> until the display says “Hard RESET”
    4. press Enter
    5. press the >>> button under “Yes” in the display.

Via either method, the unit will “initialize” itself for about 5 sec. or so and then reboot to factory specs.

If the above methods do not successfully restore your unit’s normal operation it will likely be time to take the unit to an “authorized Kurzweil service center for repairs.

Question:
I am trying to save certain settings I have altered in the Global menu but when I power down, they seem to be lost. How can I store all of my custom Global settings?

Answer:

Unfortunately there is no way to store all of the PC2 Global settings. Some will be remembered across power cycles yet others are always reset to default.

The following are those that are NOT remembered across power cycles and must be manually set with each power up as needed:

  • EQ
  • Local
  • Clock
  • FX Chg Mode
  • Bank Select
  • Xmit Buttons

DOWNLOADS

User Manuals

PC2 Keyboard User Manual – 1.2 MB
Primary Owner’s Manual
2000-03-13

PC2 Keyboard Version 2 Supplement – 341 KB
V2 Manual Addenda
2001-05-01

PC2 Version 3 Supplement – 57.4 KB
V3 Manual Addenda
2002-03-19

PC2 Orchestral ROM User’s Guide – 291 KB
ROM Option Supplemental Guide
2002-03-01

PC2 Classic Keys ROM User’s Guide – 280 KB
ROM Option Supplemental Guide
2004-09-29

PC2 ROM Installation Guide – 23.3 MB
ROM Options Installation Guide
2004-09-29

PC2 Polyphony Expansion Installation Guide – 532 KB
Option Installation Guide
2004-09-29

PC2 Made Easy – 194 KB
Supplemental Guide
(PC2R users: though not written for the rack model, this still contains useful conceptual information)
2001-11-09

OS Updates

PC2X v4.00 OS Update – 1MB
Primary OS (Installation instructions included)
(Note: if you do NOT have the Polyphony Expansion option only install this ONE OS file)
2005-12-02

Polyphony Expansion option (PCX-1) – 927 KB
If the PCX-1 Polyphony Expansion is installed, both this file and the V4.00 OS are required.
(Installation instructions included)
2005-12-02

PC2 Series Boot Loader v2.00 – 250 KB
Boot Loader v2.00 is required for all PC2 Series instruments
(Installation instructions included)
2004-10-13

GM RAM & Extra Sounds
Note: Installing new sounds into RAM will overwrite existing objects in your USER bank.

GMRAM.mid – 27.1 KB
This file, when loaded, adds the GM sound set to the User bank
(requires the Orchestral ROM Option)
(Installation instructions can be found in the PC2 Orchestral ROM User’s Guide- avail. above)
2001-11-19

Kurzdaddy Electric Pianos – 4.2 KB
This is a set of ten vintage electric piano programs for the PC2, based on the K2600 Series ROM4 “Vintage Electric Piano’s”. These programs load into the PC2’s User Bank IDs# 00-09.
2003-03-18

SUPPORT

Contact Pre-Sales

Do you have questions you need answered before you buy?

Product Registration

Register your new product with your local distributor.

Contact Distributor Support

Do you have questions about the use or application of your Kurzweil product?

Contact Service/Repair

Needing repair? Need to locate a local authorized service center? obtain parts?

Authorized Repair Facilities

Locate a Kurzweil repair facility near you.